Jump to content


Photo
* * * * * 1 votes

A 3D Printed Lockdown Bar.

3dprint

  • Please log in to reply
26 replies to this topic

#1 Quinalt

Quinalt

    Hobbyist

  • Members
  • PipPip
  • 43 posts

  • Flag: ---------

  • Favorite Pinball: Highspeed

Posted 02 September 2019 - 07:01 AM

I am trying to make a good quality 3d printed lockdown bar. I know many people feel it is important not to skimp and get a custom steel one made for $150. And that seems perfectly reasonable to me. But for various reasons (including control of the design) I wanted to try to make my own before I gave up and ordered one.

Requirements:
-I have a custom cab I designed that is not quite full size. The lockdown bar is approximately 18inch across. 
-It has to be strong and sturdy and feel good to the touch or whats the point. -
-I want it to look (and feel) like real Williams or Bally lockdown bar at least at a glance.
 
My cabinet:
mycab_t.jpg
 
I considered a lot of different ways of making them out of wood and MDF. But getting the shape right seemed like a lot of trial and error and a ton of work. Metal fabrication isnt my thing. So 3d printed seems the best option. Frankly I expected to find plenty of them on Thingverse. But unless I have missed something I couldn't find any good 3d printed ones (or even bad ones really).

First I looked real lockdown bars and took some pics.
ldbref1_t.jpg
 
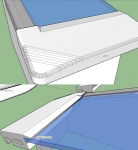
I roughed out the shape in Sketchup and after a few iterations I found something that looks right on my table and more importantly feels  very good with your palms resting on it (or pushing it).
sudesign_t.jpg
 
Then I made that top shape perfectly fit my cabinet like a box lid. Fits like a glove so it is strong an sturdy and you can push the table around until it tilts with confidence its not going to flex or break.
fitprototype_t.jpg
 

Because the LDB is 18 inches wide it wont fit on mine or many other printers. So I had to print it in at least 3 pieces. For my first test I did it in 3 sections of about 6 inch and then tried to glue the pieces with epoxy. I had alignment issues and messed that up and wound up with a very visible seam. But I decided to go ahead and use that one as a test piece for finishing techniques and reprint a second version.

mk1-glued_t.jpg


For my second print I added alignment pins and used plain super glue gel rather than epoxy. Gluing was much easier and almost seamless. This is it glued (superglue gel) and sanded.
mk2-glued-sanded_t.jpg
 
Now on to looks. Again I want it to look real at a glance, so steel metal looking ideally but shiny stainless paint looks ok at best on 3d printed objects. And as I understand it most metallic paints don't work well with a protective clear coat.  So instead I am trying for a powder coated steel look. Or possibly carbon fiber wrap (see below).
 
On the first print (the one that I messed up gluing) I used sanding and Duplicolor automobile fillable sandable primer. Multiple, coats and sanding I finally got something sorta smooth.
mk1-primed_t.jpg
 
Then I did 2 coats of glossy black, with sanding in between, then 2 coats of a black with metallic flecks in it and 2 clear coats. 
mk1-finished-left_t.jpg
mk1-finished_t.jpg
 
Note the orange carbon fiber is NOT going to be used in the final. :-)
mk1-finishedrails2_t.jpg
 
Wow. Pictures don't do it justice but it looks really good up close. Feels smooth and metal like. If it wasn't for the huge seams in the middle where I messed gluing I would be very happy with it. 
 
I am working on the second version now and will follow up this post with the results. 
 
Edit:Thanks xenonph for pointing out how to post images. Totally missed it!

Edited by Quinalt, 02 September 2019 - 07:56 PM.


#2 Quinalt

Quinalt

    Hobbyist

  • Members
  • PipPip
  • 43 posts

  • Flag: ---------

  • Favorite Pinball: Highspeed

Posted 02 September 2019 - 06:46 PM

So on to the second version. Again this version had alignment pins and I used superglue gel instead of 2 part epoxy.
mk2-glued-sanded_t.jpg
 
 
This one I decided to use filler to better cover the layer lines and striations. I tried a dry wall spackle, a wood filler and Bondo auto putty. NO on the spackle and wood filler. Way too soft. And jury is still out on the bondo putty. By the time I got to the putty the piece was already a mess.
mk2-amess_t.jpg
 
But I filled what I could and went ahead and finished sanding and painted it a gloss black color and then tried some car carbon fiber vinyl wrap ($12) on it. The results were pretty decent. My wrapping skills leave a lot to be desired and I think with some practice I could do better. The apparent bumps in wrap are actually flaws in the piece from my attempts at fillers. If the finish on the 3d printed surface was smooth it would look much cleaner. 
mk2-carbonfiber_t.jpg
mk1andmk2_t.jpg
 

So I am getting ready to reprint it a 3rd time. This time I am going to try to improve the print quality a bit and either just use the Bondo putty for filler or try some XTC 3d I just ordered.

If the XTC works as advertised it could do away with all the fillers and most of the sanding.  
 
I am also working on ideas print it to minimize the artifacts.
I still think it is going to be possible to get a good or very good LDB with just A LOT sanding and primer. And it will be at least my 3rd try before I manage it.
 
Getting rid 3d printed artifacts showing through the finish is currently the hardest part of getting it to look good. But its doable. And I am working on making it easier. I'll let you know if I succeed.
 
My ultimate plan for the top of my playfield cabinet is. Aluminum channel from local hardware for rails $15 , custom size tempered glass $50 (could have used scratch resistant plexi for 30), 3d printed lockdown bar $3 dollars in filament and $20 in spray paint/finishing. All told less than the cost of a custom lockdown bar alone.  
 
To be continued...

Edited by Quinalt, 02 September 2019 - 08:00 PM.


#3 xenonph

xenonph

    I have Pinball Fever!

  • VIP
  • 3,893 posts
  • Location:Castle Rock, WA.

  • Flag: United States of America

  • Favorite Pinball: TRON Classic-Congo-Xenon-PINBOT-BOP-LOTR-A Real American Hero OPERATION PINBALL-Millionaire-Whirlwind-Krull-NFL-BlackKnight-FishTales

Contributor

Posted 02 September 2019 - 06:51 PM

For people who are having problems trying to upload pics here to forums, or attaching images to posts...


Try this...


capture31_t.png


Then you will see this..

capturea6_t.png


and then this...

capturec3_t.png


Carry on.


CHECK OUT THIS TUTORIAL http://www.vpforums....howtopic=32515
TO USE DB2S BACKGLASS PROGRAM WITH DESKTOP TABLES ON 1 MONITOR


#4 Quinalt

Quinalt

    Hobbyist

  • Members
  • PipPip
  • 43 posts

  • Flag: ---------

  • Favorite Pinball: Highspeed

Posted 06 December 2019 - 07:02 AM

I am coming back to this project after some time away. I finished the 3rd version of my lockdown bar and am very happy with it. This is what I did. Major changes were I used XTC 3d to smooth the print. And a larger layer height to speed up the print and to see if it would make a difference in quality.  I was very happy with results. 
 
Process for Mk3 Lockdown Bar.
-Print in 3 pieces. Layer height 0.28  and 15% infill
-Glued with Superglue Gel and clamped
-Wet sanded with 150,220,320. Surface was smoothish but still had lines and sounded like vinyl.
-XTC3D with foam brush. After drying overnight surface hard and glassy but with small furrows from print lines and bubbles.
-Wet Sanded 220,320,500+. Surface is now very smooth and hard. Signs of furrows and bubbles mostly gone.
-3 (2 light 1 medium 10 min apart) quick coats of Duplicolor 2-1 sandable fillable primer.
-Wet sanding 220,320,500,1000,1200. Surface very smooth and hard. :-) BUT glue seams still very visible. :-(
-Bondo putty on glue seams. <-Should have done this step and sanded it before priming.
a026d5098d9b10ebc78fb145db74f33a_t.jpg
-Dry Sand bondo putty
-Repeated primer coats to cover Bondo.
-Dry sanded (Bondo takes 8+hrs to dry enough for wet sanding) 500,1000,1200.
-3-4 light coats of Duplicolor Metallic 1-2 minutes apart.
-Lightly sanded with 1200
-3-4 coats of Krylon Crystal Clear
 
It looks and feels amazing. The only flaw is one side the glue seam is still visible. I could have done a better job with the Bondo there. But it just looks like a small scratch and its not enough of a flaw to redo the whole thing.
Note thicker layer lines largely disappeared after XTC and sanding. Probably no point in going with a .2 or lower layer height for this print.
 
81643f9e5d9586f8bee1d50efe530208_t.jpg
 
d83444456f301cb3402c3d9056465775_t.jpg
a283d174d4807a86286153dcb5a4f281_t.jpg
 
8e282cc89933dbbb432693dd3ee93ed0_t.jpg
 
47572f642418ed5724aea97ae940a22d_t.jpg
 
1e00ba499dd6d2f7029e1931e23cd687_t.jpg


I also uploaded a version of the model to 3d warehouse. I will probably put it on thingverse once I finish the design. 
 
 
I am working on a fourth version now.  I plan to print it as two pieces instead of three, use a piece of wood as a backbone to strengthen it, and a different method of smoothing that should hide the seams and layer lines without a bunch of sanding. 

Edited by Quinalt, 06 December 2019 - 07:20 AM.


#5 GInsonic

GInsonic

    Enthusiast

  • Platinum Supporter
  • 188 posts

  • Flag: Austria

  • Favorite Pinball: Addams Family

Posted 06 December 2019 - 07:33 AM

Wow, an incredible work  :otvclap:

It would be real nice, if you could share it on Thingiverse!


#6 RubiiZ

RubiiZ

    Hobbyist

  • Members
  • PipPip
  • 25 posts

  • Flag: Netherlands

  • Favorite Pinball: Stern Star Trek (owned) / Cactus Canyon (wanted)

Posted 06 December 2019 - 02:06 PM

Awesome, very cool! I really like the finished result.

Just wondering how many hours it took to print!  :P


#7 Quinalt

Quinalt

    Hobbyist

  • Members
  • PipPip
  • 43 posts

  • Flag: ---------

  • Favorite Pinball: Highspeed

Posted 06 December 2019 - 06:09 PM

Thanks! It took a little less than 20 hours to print at 0.28 layer height. 


I am going to try to do one start to finish this weekend. I'll start the print today and it will be done Sat morning. It takes about an hour to prep, glue and smooth it. Let it dry overnight. Then sanding, painting, clear coat with time to dry on Sunday. I'll post the result if it turns out.  


Edited by Quinalt, 06 December 2019 - 06:29 PM.


#8 Quinalt

Quinalt

    Hobbyist

  • Members
  • PipPip
  • 43 posts

  • Flag: ---------

  • Favorite Pinball: Highspeed

Posted 09 December 2019 - 08:00 AM

Here is the one I did this weekend. I am thinking of doing a Batman '66 theme on my next so I did it in purple.


-Printed at 0.28. Each of the two pieces took 9hrs.

-Superglue and Screws to secure it to a piece of wood that acts as a backbone. Much much stronger now.

-Quick sand with 220.

-Smooth with Amazing Clear Cast Resin from local craft store. Let dry overnight

-Wet sand with 220, 320,550

-Bondo fill small seem. Let dry 2hrs and dry sand

-Primer, 3 coats 10 min apart

-Purple paint, 2 light, 1 heavy 10 min apart

-Clear coat


I think it looks great!

c361494a1d5f30adb60cb892ff3ec452_t.jpg

20191206_190342_t.jpg

27bc2f649699ce5478fbba64f07c8c05_t.jpg


I also painted a test piece in a chrome paint. It looks good here but didn't look nearly as nice once I clear coated it. 

chrometest_t.jpg


Edited by Quinalt, 09 December 2019 - 08:03 AM.


#9 nevess

nevess

    Hobbyist

  • Members
  • PipPip
  • 47 posts

  • Flag: Portugal

  • Favorite Pinball: Indiana Jones

Posted 09 December 2019 - 08:12 AM

It looks amazing, good work. How does it feel to the touch?


#10 LynnInDenver

LynnInDenver

    Pinball Fan

  • Members
  • PipPipPipPip
  • 570 posts
  • Location:Denver

  • Flag: United States of America

  • Favorite Pinball: Genie

Posted 09 December 2019 - 12:50 PM

Probably the better clear coat to use for the chrome is something modelers use - Alclad. It's an airbrush medium, but they have a clear lacquer meant for putting on top of metallic and chrome finishes, and doesn't dull them down quite as much.


#11 Quinalt

Quinalt

    Hobbyist

  • Members
  • PipPip
  • 43 posts

  • Flag: ---------

  • Favorite Pinball: Highspeed

Posted 09 December 2019 - 07:17 PM

It looks amazing, good work. How does it feel to the touch?

It feels great! The smoothing resin makes it feel as hard and as smooth as steel. And the shape feels great in your palm. Part of the reason I wanted to 3d print this part is so I could control the shape. 


Probably the better clear coat to use for the chrome is something modelers use - Alclad. It's an airbrush medium, but they have a clear lacquer meant for putting on top of metallic and chrome finishes, and doesn't dull them down quite as much.

I will look into that. I am not really happy with the Krylon Clear Coat I have been using. It caused some "crazing" on one piece I did. 


#12 rob3d

rob3d

    Hobbyist

  • Members
  • PipPip
  • 45 posts
  • Location:Miami, FL

  • Flag: United States of America

  • Favorite Pinball: Twilight Zone

Posted 09 December 2019 - 09:05 PM

What chrome paint did you use?. It looks really good.


#13 Quinalt

Quinalt

    Hobbyist

  • Members
  • PipPip
  • 43 posts

  • Flag: ---------

  • Favorite Pinball: Highspeed

Posted 09 December 2019 - 09:22 PM

What chrome paint did you use?. It looks really good.

Dupli-Color Metallic Chrome. Two light coats and then as heavy as you can get away with. 


https://www.amazon.c...l/dp/B001DKR3C4


If I could figure out a way to make it durable and still look like chrome I would love it. I am going to look into the Alclad suggested above.


Edited by Quinalt, 09 December 2019 - 09:24 PM.


#14 FinnsDad

FinnsDad

    Neophyte

  • Members
  • Pip
  • 3 posts

  • Flag: Netherlands

  • Favorite Pinball: Adams Family

Posted 20 December 2019 - 06:27 PM

Thank you for sharing your 3D model because this is such a great idea! Looks absolutely amazing. I downloaded the SketchUp programme to have a look at your 3D model. Looks quite complex software for a 3D-newby, I must admit. Clueless where and how to start, but YouTube is my friend in this. :dblthumb:


I need to adjust your model to the dimensions of my cabinet, split it in two parts, not three (because I purchased a 30x30x40 printer) and then find out how to print it ;-)


Please keep us updated!


Regards,

Ronald  


#15 gtxjoe

gtxjoe

    VPF Veteran

  • VIP
  • 5,059 posts

  • Flag: United States of America

  • Favorite Pinball: Medieval Madness, AbraCadabra


Contributor

Posted 20 December 2019 - 07:03 PM

Nice work. How about adding a fire button?

#16 Quinalt

Quinalt

    Hobbyist

  • Members
  • PipPip
  • 43 posts

  • Flag: ---------

  • Favorite Pinball: Highspeed

Posted 20 December 2019 - 11:00 PM

Thank you for sharing your 3D model because this is such a great idea! Looks absolutely amazing. I downloaded the SketchUp programme to have a look at your 3D model. Looks quite complex software for a 3D-newby, I must admit. Clueless where and how to start, but YouTube is my friend in this. :dblthumb:


I need to adjust your model to the dimensions of my cabinet, split it in two parts, not three (because I purchased a 30x30x40 printer) and then find out how to print it ;-)


Please keep us updated!


Sketchup is a lot easier to learn than most 3d programs. Take a look at Blender if you want to be frightened. 


I have a new version of the model that is only in two pieces and is designed to screw onto a piece of wood to make it stronger. I will upload a version of that sometime this weekend.


Nice work. How about adding a fire button?


That should be easy. In fact it would have an advantage of making it easier to hide the seam when you put it together. But I don't know when I'll have time to build it. 


#17 gtxjoe

gtxjoe

    VPF Veteran

  • VIP
  • 5,059 posts

  • Flag: United States of America

  • Favorite Pinball: Medieval Madness, AbraCadabra


Contributor

Posted 21 December 2019 - 02:16 AM

No worries. I have a 3D pirinter also. It will give me something to work on during the holidays

#18 Quinalt

Quinalt

    Hobbyist

  • Members
  • PipPip
  • 43 posts

  • Flag: ---------

  • Favorite Pinball: Highspeed

Posted 21 December 2019 - 02:27 AM

I uploaded a new version of my lockdown bar to Thingverse. NOTE this is sized for my cabinet and will have to be adjusted to whatever size yours is. I included the Sketchup file if you want to edit it in Sketchup Online or Sketchup Make 2017. 


This version is in two pieces instead of three and is designed to have a piece of wood as a stiffener.


diagram_t.jpg


https://www.thingive...m/thing:4059169


#19 FinnsDad

FinnsDad

    Neophyte

  • Members
  • Pip
  • 3 posts

  • Flag: Netherlands

  • Favorite Pinball: Adams Family

Posted 22 December 2019 - 02:08 PM

I uploaded a new version of my lockdown bar to Thingverse. NOTE this is sized for my cabinet and will have to be adjusted to whatever size yours is. I included the Sketchup file if you want to edit it in Sketchup Online or Sketchup Make 2017. 


This version is in two pieces instead of three and is designed to have a piece of wood as a stiffener.


diagram_t.jpg


https://www.thingive...m/thing:4059169


I like this design even more because the wood acts as a stop for the glass, thank you. 


Me personally, I am still struggling with SketchUp. "found" a version of SketchUpPro 2018 which I am using. I want to alter the dimensions e.g. the width of the thickness of the cabinet, the length of the two pieces etc, with no luck (i.e. skill) yet  :-P 


Please keep us updated. Especially your photos are really helpful!


Happy hollidays!


R.


#20 Jonesin9999

Jonesin9999

    Neophyte

  • Members
  • Pip
  • 1 posts

  • Flag: United States of America

  • Favorite Pinball: Jurassic park

Posted 13 May 2020 - 02:16 PM

Does anyone have this made up with 3/4 inch ply gaps instead of 1/2 inch? This is awesome!