


Hi everyone,
I've been working on my cabinet project for a few months now, and figured it was time to start my own thread, rather than keep posting little details here and there in (mostly) Chris' threads *grin* (my machine is heavily inspired by Chris' work (thanks Chris!), so I started asking questions there, and in the process started mentioning my work here and there).
My cabinet will be using two 46" LCDs, rather than the 3 display setup. The reason for this is because I like to switch back and forth between old and new tables, and older tables don't look right to me with a physical grill with a DMD and speakers, like many modern machines use. I wanted my machine's backbox to look as close to the original machine as possible, and the only way I could see to do that was to allow for the entire backbox to display whatever it needed - a full translite with no score or DMD (Cirqus Voltaire, for example), a translite with a DMD and speakers (most modern machines), or a translite with LED or reels in it (any older machine - KISS, for example).
So far, I have built the PC, have all of my illuminated buttons, have my IPAC configured, my LEDWiz is tested and waiting for me to set it up, HyperPin is operational, several tables are installed, and the two 46" displays are alive. The CREEs have arrived for the backbox flashers and mercury switches for the nudge feature are here. I got all of my cabinet accessories (legs, side rails, lockbar, etc.) from the VirtuaPin website in their Ultimate Cabinet Builders Kit (Widebody). I added the Williams/Bally coindoor option, and the custom lockdown bar (because my cabinet is slightly wider than typical for a widebody). I shopped around for all the parts separately, but it was actually slightly cheaper to get everything as a package - especially since I needed the custom lockdown bar anyway.
I don't yet have a shaker motor. All in good time!
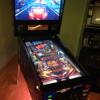
Below are some photos of the displays running with one of my favorite tables, JP's Attack From Mars, as well as a few 3D models of what the cabinet should look like (or reasonably close to it). The 3D model was mostly to get measurements close and ensure everything will fit the way I imagined it in my head. The art on the cabinet is what I plan to have on the real cabinet (I have the fire image as a vector image, which I just purchased from a stock image site, and the Wildfire Pinball logo I created myself as a raster image - but at 15000 pixels wide, it'll be about 425DPI for the 35" wide image of the logo on the side). I ended up ordering the lockbar and stuff part way through the cabinet build, so I can position the playfield display properly. I've also included an x-ray version of the model, so you can see how the displays will be positioned.
I can't go a single night without sitting on the floor, playing some pinball on my decased, naked displays. I can hardly wait to get it all into a cabinet, where I can stand and play!
The cabinet is in progress, with the major parts assembled. I'll do my best to update with photos as I go, in the hopes that my experience will help others. I know that reading through other people's build threads has been immeasurably helpful for me, and my hat's off to all those that have worked out many of the problems and shared with everyone their build experiences. It's all been extremely inspiring for me, and very helpful.
Let the fun begin!


Specifications:
- Based on Williams wide body dimensions (widened by 1" to accommodate 46" LCD without cutting all the way through the sides to the outside to fit it).
- 1 x Playfield: Philips 46" LCD connected via HDMI
- 1 x Backbox: Sharp Aquios 46" LCD connected via HDMI
- 4 x ChromaLite buttons with premium microswitches from GroovyGameGear for front of cabinet
- 4 x Electric ICE 2 buttons with RGB Drive and True Leaf Pro switches from GroovyGameGear for flippers/magnasaves
- 1 x Williams/Bally large, red Launch Ball button
- 5 x CREE XP-E RGB Star from LED-Tech (backbox flashers)
- 5 x heat sinks for CREEs from LED-Tech
- 1 x LEDWiz from GroovyGameGear
- 1 x IPAC2 USB from Ultimarc (reprogrammed to match HyperPin/Visual Pinball keys (remapped HyperPin start from enter to 1, so I can use a single button to launch a table and start a game once table has started, and remapped Visual Pinball's ESC to E to avoid weirdness when exiting tables)
- Lots of colorful wire, and loads of push on crimp connectors for buttons
- 1 x 5V/12V 100W power supply from GroovyGameGear
- 1 x Intel i5 3.3Ghz 6Mb Cache with Integrated Intel 2000 Video
- 2 x Kingston 4Gb DDR3 (8Gb total)
- 1 x Gigabyte ATI HD 6850 PCIe video card (dual DVI/HDMI output)
- 1 x Intel 40Gb SSD
- 1 x MSI H67MS-E43 Motherboard (Slot 1155, 6Gbps SATA, etc.)
- 1 x Creatve Labs SoundBlaster X-Fi Xtreme Audio PCIe Sound Card
- 4 x Noctua NF-P14FLX 140MM Ultra Quiet Cooling Fans
- 4 x Mod Smart 140MM Fan Grills
- 1 x Extra playfield glass rear channel (needed two to span the width of the cabinet)
- 2 x backbox glass top channels for sides (stock sides are too short, since they expect a speaker panel)
- Updated 3 LED (brighter) lights for buttons and coin door from Pinball Life
- Windows 7 Professional x64
- HyperPin 1.0
- Visual Pinball 9.1
- UltraVP
- 2 x 3/4" good-two-side plywood sheets (8' x 4')
- 2"x2"x8' for corner bracing, cabinet body bracing in the middle
- Piano hinges (backbox door, cabinet body back door, cabinet body floor door (floor will drop down with all components mounted on it for each access under the machine)
- 4 x Door locks (2 for cabinet floor "door", 1 for backbox, 1 for back of cabinet body (the back doors are mostly to get at the backbox display and backbox flashers)
- A lot of #10 1-1/2" screws
- 3 x Mobilitics mercury switches from eBay (nudge/tilt)
- 1 x Set of 4 rubber leveler feet to protect floor from Pinball Life
- 5 x Clear twist-on light domes + bases (modified)
- 1 x Solenoid for replay knocker from All Electronics
- 8 x TE Connectivity T92P11D22-12 12 volt contactors for force feedback from Mouser.com
- 10 x 5v relays and diodes for above solenoids, stobe, replay knocker (the LEDWiz can't drive the solenoids directly)
- 15 x 22Ohm, 5 Watt resisters for CREEs (5 x Red, Green, Blue = 15 total)
- 15 x 500mV fuses to protect CREEs
- 3 x 8' lengths of slotted channel for wiring
- 1 x power switch
- 1 x Night mode switch (kills power to relays to stop solenoids from knocking)
- 1 x Front of PC USB/Headphone jack connector (headphone jack will kill speakers for night use)
- 1 x APC "Green" power bar (P7GB, with Master plug for PC that will kill power to displays and secondary power supply when PC shuts down)
- 1 x Power cord and plug for back of machine to wall
- 1 x Playfield glass (5mm, tempered)
- 1 x Backbox glass (3mm, tempered)
Not ordered yet:
- Vinyl artwork (waiting for exact measurements, but do have digital artwork already)
- Shaker motor for force feedback
- Strobe CREEs
- Solid state relay for strobe (the mechanical relay is ok, but it's not fast enough in some cases).
Resources of interest in this topic:
Williams Serial Number Sticker
Making Perfect Holes with a Router on the Cheap
Backbox Warning Template
Wiring Schematic (So Far)
Coin Reject Buttons as Coin Add Buttons
Awesome Shaker Motor for Cheap
Edited by Darkfall, 08 October 2011 - 01:59 AM.


 are all trademarks of VPFORUMS.