Jump to content


Photo
* * * - - 2 votes

Plunger solution.

plunger hardware

  • Please log in to reply
26 replies to this topic

#1 jag164

jag164

    Hobbyist

  • Platinum Supporter
  • 12 posts
  • Location:Georgia, USA

  • Flag: United States of America

  • Favorite Pinball: Black Knight, any late 60's early 70's EM

Posted 18 October 2013 - 07:01 AM

When I built my cab, I rigged an authentic Gottlieb plunger to an old analog game pad using a metal rod, a battery terminal, some tape, and a few grommets.   The gamepad was secured to the bottom of the cabinet and the rod hooked into the tip of the plunger.   (I have pics if anyone is interested)   This worked VERY well.   But I was dismayed by the lack of tables that supported analog plunger.   My friends were always confused by the whole "which one do I use for this game, the button or the plunger".   I kinda was too, so I removed that rig and kept it in a safe place to possible use later.... 


Now, here's what I did to replace it and free up my "launch button".


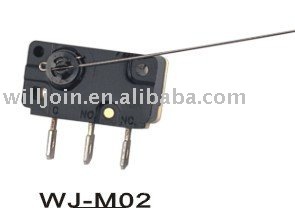
The plunger is now digital. I snagged an Amico DC 6-36V 300mA NPN NC 8mm Tubular Inductive Proximity Sensor Approach Switch from amazon for $6 


An Inductive proximity sensor is basically a metal detector. NC = normally closed which means the circuit is triggered when no metal is present.

I mounted the sensor directly under the tip of the plunger.   So when the plunger is at rest, the sensor detects metal and goes 'open'. No signal being sent to my encoder.  My sensor is hooked into the "Enter" key via the ipac/keywiz/Kade.  When I pull back the plunger, the metal is no longer the detected and the sensor closes the circuit (essentially the same has pressing and holding a "launch ball button") until I release the plunger and then it closes (like releasing the "launch ball" button)  

This mimics analog pretty well and it works on all tables because it's basically using the same principal as a launch button.  


Anyway, if you go this route, make sure:

1)  The sensor is a Direct Current

2)  The sensor is 3-wire NPN (NOT PNP),

3)  The sensor is NC/normally closed, not NO normally open. 

4)  Your encoder has a auxillary +5v terminal. Though the product says 6-36, 5v works.  I can verify both the Keywiz and Kade have this aux terminal. I assume the ipac does as well.


Hook the brown wire into the +5v,   hook the  blue wire into the common ground, hook the black into which ever key you want to map it to.


If anyone is interested in a visual, let me know and I'll make a youtube video.


Edit: vid here http://youtu.be/WsO1uIQhems


Edited by jag164, 19 October 2013 - 01:21 AM.


#2 BamBam

BamBam

    Enthusiast

  • Members
  • PipPipPip
  • 101 posts
  • Location:Ontario, Canada

  • Flag: Canada

  • Favorite Pinball: Mars Attacks

  • PS3 Gamer Tag: Misfit1963
  • 360 Gamer Tag: BamBam1963

Posted 18 October 2013 - 08:00 PM

I would love to see the Youtube video to check out how you made it all happen.  I have an electronic analogue plunger and want to do this for the same reasons you mentioned.

Cheers.


John


This is better than Disney Land man!

#3 mameman23

mameman23

    Pinball Fan

  • Silver Supporter
  • 506 posts
  • Location:Farmington Hills, MI

  • Flag: United Kingdom

  • Favorite Pinball: Dr Who, robocop

Posted 18 October 2013 - 08:33 PM

i have basically the same devices on my cnc router. they are used in the same way to home it to zero.


From what I read of your post you are really just using it as a switch much like a micro switch does, so your still not getting the linear effect as you would with a real plunger or Pauls new digital plunger correct? still a nice way to do it without have to deal with a switch that wears and has contacts.


PM me for any CNC needs.
Find me on Facebook....Xtreme Pinball
Doctor Who Cabinet Build Thread Here
Tron Cabinet Build Thread Here
Big Bang Bar Build Thread Here
Mameman's cnc fun

#4 jag164

jag164

    Hobbyist

  • Platinum Supporter
  • 12 posts
  • Location:Georgia, USA

  • Flag: United States of America

  • Favorite Pinball: Black Knight, any late 60's early 70's EM

Posted 19 October 2013 - 12:51 AM

i have basically the same devices on my cnc router. they are used in the same way to home it to zero.


From what I read of your post you are really just using it as a switch much like a micro switch does, so your still not getting the linear effect as you would with a real plunger or Pauls new digital plunger correct? still a nice way to do it without have to deal with a switch that wears and has contacts.


Correct. These (and most??) inductive prox's are not variable, so yeah, they are used just like a micro switch.


#5 jag164

jag164

    Hobbyist

  • Platinum Supporter
  • 12 posts
  • Location:Georgia, USA

  • Flag: United States of America

  • Favorite Pinball: Black Knight, any late 60's early 70's EM

Posted 19 October 2013 - 01:22 AM

I would love to see the Youtube video to check out how you made it all happen.  I have an electronic analogue plunger and want to do this for the same reasons you mentioned.

Cheers.


John


Okidoke.  http://youtu.be/WsO1uIQhems


#6 gtxjoe

gtxjoe

    VPF Veteran

  • VIP
  • 5,152 posts

  • Flag: United States of America

  • Favorite Pinball: Medieval Madness, AbraCadabra


Contributor

Posted 25 October 2013 - 01:43 AM

Thanks for posting this.


I don't think the I-pac encoder as a 5v output.  Anyone know if I can supply external 5v to power the sensor and then connect to the Ipac ground and one of the Ipac inputs?


#7 jag164

jag164

    Hobbyist

  • Platinum Supporter
  • 12 posts
  • Location:Georgia, USA

  • Flag: United States of America

  • Favorite Pinball: Black Knight, any late 60's early 70's EM

Posted 26 October 2013 - 02:42 AM

Thanks for posting this.


I don't think the I-pac encoder as a 5v output.  Anyone know if I can supply external 5v to power the sensor and then connect to the Ipac ground and one of the Ipac inputs?


I did a google image search on the ipac and it looks like one of the header pins can deliver 5v.  http://www.ultimarc.com/header.gif  


#8 gtxjoe

gtxjoe

    VPF Veteran

  • VIP
  • 5,152 posts

  • Flag: United States of America

  • Favorite Pinball: Medieval Madness, AbraCadabra


Contributor

Posted 26 October 2013 - 01:45 PM

Ordered. Thanks

#9 Linvhoo

Linvhoo

    Hobbyist

  • Members
  • PipPip
  • 13 posts

  • Flag: Spain

  • Favorite Pinball: indiana jones

Posted 09 November 2013 - 11:49 AM

Hi,


Following your idea I purchased the "" gadget "" but I can not make it work.


I connected the brown wire to a 12v power supply, the blue wire to the mass of the ipac and black cable to a port on the ipac to do the function of a key and the problem is that the sensor was always so ON, any ideas?


Thank you!!


Edited by Linvhoo, 09 November 2013 - 11:50 AM.


#10 jag164

jag164

    Hobbyist

  • Platinum Supporter
  • 12 posts
  • Location:Georgia, USA

  • Flag: United States of America

  • Favorite Pinball: Black Knight, any late 60's early 70's EM

Posted 09 November 2013 - 09:02 PM

"to a 12v supply?"  Not sure that's the best approach, but it shouldn't matter (i think) with NPN set up.


 Hmmm, make sure your plunger is ferrous (i.e. a magnet will stick to it)  if it isn't, then you'll need to wrap the tip with something that is in order for the 


#11 gtxjoe

gtxjoe

    VPF Veteran

  • VIP
  • 5,152 posts

  • Flag: United States of America

  • Favorite Pinball: Medieval Madness, AbraCadabra


Contributor

Posted 10 November 2013 - 02:51 PM

Just hooked it up this morning to an iPac.  Need to make a bracket to mount but I have it working.  Thanks jag164


1) Brown wire to the +5 volt on the iPac based (Pin to the right of the empty pin circled in red on the picture attached).  I used an old sound card cable to plug into the iPac connector.

2) Blue wire to the iPac ground pin (The ground used by all the ipac inputs).

3) Black wire to the iPac input mapped to ENTER key


To test the sensor, just hook up the Brown to any voltage (6-36V) and hook up the blue wire to iPAC ground pin.  The LED on the sensor should light up when not close to any metal. LED turns off when close to metal   


OK, I also the tried the following connection and this also worked:

1) Power (brown wire) and Ground(blue wire) from the iPAC connector (See pins circled in Blue on the picture attached)

2) Black wire to the iPac input mapped to ENTER key

Attached Files


Edited by gtxjoe, 10 November 2013 - 03:03 PM.


#12 Linvhoo

Linvhoo

    Hobbyist

  • Members
  • PipPip
  • 13 posts

  • Flag: Spain

  • Favorite Pinball: indiana jones

Posted 10 November 2013 - 04:20 PM

Thank you very much friends!!!


I have it working, it's best to put it to 5v  and the mass had incorrectly connected.


The "" invention "" is the best I've seen, cheap and functional. Perfect!! :otvclap:  :otvclap: :otvclap:  


#13 Linvhoo

Linvhoo

    Hobbyist

  • Members
  • PipPip
  • 13 posts

  • Flag: Spain

  • Favorite Pinball: indiana jones

Posted 11 November 2013 - 09:45 AM

I leave you a video of how I left it running.

Best regards,


#14 blur

blur

    Pinball Fan

  • VIP
  • 1,500 posts

  • Flag: Croatia

  • Favorite Pinball: Amazing Spiderman, Black Hole, Totem


Posted 11 November 2013 - 03:20 PM

too much trouble for digital plunger - you can make digital plunger with any microswitch 


but i'm very interested in this gamepad plunger that you said that worked great but was not supported in tables


i would rather fix some tables or reduce number of tables to only ones that support analog plunger then go to digital.


Edited by blur, 11 November 2013 - 03:21 PM.


#15 Linvhoo

Linvhoo

    Hobbyist

  • Members
  • PipPip
  • 13 posts

  • Flag: Spain

  • Favorite Pinball: indiana jones

Posted 11 November 2013 - 07:53 PM

The micro is harder to hold and just moving with both stroke.

#16 xzotic

xzotic

    Pinball Fan

  • Platinum Supporter
  • 637 posts

  • Flag: ---------

  • Favorite Pinball: TOTAN

Posted 13 November 2013 - 07:33 AM

Very innovative - but yes you won't get actual variable plunging - but nice idea.


The best thing about this is when someone asks you what you are doing you can say "Oh, just installing my Tubular Inductive Proximity Sensor Approach Switch".   :clnglasses:


|

|

___________________________________________

YouTube: www.spaciesarcade.com


#17 jag164

jag164

    Hobbyist

  • Platinum Supporter
  • 12 posts
  • Location:Georgia, USA

  • Flag: United States of America

  • Favorite Pinball: Black Knight, any late 60's early 70's EM

Posted 13 November 2013 - 09:49 PM

too much trouble for digital plunger - you can make digital plunger with any microswitch 


but i'm very interested in this gamepad plunger that you said that worked great but was not supported in tables


i would rather fix some tables or reduce number of tables to only ones that support analog plunger then go to digital.


Actually, I thought the leaf/microswitch route was more of a pain, thus why I went with a sensor.... And hell, with Amazon Prime it was the cheaper route as well.    


My next hack will probably be to see if I can get the gamepad contraption hooked back up with the prox in place as well. I'll see if I can get them working mutually exclusive depending a table's analog support....without having to mod a single table.     That would be sweet. 


I'll make video of my old contraption once I get home from work....


For Blur.....   mock up of my original analog plunger


Edited by jag164, 14 November 2013 - 12:18 AM.


#18 MTPPC

MTPPC

    Enthusiast

  • Members
  • PipPipPip
  • 352 posts
  • Location:Big Sky, Montana USA

  • Flag: ---------

  • Favorite Pinball: Mata Hari .directB2S

Posted 20 November 2013 - 05:27 PM

A solid state replacement for a switch is always preferred. I have this in a new build and will get a good test of it. Thanks, OP. I don't like an analog plunger because you still need a button for many games. I repurpose old cabinets and I don't like any unnecessary buttons or switches.


#19 blur

blur

    Pinball Fan

  • VIP
  • 1,500 posts

  • Flag: Croatia

  • Favorite Pinball: Amazing Spiderman, Black Hole, Totem


Posted 03 January 2014 - 02:29 AM

for jag - analog plunger looks great - I was sure you would put that auto part on the end of the plunger so that wire from the stick goes through the hole but works your way also


for digital plunger not all microswitshes are hard - you have microswitches with wires called coin door microswitches which are very easy to activate like this:

MICRO_SWITCH_FOR_COIN_SELECTOR_ZIPPY_.jp


there are some other digital solutions with wires and contacts on plunger


but i agree with mtppc - it is pain in the ass to have both analog plunger and separate digital button - and some tables just don't accept analog input - like sttng, T2 and so on


so what i would do is maybe take xpadder and map up (forward) movement of plunger to enter key - so when you pull plunger it works as analog - when you release it it also works as analog - but when it comes to plus zone it works as enter key firing the ball - which means if you play sttng or t2 you could pull it - nothing will happen - when you release it nothing will happen - until stick comes to + position and then ball will fire - or you could just push plunger forward and get the ball fired in digital games


however - on analog games you would loose the possibility of firing the ball with strong kick of the plunger (like in noah's demo of his new plunger kit) - cause that will send enter which pulls plunger back instead of forward - never really tried this - you could try and let us know how it works


Edited by blur, 03 January 2014 - 02:23 PM.


#20 koadic

koadic

    Pinball Fan

  • VIP
  • 1,363 posts
  • Location:Omaha, NE, USA

  • Flag: United States of America

  • Favorite Pinball: Addams Family/Fish Tales/Medieval Madness


Contributor

Posted 03 January 2014 - 04:26 AM

If you want to control a launch button (such as those on MM, STTNG, etc...) with a plunger as found on the Mot-Ion kit or VirtuaPin kit, and you are willing to do some very minor table editing, it is really easy to do.

Add a plunger object to the table somewhere outside the table area (will only used for the timer and position reading), make sure it is named 'Plunger', uncheck 'visible', set the timer interval to 40 and enable the timer (all other settings/options aren't going to be used). Then add the following code to the table, it can be placed just about anywhere, even at the very end of the existing script...
 
 Dim PlPos(3)
 Sub Plunger_Timer()
   Dim x
	PlPos(PDelay) = Plunger.Position
	If PlPos(PDelay) < 2 and PlPos(0) > 5 Then PlungerIM.AutoFire
	For x = 0 to ubound(PlPos)-1:PlPos(x)=PlPos(x+1):Next
 End Sub
All you need to do is make sure that PlungerIM matches the existing impulse plunger already included in the table (usually defined in the Table_Init section). If the plunger is pulled past the 5 position, and then released quickly, it will launch the ball just like if you had hit the button... If for some reason you decide you don't want to launch the ball after pulling the plunger back, you can release it slowly back to it's resting point and it shouldn't launch.

The above is a very simplified version of the scripting I use to control the plunger in tables using my analog impulse plunger scripting, but since it is only used for launching with no plunger animation, much of the scripting is unneeded requiring only what I have included above.

Edited by koadic, 03 January 2014 - 04:27 AM.