Jump to content


Photo
* * * * - 4 votes

How to Set Up Addressable LED Strips


  • Please log in to reply
391 replies to this topic

#1 scottacus

scottacus

    Enthusiast

  • Gold Supporter
  • 307 posts
  • Location:Wisconsin

  • Flag: United States of America

  • Favorite Pinball: Adventures of Rocky and Bullwinkle

Posted 18 October 2016 - 02:30 PM

How to set up addressable LED strips for your cab
 

I spent many hours trying to get my addressable LED strips working so I put together this post to help save you the effort of trying to find all of the pieces of this puzzle and get them put together correctly!
 
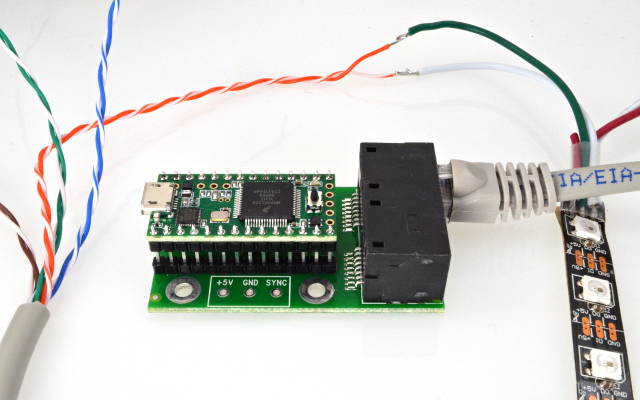
Addressable LED strips can be used in many ways in a cab, the way that I’m going to describe is how to set up the strips that run up the sides of the cab that look like this:
 
 
If you want to set up the large matrix of LED in the back of the cab that can be used to replace 5 way flashers, look for TerryRed’s machine post to see how those are done.
 
You need three pieces of hardware to make addressable LED strips
 
-LED Strips
-Something to drive them
-Something to mount them on
 
LED strips are available from a wide variety of vendors and come in different LED densities ranging from 30 LEDs/m to 144 LEDs/m (WS2811/WS2812). The price goes up dramatically as you reach higher density LED strips but if you are making a matrix for the back of the machine density will determine resolution so I think higher is better. For my application I am making flashing, pulsing, strobing light effects for the side of the cab so I went with 60 LED/m strips. These strips are one directional in their signal flow and are marked with arrows to show that direction.
 
0J5801.1200.jpg?7e89d6512a2ba534004078af
 
You can inject power and ground from any location in the strip but the signal must come from the starting end. Speaking of injecting power, these LEDs are power hungry so very long lengths or dense matrixes need power injected every 180 LEDs per one source. You can make longer chains as far as the data is concerned but power must be injected at least every 180 LEDs. These LED strips run on +5v and not the +12v that the under cabinet use.
 
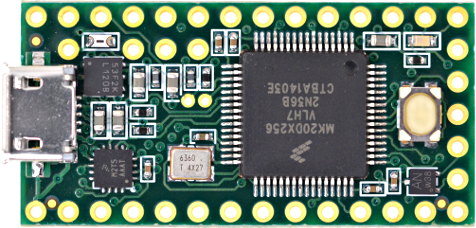
You next need something to control the LEDs, I chose to use the Teensy board to do this but you could use Arduino or another type of controller for this application. The Teensy board is available here and currently the 3.2 version is $19.80 so the price is reasonable
 
 
teensy32.jpg
 
There is an optional daughter board that has two CAT6 cable connectors on it that can be used for easy data distribution OCTO2811 available here currently priced at $10
 
 
octo28_adaptor_1.jpg
 
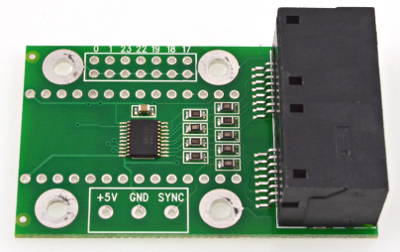
When these two are put together they look like this
 
octo28_adaptor_6.jpg
 
The Teensy needs to be loaded with software to run the LED strips and the instructions for doing this are available here
 
 
The Teensy board connects up to your PC via USB cable so you need one of these with a regular USB on one end and a micro USB on the other.
 
The LED strips need +5v and Gnd to the outer two pads and assuming that you use the Octo28 adaptor you must connect a CAT6 cable to the strips to send the signal to them. As best I can tell Teensy sees the LED strips as one long continuous strip. This doesn’t mean that you have to daisy chain the strips together by sending the signal out the end of one strip and into the beginning of another. You can use up to 8 twisted pairs of wires from the CAT6 cables to send the signals to up to 8 different LED strips. The order of twisted pairs is:
 
Orange
Blue
Green
Brown
 
With the solid color being the data wire and the white being the ground. If your LED strips are like mine, they use black as ground and white as data so you need to hook up the colored CAT6 wire to white on the LED strip and the white CAT6 wire to the black on the LED strip.  The jack on the right as you hold the jacks towards you sends the first four signals and the jack on the left handles signals 5-8.
 
The last thing that you need is some way to mount the LED strips in your cab. My play field TV has about 1/16” clearance on the sides so I had to either route a channel into the cab for these or make a removable strip to mount them on. Since my cab is assembled I mounted the LED strips onto a 1/16” think aluminum strip using Duck permanent double sided tape. This tape is made from white foam so it can insulate the bottom of the LED strips from the aluminum because the solder pads between each LED are not insulated on the bottom so shorting them out is a concern. I painted the aluminum strip and tape black for my cab.
 
The last part of the set up is getting DOF to talk to the Teensy controller. To do this you need a Global Configuration file and a cabinet configuration file in your Directoutput/Config folder.
 
Here is a copy of my Global Configuration file.
<?xml version="1.0" encoding="utf-8"?>
<!--Global configuration for the DirectOutput framework.-->
<!--Saved by DirectOutput Version 0.8.6002.28451: 2016-09-25 10-00-34-->
<GlobalConfig>
  <LedWizDefaultMinCommandIntervalMs>1</LedWizDefaultMinCommandIntervalMs>
  <LedControlMinimumEffectDurationMs>60</LedControlMinimumEffectDurationMs>
  <LedControlMinimumRGBEffectDurationMs>120</LedControlMinimumRGBEffectDurationMs>
  <IniFilesPath />
  <ShapeDefintionFilePattern>{DllDir}\DirectOutputShapes.xml</ShapeDefintionFilePattern>
  <CabinetConfigFilePattern>C:\DirectOutput\config\CabinetConfig.xml</CabinetConfigFilePattern>
  <TableConfigFilePatterns />
  <EnableLogging>true</EnableLogging>
  <ClearLogOnSessionStart>false</ClearLogOnSessionStart>
  <LogFilePattern>.\DirectOutput.log</LogFilePattern>
</GlobalConfig>
 
Here is a copy of my Cabinet configuration file this is the tricky one to set up because there is not a lot of information out there on how to do this.  I'll inject notes in bold to explain what everything does.  These bold notes should not be copied into the XML file or you will generate errors..
 
<?xml version="1.0" encoding="utf-8"?>
<!-- This config file will set up two addressable LED strips orange on the right and blue on the left.  Each is 53 long and have the distal LED as the first in the array -->
  <Name>MultiBall</Name> Cabinet Name
  <OutputControllers>
    <TeensyStripController> 
      <Name>TeensyStripController</Name>
      <NumberOfLedsStrip1>53</NumberOfLedsStrip1>  Number of LEDs on the right playfield 
      <NumberOfLedsStrip2>53</NumberOfLedsStrip2>  Number of LEDs on the left playfield
      <NumberOfLedsStrip3>0</NumberOfLedsStrip3>
      <NumberOfLedsStrip4>0</NumberOfLedsStrip4>
      <NumberOfLedsStrip5>0</NumberOfLedsStrip5>
      <NumberOfLedsStrip6>0</NumberOfLedsStrip6>
      <NumberOfLedsStrip7>0</NumberOfLedsStrip7>
      <NumberOfLedsStrip8>0</NumberOfLedsStrip8>
      <ComPortName>COM3</ComPortName> You must look in device manager to see what port Windows assigned for the Teensy USB connection.
    </TeensyStripController>
  </OutputControllers>
  <Toys>
    <LedStrip>
      <Name>PF Right</Name> This is the name that I gave the right playfield strip
      <Width>1</Width> These strips run as one long string as far as the Teensy board is concerned.  If you set the width to anything other than 1 it will give you funny results like the entire strip being LED 1
      <Height>53</Height> This is the length of the right playfield LED array
      <LedStripArrangement>TopDownLeftRight</LedStripArrangement> There are several choices that can be used here like BottomUpLeftRight.  This determines the order of LEDs that the Teensy sends out on its signal path.  If you use TopDown then the furthest LED from the connecting wires will be the first one in the segnal pathway.  I needed this because I wanted my Teensy Board in the back of the machine by the power supplies to make the shorted wiring runs.
      <ColorOrder>GRB</ColorOrder>  You must choose GRB not RBG with these strips to get them to correctly display the colors sent to them
      <FirstLedNumber>1</FirstLedNumber> This is the first strip so it starts with LED 1
      <FadingCurveName>SwissLizardsLedCurve</FadingCurveName> I didn't play with this setting so I can't tell you what this does but I suspect that this sets the protocol that DOF uses for lighting the strips.
      <OutputControllerName>TeensyStripController</OutputControllerName>
    </LedStrip>
    <LedStrip>
      <Name>PF Left</Name> This strip is set up just like the other with exceptions in bold
      <Width>1</Width>
      <Height>53</Height>
      <LedStripArrangement>TopDownLeftRight</LedStripArrangement>
      <ColorOrder>GRB</ColorOrder>
      <FirstLedNumber>54</FirstLedNumber> Since this is the second strip its first LED is the next one after the last LED on the other strip so since my strips are 53 LEDs long it is LED 54.
      <FadingCurveName>SwissLizardsLedCurve</FadingCurveName>
      <OutputControllerName>TeensyStripController</OutputControllerName>
    </LedStrip>
    <LedWizEquivalent>
       <Name>LedWizEquivalent 30</Name> This is the number assigned to the WS2811 controller by the online DOF config tool
      <Outputs>
        <LedWizEquivalentOutput>
          <OutputName>PF Right</OutputName> Name as defined above
          <LedWizEquivalentOutputNumber>1</LedWizEquivalentOutputNumber> This is the port number of the first set of combos set up In the online DOF Config tool so it is port 1
        </LedWizEquivalentOutput> 
        <LedWizEquivalentOutput>
          <OutputName>PF Left</OutputName> Name as defined above
          <LedWizEquivalentOutputNumber>4</LedWizEquivalentOutputNumber> This is the port number of the second set of combos set up in the online DOF config tool so it is port 4
        </LedWizEquivalentOutput>
      </Outputs>
     <LedWizNumber>30</LedWizNumber>
    </LedWizEquivalent> 
  </Toys>
 <AutoConfigEnabled>true</AutoConfigEnabled> This needs to be set to true to work
</Cabinet>
 
The last thing that you need to do is to go to the online DOF config tool, sign in and make a new config file that includes a WS2811 controller. To do this you sign in and go to the My Account tab and increase the number of WS2811 Devices to 1 (for the Teensy board).
 
Next go to Combine Toys and make two combos one for the right PF Flashers MX and PF Effects MX and one for the left.
 
Lastly, go to the Port Assignments Tab, choose the WS2811 - directoutputconfigini30 device and assign port 1 to your first LED strip (1 red, 2 green, 3 blue) and port 4 for the second LED strip (4 red, 5 green, 6 blue).
 
You should now have everything you need to test out your strips and get them running!


#2 hlr53

hlr53

    Pinball Fan

  • Gold Supporter
  • 683 posts
  • Location:Maineville OH area

  • Flag: United States of America

  • Favorite Pinball: 1964 Williams Palooka Joe

Posted 18 October 2016 - 04:15 PM

Thanks! I just ordered a strip of 5050's from Lighting Ever. I've dealt with them for years. I hadn't a clue on how to set them up. These are going under my cab. When I built it I recessed the bottom up 3/4" to hide the lights.


Still gotta wire up Pinscape stuff (flashed it in August - where DOES the time go??) Hate it when real work takes up all the time!


Former Cab: 40" Haier, 28" I-INC, i7-6700, 1080 GPU, v3DMD, 4D7 solenoids. Altec-Lansing speakers and sub. Artwork by Stuzza. Printing by Brad Bowman. VR HP reverb


#3 Outhere

Outhere

    Pinball Wizard

  • Platinum Supporter
  • 4,720 posts

  • Flag: United States of America

  • Favorite Pinball: M M

Posted 18 October 2016 - 04:38 PM

Nice write up

  Thank you


#4 viktory2k1

viktory2k1

    Autistic Genius

  • Platinum Supporter
  • 986 posts
  • Location:Waukesha Wisconsin

  • Flag: United States of America

  • Favorite Pinball: Tales of the Arabian Nights

Posted 19 October 2016 - 01:25 AM

Nice! I have a bunch of addressable and regular led strips and just the basic controller so far, my question is: I know these things are bright, do they impede with the table brightness much? will you "lose the ball"? Just wondering, thats alot of lights!


logo.png


If it ain't broke, it's probably a good idea to take it apart anyway!

I just post here to hear myself type.


#5 scottacus

scottacus

    Enthusiast

  • Gold Supporter
  • 307 posts
  • Location:Wisconsin

  • Flag: United States of America

  • Favorite Pinball: Adventures of Rocky and Bullwinkle

Posted 19 October 2016 - 02:39 AM

They are no where near as bright as the star flashers in the back of the machine, when those go off they can impact the viewing of the upper playfield.  I think the addressable strips add a lot to the playing experience and in terms of importance I would say that flashers are the best playfield toy light toy and the addressable LEDs come in second.


#6 hlr53

hlr53

    Pinball Fan

  • Gold Supporter
  • 683 posts
  • Location:Maineville OH area

  • Flag: United States of America

  • Favorite Pinball: 1964 Williams Palooka Joe

Posted 20 October 2016 - 11:48 AM

Scottacus,


Where did you get the star flashers, holders, lenses, etc? Kit or homebrew? I wasn't going to add those but now I figured why not? Getting ready to fit the TV and frame this weekend and will cut that piece also.


Thanks


Former Cab: 40" Haier, 28" I-INC, i7-6700, 1080 GPU, v3DMD, 4D7 solenoids. Altec-Lansing speakers and sub. Artwork by Stuzza. Printing by Brad Bowman. VR HP reverb


#7 scottacus

scottacus

    Enthusiast

  • Gold Supporter
  • 307 posts
  • Location:Wisconsin

  • Flag: United States of America

  • Favorite Pinball: Adventures of Rocky and Bullwinkle

Posted 20 October 2016 - 01:35 PM

The star flashers came from ebay like these:


http://www.ebay.com/...p4AAOSwyQtVtHBe


and the domes came from Pinball Life


http://www.pinballli...=product&id=310


With bases


http://www.pinballli...=product&id=548


#8 roar

roar

    Enthusiast

  • Members
  • PipPipPip
  • 452 posts

  • Flag: Canada

  • Favorite Pinball: TOM

Posted 20 October 2016 - 05:13 PM

Some people put heat sinks on the flashers... I used these ones:


https://www.aliexpre...0608.0.0.TmXK9m


I've seen other solutions though where they attached them to a thin aluminium bar.


#9 hlr53

hlr53

    Pinball Fan

  • Gold Supporter
  • 683 posts
  • Location:Maineville OH area

  • Flag: United States of America

  • Favorite Pinball: 1964 Williams Palooka Joe

Posted 20 October 2016 - 06:15 PM

Thanks for the info. I have to bone up on LEDs. I haven't looked at diode schematics since the 80's.


Former Cab: 40" Haier, 28" I-INC, i7-6700, 1080 GPU, v3DMD, 4D7 solenoids. Altec-Lansing speakers and sub. Artwork by Stuzza. Printing by Brad Bowman. VR HP reverb


#10 rablack97

rablack97

    Enthusiast

  • Members
  • PipPipPip
  • 57 posts
  • Location:Texas, USA

  • Flag: United States of America

  • Favorite Pinball: Tron Legacy

Posted 04 December 2016 - 02:45 AM

FYI


Not sure if anybody noticed that the side effects while browsing the menu in pinballx, only utilized 70% of the strip.  Heres how to change it so it uses the entire strip.


Got you your INI30 file and edit


Do a find and look for Menu


You will see a precursor of $PBXMenuUp Yellow.


There is a setting AH70, change that to 100, do a find next and do the same for all, should be 4 entries.


You will now have the side menu effect utilizing 100% of the strip.


AH sets the percentage of the strip used.


#11 rambo3

rambo3

    Enthusiast

  • Members
  • PipPipPip
  • 53 posts

  • Flag: Norway

  • Favorite Pinball: Attack from Mars!

Posted 21 January 2017 - 10:22 PM

Pardon the stupid question: Got Teensy and 144/m WS2128b RGBs running in test mode one pixel at a time. About to power more of these up (worst case scenario).


How would one connect multiple (say two Mean Well 150W 5v) PSUs to power 6m of this stuff? Can one PSU power say strip 1, 2, 3 and a second 4, 5 and 6 without causing electrical problems?


#12 scottacus

scottacus

    Enthusiast

  • Gold Supporter
  • 307 posts
  • Location:Wisconsin

  • Flag: United States of America

  • Favorite Pinball: Adventures of Rocky and Bullwinkle

Posted 27 January 2017 - 03:29 AM

I just saw your post tonight...


According to what I've seen you need to inject power every 180 LEDs.   It looks like you have 6 x 1m lengths (144/m) to I would inject power into each of the strips.


It would be good if someone could double check these calculations before you put this to a physical test.  As far as your PS is concerned, you have a 150W at 5v PS which is 75A (75000mA) at 5v.  According to the Pololu site, each LED draws 50mA at full brightness so 75000mA/50mA per LED = 1500 LEDs that can be powered by your PS.   You have 6 x 144 LED/m for a total of 864LEDs so according to these calculations your PS should handle all of your LEDs.


#13 rambo3

rambo3

    Enthusiast

  • Members
  • PipPipPip
  • 53 posts

  • Flag: Norway

  • Favorite Pinball: Attack from Mars!

Posted 27 January 2017 - 04:54 PM

I got it working yesterday :) I do have some interesting bits of info though which might be interesting for others.


Setup is 4 144-strips split into 8 halves resulting in a 72x8 pixel resolution for a total of 576 LEDs for the matrix. Each pair gets its own 5V + and - from the PSU to spread the load across more wires (16AWG). Basically 4 molex plugs from the PSU with the 5v and ground pins only, which get hooked up to each strip powering 144 LEDs. I could measure the input 5V current increase per pair for the wires injected into it, then stop as another pair started lighting up. Which seems good and controlled, as the current load + and - got spread.


Measured the current for a single WS2128B LED, the first, full white LED at around 44mA and about 0,22W. They're specced according to the eBay-page I bought them from at 60mA 0,3W, didn't quite get there. My multimeter isn't that precise I'm afraid, or they're cheaper knockoffs, or I'm doing something wrong. A full 144 LED strip measured at +5V (just before LED-strip) around 4,87A. Nowhere near 60mA*144=8,64A. All four pairs (576) = around 123W full blast for 10 minutes, 143W total from the actual socket.


Each strip gets an individual + and - to the PSU using molex plugs and 5v to reduce load on ground. No discoloring issues, bright cool white, first and last LED per strip identical. Cooled using fan and heatsinks. No issues, no blinking. Solid stuff.


The Octo TP-ground was only soldered onto the first LED ground. If that same ground was soldered onto each strip ground, ground from PSU 5Vs would end up following a single cable back to the PSU instead of being spread across more wires. I could literally ignore hooking up 3 ground wires and just use their 5V +. Not ideal.


So, in conclusion, using the ATX power supply seems to be working extremely well. Current load is shared, and each molex plug for 5V measure at most ~5A. 5V stayed at a solid 5V too. I'm surprised. Still got plenty of juice left in that box for 288 LEDs.


....

Now, the interesting part; if I combined two power supplies (just tried lighting up the first green LED on each strip), I had to use a shared ground. Octo TP output ground, PSU1 ground, PSU2 ground, each LED-strip ground. If you have an ATX power supply with several 5V cable outputs, you might end up having ground for the ATX +5V output going back a single black cable. Which happened to me. Which I guess is allright if you have say two Mean Well PSUs instead of ATX PSUs where you can directly and easily hook up say 14AWG wires. But for an ATX PSU (which you don't really want to open up) you're "kind of" stuck with the cables out of that box at around something that looks like 18AWG (30A?). Gets compliated..?


(sorry for bad English or long sentences, just got back home..so tired, not touching that LED-stuff now)


Edited by rambo3, 27 January 2017 - 05:00 PM.


#14 javier1515

javier1515

    Pinball Fan

  • VIP
  • 573 posts
  • Location:Villa Maria Cordoba

  • Flag: Argentina

  • Favorite Pinball: The Addams Family, Hook


Posted 28 January 2017 - 01:36 AM

Can be done with an Arduino like this


arduino-pro-mini-328-5v-16mhz.jpg


excuse my ignorance  :blush:


"Learning without thought is vain, thought without learning is dangerous." (Confucius)
 
"Aprender sin pensar es inútil, pensar sin aprender es peligroso". (Confucio)


Please, if you can help me with a small contribution to update my work team and continue to make more tables I will be eternally grateful.
 

#15 scottacus

scottacus

    Enthusiast

  • Gold Supporter
  • 307 posts
  • Location:Wisconsin

  • Flag: United States of America

  • Favorite Pinball: Adventures of Rocky and Bullwinkle

Posted 28 January 2017 - 04:57 AM

Rambo3 please make sure that your single ground wire doesn't get hot when you do your test run of 576 LEDs. At 5 v your 123W is around 24A who is a lot of current...

#16 rambo3

rambo3

    Enthusiast

  • Members
  • PipPipPip
  • 53 posts

  • Flag: Norway

  • Favorite Pinball: Attack from Mars!

Posted 28 January 2017 - 05:47 PM

Double checked today using a new multimeter (~20 year old one wasn't reliable..poor thing...). Getting 5,3A per strip (144), per wire (+ and -), at 100% white. Using a single PSU. If I was using two PSUs I'd be using a shared ground. Right now I can share the current load for both + and -.


EDIT: correction, 5,7A -> 5,3A.


Edited by rambo3, 28 January 2017 - 06:10 PM.


#17 Hellfire666

Hellfire666

    Hobbyist

  • Members
  • PipPip
  • 10 posts

  • Flag: Germany

  • Favorite Pinball: Star Trek TNG

Posted 01 March 2017 - 02:34 PM

Hello there,

first I'd like to thank you for the great ideas and community here and at vpuniverse. This was the reason I am now building my own VPin.

I like to add addressable LEDs  to my cabinet project. However I have a problem with the above used Teensy/Optoboard solution. I cannot get any effects from the LEDs at all.

I am using Win 10 x64 pro with 16 GB Ram and using latest VP10.2

I have a working DOF config with the latest DOF r3 from http://www.mjrnet.or...jr-20161019.zip. Several effects are working within VP (Solenoids, Shaker, RGB undercab, Gear motor, beacon, strobes)

I have flashed the latest beta firmware (dd. 2.1.2016 from https://github.com/D...roller/releases) on the Teensy using Teensy loader software. The teensy is on COM7.

I have connected 1 continuous LED strip with 388 LEDs (5 V) (2x 101 LEDs for left/right side, 62x3 LEDs for back)

When I check connections with my multimeter I get a connection on the strip both for ground and +5v all the way from beginning to end of LED strip. The only thing that has no connection from beginning to end is the data wire. I think this Is normal?

When I use the automatically generated directoutputconfig30.ini from DOF config, my DOF log shows an error: "failed: AH100" with several following errors "can't parse ..."

When I use Terry Reds directoutputconfig30.ini he published on vpuniverse get an error "rom mtl already...". Once I delete the line "mtl,0,0,0,0,..." I get no more errors in the log. However still no effects.

Any tips?


Furthermore isn't it possible to use an "out-of-the-box"-solution like

https://www.amazon.d...0?ie=UTF8&psc=1 or

https://www.amazon.d...ETS8JF1V1XESSAD

this is a LED player/controller configurable by USB connection ("S" for up to 256 LEDs, "M" for up to 2048 LEDs) using TPM2 protocol for LED control.

Is it possible to configure DOF for TPM2 protocol output?


#18 scottacus

scottacus

    Enthusiast

  • Gold Supporter
  • 307 posts
  • Location:Wisconsin

  • Flag: United States of America

  • Favorite Pinball: Adventures of Rocky and Bullwinkle

Posted 31 March 2017 - 04:42 PM

Hi Hellfire I didn't see your post until today.  I hope you've got your strips up and running but if not here are a few things ideas:


-One problem that I see is that your LED strip is too long to have just one +5v injection site.  I believe these strips need power every 180 LEDs.  

-I'm not sure about the data continuity check but not having continuity from end to end makes sense.

-Feel free to copy my global and cab config files above and edit them to make them correct for your machine and make sure that they are in your DirectOutput/Config folder.  Be sure to remove any BOLD comments when you edit the text since I did not put the text behind the proper "comment" XML character.


#19 Outhere

Outhere

    Pinball Wizard

  • Platinum Supporter
  • 4,720 posts

  • Flag: United States of America

  • Favorite Pinball: M M

Posted 04 April 2017 - 04:49 AM

The string of lights came pre-wired this way ....Has anybody else worked with this type of hook up?...

From what I can tell the two separate wires would be the 5 volt red and the white wire would be negative - Which must be for injecting 5 volt power if needed but in my case this will be the single string of 144 per each side of the pinball cabinet Or do I also need to hook them up....

.... The three in one connection the red is 5 volt the white would be negative and the green would be the signal for the addressable strip...

Attached Files


Edited by Outhere, 04 April 2017 - 05:57 AM.


#20 kiwiBri

kiwiBri

    Enthusiast

  • Members
  • PipPipPip
  • 369 posts
  • Location:Ontario, Canada

  • Flag: Canada

  • Favorite Pinball: STNG/TAF/IJ

Posted 05 April 2017 - 08:09 PM

Teensy & OCTO2811 boards ordered. 


Haven't worked out what LEDs I will be using.  Most likely look at the 144s that some people have mentioned. 


Edited by kiwiBri, 26 June 2017 - 05:04 AM.

Completed: (For now ;) )  - My 46/30/DMD Judge Dredd Cab Build