Jump to content


Photo
- - - - -

ALP - Need to cut some holes


  • Please log in to reply
9 replies to this topic

#1 Tesla

Tesla

    Pinball Fan

  • Silver Supporter
  • 1,004 posts
  • Location:Texas, USA

  • Flag: United States of America

  • Favorite Pinball: Star Trek - TNG

Posted 24 March 2023 - 01:42 AM

The AtGames Legends Pinball cabinet doesn't appear to be solid wood (what do you expect for $400 total) but sturdy and pretty nice otherwise. I don't want to butcher it so I thought yall might have some advice of the best procedures and tools to cut some holes in it.


Main problem is the ALP has absolutely no ventilation (like it's closed-up solid). The screens, power-supply, and 2-controller boards are getting pretty hot after extended periods of use. Instead of leaving the 2 back covers removed I wanted to install an exhaust fan and cut some 1-inch vent holes. I was hoping to create a low-flow or air from the front to the back.


The thickness varies between 1/4-inch and 1/2-inch depending on where you are cutting. It appears to be MDF, with a thin black plastic coating laminated to one side (similar to cheap furniture).


This is what I need to cut:

5-inch diameter hole for 120mm back exhaust fan

1-inch diameter vent-holes in various places

1-inch hole for VIBS-Board Switch (a standard pinball cabinet switch)

1-inch holes for various Pinscaped-KL25Z things


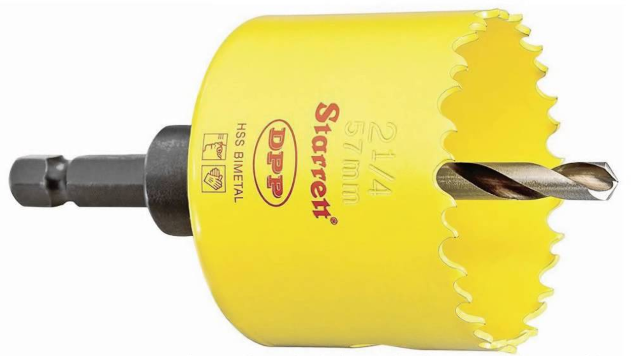
Please verify, but I think a standard hole-saw (on a drill) is the proper tool for the 1-inch holes.


But what about the 5-inch diameter hole for back exhaust fan? It's going to be visible from the back, so I would prefer if it was perfectly-round and the edges were clean/sharp. I think a jig-saw can do it, but it's gonna look pretty rough.


I'm thinking maybe the router/cutting bit on my Dremel? The Dremel 678 Circle Cutter attachment came in my kit, but I've never used it.


Or, do they make hole-saws that big? 


I wonder what they use to make custom-built ventilated home-theater cabinets? Those and pinball-cabinets is all I could think of. Maybe musicians have a need for ventilated cabinets? Anyway, I figured yall would know the best way. You know ... measure-twice, cut-once ... I only get one chance at this.


Edited by Tesla, 24 March 2023 - 06:22 PM.


#2 Tesla

Tesla

    Pinball Fan

  • Silver Supporter
  • 1,004 posts
  • Location:Texas, USA

  • Flag: United States of America

  • Favorite Pinball: Star Trek - TNG

Posted 24 March 2023 - 05:18 AM


Or, do they make hole-saws that big? 


Answer: Yes, they do ... so I ordered an inexpensive set. If it works for 1-2 large holes, I'll be happy.


Since I'm planning to use a hole-saw for the 1-inchers, makes sense to try the 4 or 5 inch dia. hole-saw for the fan as well. If it goes poorly, I suppose I can always finish-up with Dremel and/or sanding.


That's the plan unless I hear otherwise from yall.


Edited by Tesla, 24 March 2023 - 06:22 PM.


#3 BoltBait

BoltBait

    Software Developer

  • Members
  • PipPipPip
  • 399 posts
  • Location:Sacramento, CA

  • Flag: United States of America

  • Favorite Pinball: Elvira, Whitewater, Big Bang Bar, Fun House and All the old EM tables of the 70s that I played as a kid (including Buccaneer, Spirit of 76, and King Kool)

Posted 28 March 2023 - 04:54 PM

I imagine you'll be using a hole saw with a hand-held drill:


HoleSaw.png

If so, you'll want to go slow and apply minimal pressure.  Hole saws tend to "bite"... not fun.


Follow up with a jig saw.  You can see my handywork here: https://boltbait.com...ball/wiring.php


Planning: Don't just drill random holes in your cabinet.  Plan where you want the air to flow.  Drill 1 or 2 input holes near the bottom front and 1 or 2 exhaust holes near the top back. (I placed my fan over the input hole.) 


If you place random holes, you'll never be sure the air is going everywhere.  Air tends to take the shortest path out of your machine.  So, keep the input and output holes far apart.


Edited by BoltBait, 28 March 2023 - 05:05 PM.

How I built my B2S Pinball Cabinet, step-by-step, with pictures!  Full-sized cabinet for ~$700. Believe me, if I can do it, so can you!

"Making anything with your hands goes wonderfully with whatever in your life you would consider your grind." ~Nick Offerman


#4 Tesla

Tesla

    Pinball Fan

  • Silver Supporter
  • 1,004 posts
  • Location:Texas, USA

  • Flag: United States of America

  • Favorite Pinball: Star Trek - TNG

Posted 28 March 2023 - 06:24 PM

1. I imagine you'll be using a hole saw with a hand-held drill:


2. You can see my handywork here: https://boltbait.com...ball/wiring.php


3. Planning: Don't just drill random holes in your cabinet. 


1. Yes, I think so. I got a set from Amazon that includes a 4-incher and a 5-incher (as well as the smaller ones).


2. Informative blog. Refreshing to see a blog (with written directions and close-up pics) and not just a video.


Your cabinet turned-out nice.


3. Agreed. I was thinking one-or-two 1-inch holes on the underside (near the front) and also some across the top of the back-box back-cover ... drawing cool air across both and funneling it out the lower back.  The fan will be facing and exhausting air directly backwards ... either installed in the cabinet or installed in the cabinet's back access-panel itself. 


It's actually rather bizarre. This ALP is built without any ventilation holes what-so-ever. I can see why many guys just leave both back covers removed. Problem is, that doesn't really work for households with children or small pets. 


Right now, I just have my new 120mm fan temporarily installed exhausting out the back. Even sucking against negative pressure, the power-supply, screens, and cpu/gpu boards are now lukewarm instead of burning-hot.


Edited by Tesla, 29 March 2023 - 12:11 AM.


#5 htamas

htamas

    Pinball Wizard

  • VIP
  • 2,219 posts
  • Location:California

  • Flag: Hungary

  • Favorite Pinball: cannot pick just one, and they change anyway


Posted 28 March 2023 - 09:13 PM

Speaking of ALP... who in their right mind would buy this?

Shaking my head in disbelief... one must be completely uninformed to do so, but I guess there could be suckers who think 3 grand is an acceptable price for it  :crazy:


Edited by htamas, 29 March 2023 - 07:12 PM.


#6 BoltBait

BoltBait

    Software Developer

  • Members
  • PipPipPip
  • 399 posts
  • Location:Sacramento, CA

  • Flag: United States of America

  • Favorite Pinball: Elvira, Whitewater, Big Bang Bar, Fun House and All the old EM tables of the 70s that I played as a kid (including Buccaneer, Spirit of 76, and King Kool)

Posted 29 March 2023 - 12:03 AM

Your cabinet turned-out nice.


Thanks!  It's far from perfect, but it works well for me.


3. Planning: Don't just drill random holes in your cabinet. 


3. Agreed. I was thinking one-or-two 1-inch holes on the underside (near the front) and also some across the top of the back-box back-cover ... drawing cool air across both and funneling it out the lower back.  The fan will be facing and exhausting air directly backwards ... either installed in the cabinet or installed in the cabinet's back access-panel itself. 


Heat rises.  It would be best to have your exhaust holes at the top of your backbox (assuming you get good air flow between the main cabinet and the backbox).


My 120mm fan is mounted over the intake hole and blows directly across my PC's heatsink.  Then, my exhaust holes are at the top of my backbox and are passive. I get pretty good air flow out the back--the air feels a little warm.


Read the "Lessons Learned" section of the last page: https://boltbait.com/pinball/done.php


Edited by BoltBait, 29 March 2023 - 12:06 AM.

How I built my B2S Pinball Cabinet, step-by-step, with pictures!  Full-sized cabinet for ~$700. Believe me, if I can do it, so can you!

"Making anything with your hands goes wonderfully with whatever in your life you would consider your grind." ~Nick Offerman


#7 Blublub

Blublub

    Neophyte

  • Members
  • Pip
  • 4 posts

  • Flag: United States of America

  • Favorite Pinball: Medieval Madness

Posted 29 March 2023 - 03:37 AM

Speaking of ALP... who in their right mind would buy this?

Shaking my head in disbelief... one must be completely uninformed to do so, but I guess there could be suckers who think 3 grand is an acceptable price for it  :crazy:


Is that what they go for in some places?  I think it retails for like $800 in the US and many of us got it when it was $250-$400 at Sam's Club. I agree I don't know that I'd pay any more than that.


#8 tassie2

tassie2

    Hobbyist

  • Members
  • PipPip
  • 26 posts
  • Location:Tasmania

  • Flag: Australia

  • Favorite Pinball: Yukon

Posted 13 April 2023 - 12:36 PM

For clean eg 1 inch holes try forstner bit. Drill from both sides. Less chance of breakouts.

Plus have handle on drill to save jam ups on wrist and easier to control. 

Handle good for any holesaws too. Can masking tape both sides .

Drill a pilot hole first makes it easier. Same size as holesaw drill.

If eg mdf watch out for dust.

Nick Tasmania


#9 Tesla

Tesla

    Pinball Fan

  • Silver Supporter
  • 1,004 posts
  • Location:Texas, USA

  • Flag: United States of America

  • Favorite Pinball: Star Trek - TNG

Posted 04 November 2023 - 05:35 PM

Well, I ended-up just leaving the cover-off and temporarily mounting the fan a different way. But, all that is gone now as I am converting my ALP cabinet to a conventional Windows/Pinscape/VPX pinball-cabinet.


So, now ... the real work begins. I'm thinking something like 2-in Dia. hole through the 1/2-in MDF floorboard ... near the middle-back.


Seems like now would be a good time while the lower cabinet is (or can be) a very empty shell right about now.
 
Do yall tend to haul the cabinet out to the garage to drill any large holes (into solid-wood or MDF)?
I was thinking the air-compressor might be good for clean-up afterwards also.

Edited by Tesla, 04 November 2023 - 05:40 PM.


#10 Tesla

Tesla

    Pinball Fan

  • Silver Supporter
  • 1,004 posts
  • Location:Texas, USA

  • Flag: United States of America

  • Favorite Pinball: Star Trek - TNG

Posted 26 October 2025 - 04:24 AM

I have drilled some large-holes in it finally (just working down my To-Do list).


With a normal bit (like for bolts) and the pre-drill for MDF/wood screws. Still in the exercise-room, so I used a small box to catch the saw-dust, and used a vacuum on the cabinet afterwards.


Today, I finally also did some with the hole-saw bits ... some 1-1/8-inch (29mm) ventilation holes near the top of the Back-Box cover. I haven't had it installed because AtGames had this thing sealed-up tight (no fans or even ventilation holes) so I'm just been keeping them off.


I think this might be Melamine-board or MDF with Melamine (vinyl or PVC) covering on both sides. Not sure of correct terms. Anyway, when I drill it, it produces a very fine powder (like surely not good for breathing-in ). The surfaces are tough, but the edges (with no covering) are venerable. 


The back-cover was detachable, so I hole-saw drilled it outside. But then I had "an edge" inside the holes, so I painted them black to match the other cabinet surfaces. In black, I only had "Jet Black" Fueled Model Airplane Dope on-hand (like colored Epoxy) so now my Back-Box cover has Fuel-Proofed ventilation holes <smile>  


Good to have the cover back on finally. I'm hoping I can still hear my new Replay-Knocker well. I did another thing, so I might post about it all in what has sorta become my main build-thread:

https://www.vpforums...ic=52387&page=8


Edited by Tesla, 26 October 2025 - 04:07 PM.