


 Contributor
------------------------------------------------------------------------------------------------------------------------------------
---------------------------------------------- ADDRESSABLE LED GUIDE ------------------------------------------
---------------------------------------------- BY MAJOR FRENCHY -------------------------------------------
------------------------------------------------------------------------------------------------------------------------------------
Link for the Video tutorial : https://youtu.be/dWaGLqg5s50
PART 1 ( The hardware )
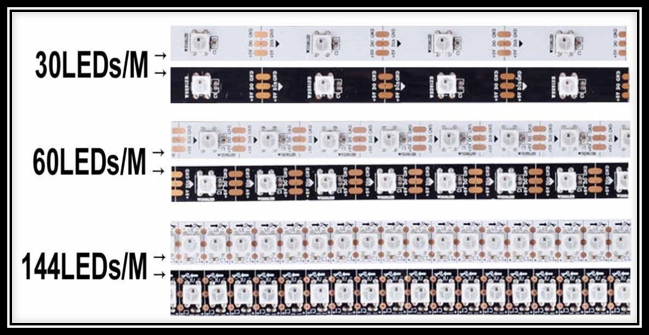
Addressable LED's WS2812B (5v or 12v ) ( 60 led/meter or 144 led per meter )
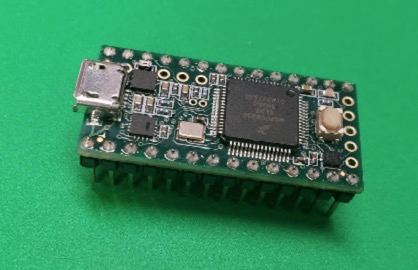
Teensy 3.1 or 3.2
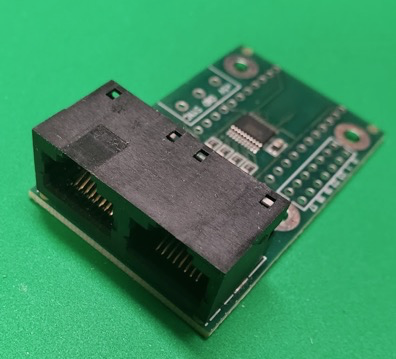
Octo 2811
PART 2 ( PREPARATION )
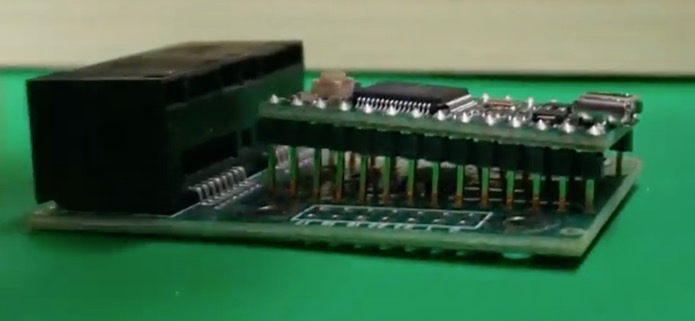
you will need to solder the teensy on the octo 2811. Insert the Teensy on top of the OCTO2811 and the micro usb
port should face the outside of the board like below.
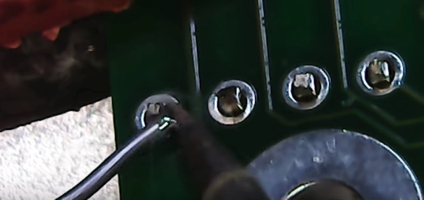
Take your time soldering. Heat up the pin and let the solder melt and fill the hole.
Decide the number of LED's that you want for your cabinet. if you have ordered strips with a male and female end, place them temporary on the location it will go in your cabinet.
If you have bought a roll of LED, you will need to cut and solder the strips together. When cutting the strips please consider the following:
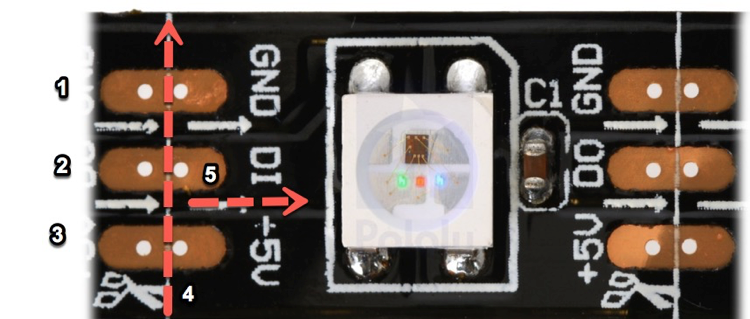
- is the ground wire
- is the Data cable
- is the Power cable
- Cutting line
- Direction the current and data is travelling on the strip.

- Ground wire
- Power wire
- Ground to Rj 45 white/orange wire. We will call it Ground RJ in this guide
- Data wire to orange Rj45 wire.
- This power cable is not going to be used.
Now you will take a RJ45 cable and strip the end.
we will only use the orange and white/orange wire

You will solder the white wire from the LEDstrip to the white/orange wire of the RJ45 cable
You will solder the green ( data cable ) from the strip to the orange wire of the RJ45 cable
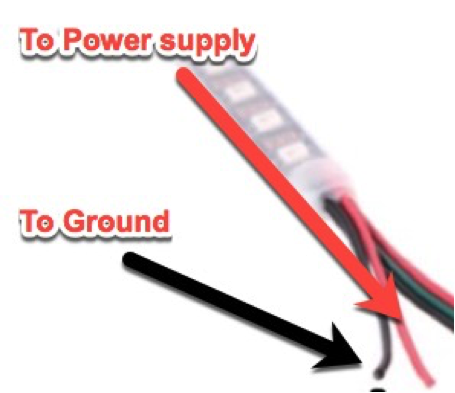
Connect the red wire to the positive lead of the power supply ( voltage required for your strip, it will say on it )
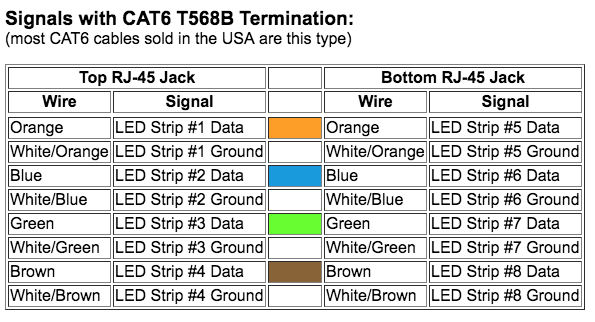
You will connect the RJ45 cable to the jack on the right side of the OCTO2811

Here's what the Strip arrangement should look like
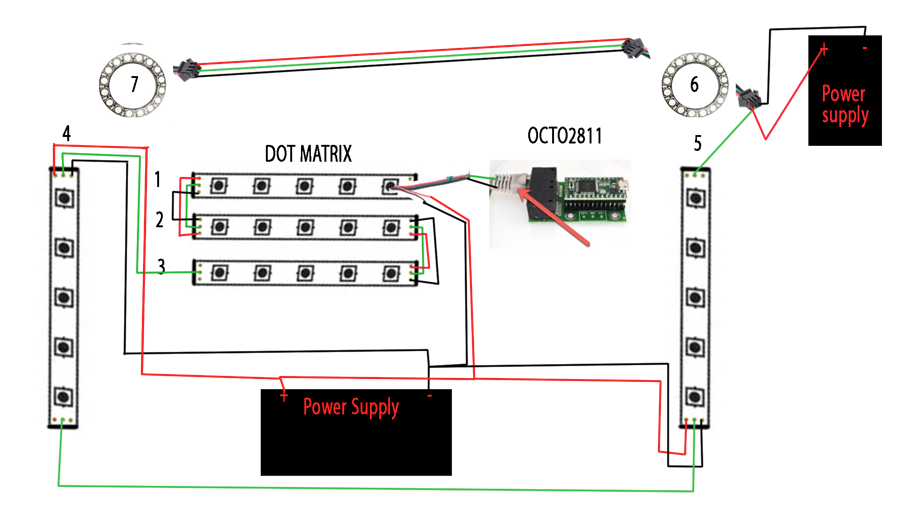
( ***** The Power supply near # 6 is the same one as shown on the bottom. We placed it there to make the drawing easier to read. )
PART 3 ( The software )
***You have to have a fully functional DOF setup before setting this up ***
We need a few software to run our addressable led strips
- Arduino
- Teensyduino
- Teensystripcontroller
- DOF ( Direct output framework )
We have links in our download section for your convenience. ( http://mameinabox.com/downloads/ )
Install the Arduino software first, then the Teensy duino.
Extract the Zipped Teensystripcontroller and rename the folder TeensyStripController-master to TeensyStripController
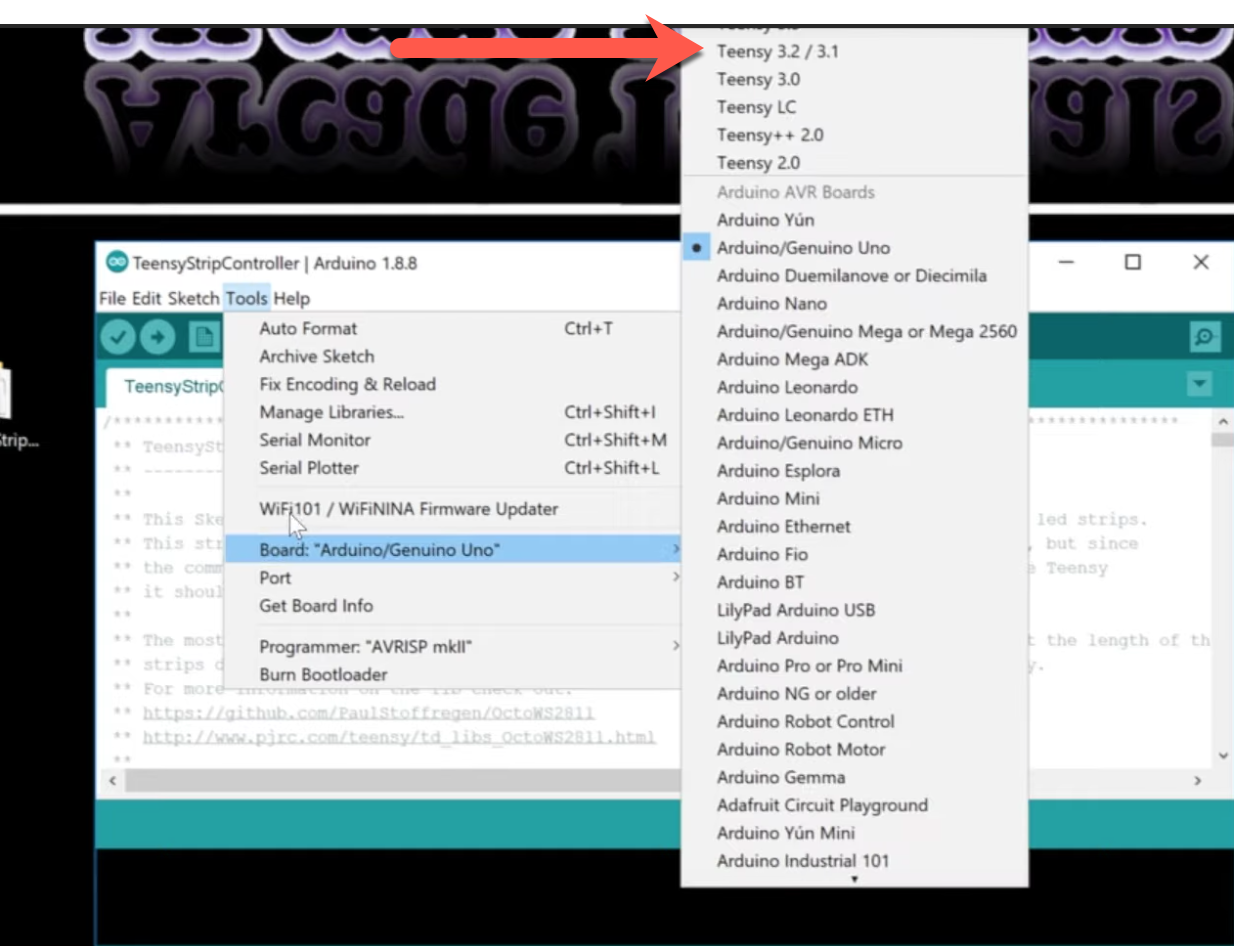
Open The Teensy Software and select the board Teensy 3.1/3.2
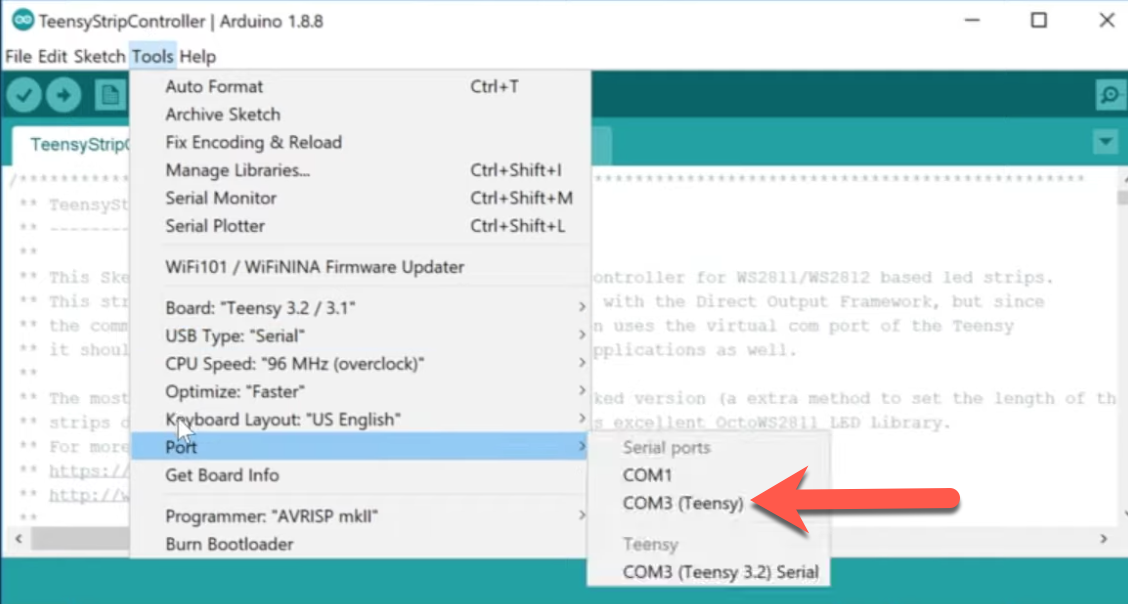
And take note of the port as you will need it for the cabinet.xml
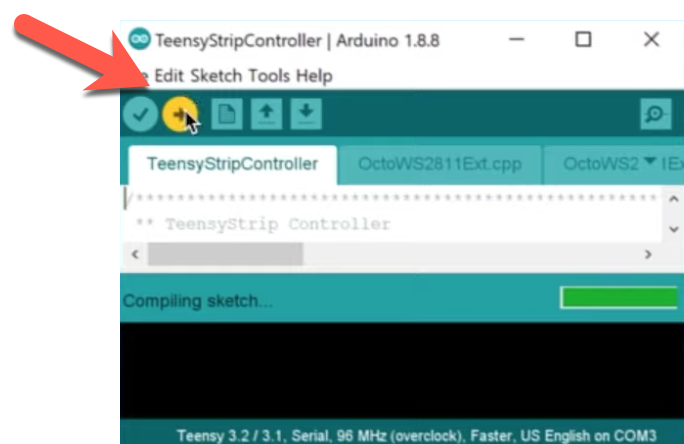
Now we are ready to send the software to the arduino.
Open the TeensyStripController Arduino file and send to your Arduino by pressing the upload button.
PART 4 ( The cabinet file )
Your Cabinet will need the following to work with addressable led
- Cabinet.xml
- GlobalConfig.xml
- GlobalConfig_B2SServer.xml
The cabinet will not get created or can not be automatically generated. You have to start from a sample or make your own.
here you can find a link to our cabinet.xml
Here's the code we used for our cabinet
<?xml version="1.0"?>
<Cabinet xmlns:xsi="http://www.w3.org/2001/XMLSchema-instance" xmlns:xsd="http://www.w3.org/2001/XMLSchema">
<Name>MajorFrenchy</Name> ( Name of your cabinet )
<OutputControllers>
<TeensyStripController>
<Name>LedStripController</Name>
<NumberOfLedsStrip1>599</NumberOfLedsStrip1> ( # of total LED's in your cabinet )
<NumberOfLedsStrip2>0</NumberOfLedsStrip2>
<NumberOfLedsStrip3>0</NumberOfLedsStrip3>
<NumberOfLedsStrip4>0</NumberOfLedsStrip4>
<NumberOfLedsStrip5>0</NumberOfLedsStrip5>
<NumberOfLedsStrip6>0</NumberOfLedsStrip6>
<NumberOfLedsStrip7>0</NumberOfLedsStrip7>
<NumberOfLedsStrip8>0</NumberOfLedsStrip8>
<ComPortName>COM6</ComPortName> . ( Teensy COM port )
</TeensyStripController>
</OutputControllers>
<Toys>
<LedStrip>
<Name>BackBoard</Name> ( Name of your dot matrix )
<Width>32</Width> ( # of LED width of the matrix )
<Height>8</Height> ( # of LED for the height of the matrix )
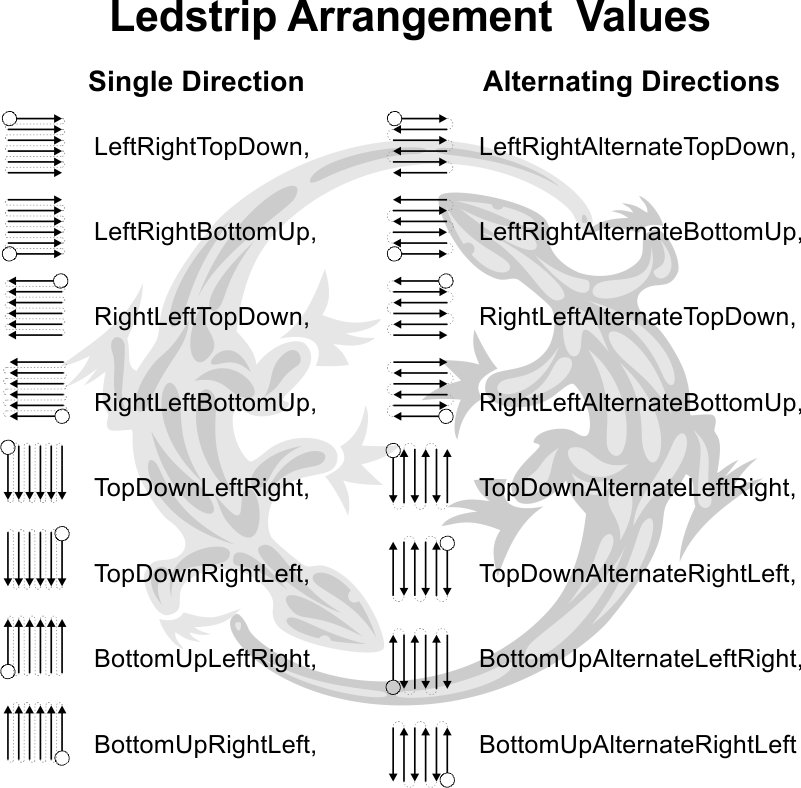
<LedStripArrangement>TopDownAlternateLeftRight</LedStripArrangement> ( This is basically the direction the led are travelling on the strip ) LED Arrangement see picture in post below ) )
<ColorOrder>GRB</ColorOrder>
<FirstLedNumber>1</FirstLedNumber> ( first LED # in the array )
<FadingCurveName>SwissLizardsLedCurve</FadingCurveName>
<OutputControllerName>LedStripController</OutputControllerName>
</LedStrip>
<LedStrip>
<Name>Sideboard Right</Name>
<Width>1</Width>
<Height>134</Height>
<LedStripArrangement>TopDownRightLeft</LedStripArrangement>
<ColorOrder>GRB</ColorOrder>
<FirstLedNumber>257</FirstLedNumber> ( 1st LED in the array, we had 256 in the previous, this one is then 257 )
<FadingCurveName>SwissLizardsLedCurve</FadingCurveName>
<OutputControllerName>LedStripController</OutputControllerName>
</LedStrip>
<LedStrip>
<Name>Sideboard Left</Name>
<Width>1</Width>
<Height>134</Height>
<LedStripArrangement>BottomUpLeftRight</LedStripArrangement>
<ColorOrder>GRB</ColorOrder>
<FirstLedNumber>401</FirstLedNumber>
<FadingCurveName>SwissLizardsLedCurve</FadingCurveName>
<OutputControllerName>LedStripController</OutputControllerName>
</LedStrip>
<LedStrip>
<Name>Ring Left</Name>
<Width>1</Width>
<Height>24</Height>
<LedStripArrangement>BottomUpLeftRight</LedStripArrangement>
<ColorOrder>GRB</ColorOrder>
<FirstLedNumber>545</FirstLedNumber>
<FadingCurveName>SwissLizardsLedCurve</FadingCurveName>
<OutputControllerName>LedStripController</OutputControllerName>
</LedStrip>
<LedStrip>
<Name>Ring Right</Name>
<Width>1</Width>
<Height>24</Height>
<LedStripArrangement>TopDownRightLeft</LedStripArrangement>
<ColorOrder>GRB</ColorOrder>
<FirstLedNumber>569</FirstLedNumber>
<FadingCurveName>SwissLizardsLedCurve</FadingCurveName>
<OutputControllerName>LedStripController</OutputControllerName>
</LedStrip>
<LedStrip>
<Name>car</Name>
<Width>1</Width>
<Height>7</Height>
<LedStripArrangement>TopDownRightLeft</LedStripArrangement>
<ColorOrder>GRB</ColorOrder>
<FirstLedNumber>593</FirstLedNumber>
<FadingCurveName>SwissLizardsLedCurve</FadingCurveName>
<OutputControllerName>LedStripController</OutputControllerName>
</LedStrip>
<LedWizEquivalent>
<Name>LedWizEquivalent 30</Name>
<Outputs>
<LedWizEquivalentOutput>
<OutputName>BackBoard</OutputName>
<LedWizEquivalentOutputNumber>1</LedWizEquivalentOutputNumber> ( These are the ports used on the LED-wiz, Each strip uses 3 Ports )
</LedWizEquivalentOutput>
<LedWizEquivalentOutput>
<OutputName>Sideboard Right</OutputName>
<LedWizEquivalentOutputNumber>4</LedWizEquivalentOutputNumber>
</LedWizEquivalentOutput>
<LedWizEquivalentOutput>
<OutputName>Sideboard Left</OutputName>
<LedWizEquivalentOutputNumber>7</LedWizEquivalentOutputNumber>
</LedWizEquivalentOutput>
<LedWizEquivalentOutput>
<OutputName>Ring Left</OutputName>
<LedWizEquivalentOutputNumber>10</LedWizEquivalentOutputNumber>
</LedWizEquivalentOutput>
<LedWizEquivalentOutput>
<OutputName>Ring Right</OutputName>
<LedWizEquivalentOutputNumber>13</LedWizEquivalentOutputNumber>
</LedWizEquivalentOutput>
<LedWizEquivalentOutput>
<OutputName>car</OutputName>
<LedWizEquivalentOutputNumber>16</LedWizEquivalentOutputNumber>
</LedWizEquivalentOutput>
</Outputs>
<LedWizNumber>30</LedWizNumber>
</LedWizEquivalent>
</Toys>
</Cabinet>
Once your cabinet.xml is set, it will be placed in the C:/DirectOutput/Config
Run Global Config in the DirectOutput folder and point to your cabinet file. You will then save as GlobalConfig.xml in the C:/DirectOutput/Config.

You will need to save as again and name it GlobalConfig_B2S.Server and save it in the same location.
***** Extra ******
if you wish to have the dot matrix effects enabled you will have to Save as a 3rd time and call the file GlobalConfig_PinballX.
Run RegisterDirectOutputcomobject as administrator and you should get a positive confirmation that DOF is running.
You are Done. Again we have more details in the video.
---------- Some additional info on our site: https://mameinabox.c...ddressable-led/
Here's a list of all Virtual Pinball Tutorials we have on our channel:
- Pinball History: https://www.youtube....h?v=yvS6slWbBh4
- Parts list: https://www.youtube....v=pPA0OhFuBBg
- Cabinet restoration: https://www.youtube....h?v=ikYdxunVAE8
- Cabinet Priming ,paint and repairing front coin door: https://www.youtube....v=KEiOHisq_Xk
- Removing rust from Pinball Parts ( The easy way ) : https://www.youtube....h?v=m3NnLbISG5U
- Self adhesive vinyl installation ( Decals ) : https://www.youtube....h?v=mnNZZ1BQM0A
- Installing cross supports and contactors: https://www.youtube....h?v=EAT64hAlM-g
- Installing components mounting board : https://www.youtube....h?v=8l3vYTZgX8U
- Building the DMD with a CNC machine : https://www.youtube....v=TxMS4UInSm4
- Setting up Addressable LED ring in speaker grill: https://www.youtube....h?v=-zvSngqQz24
- Setting up Dual Monitor in the Back box: https://www.youtube....v=qekSVIv0QlA
- Installing Diode on toys: https://www.youtube....h?v=NyzH1pVlWX0
- Wiring contactor, Fuses and power step down: https://www.youtube....h?v=7Lx1n6cJ-g8
- Installing buttons in the cabinet: https://www.youtube....h?v=rVnDZkJR4sg
- Installing digital plunger Kit: https://www.youtube....h?v=aeLVIH5NPjM
- Computer hardware and software the essentials: https://www.youtube....v=EkDcCitfKJY
- Direct Output Framework ( DOF ) setup: https://youtu.be/qbfe12eL9_Y
- Led-wiz: https://youtu.be/cxieZfF1lrQ
- Saintsmart Board: https://youtu.be/zj8qWDqQhgI
- Setting up Visual Pinball: https://www.youtube....v=SN3S6RtTko0
- Setting up Future Pinball: https://www.youtube....v=itsxm2E8vQQ
- Xpadder: https://www.youtube....v=2Kohl6KHP80
- Pinball Arcade: https://www.youtube....v=mYqM8jRhF08
- DOF Config Overview: https://www.youtube....h?v=OR-CX1Xbu7U
- Roms: https://www.youtube....?v=Y3GHdaueCMY
- Pinball FX3: https://www.youtube....?v=xf2kafUfNGc
- Setting up Pinball X: https://www.youtube....?v=zRhNhlpiq_o
- Future DMD: https://www.youtube....h?v=P7_vA8CHoNk
- Setting up BAM ( Better Arcade Mode ) https://www.youtube....h?v=FcF4SphaBW4
- Connecting a Gear motor: https://www.youtube....h?v=j6o5fRiqQGg
- DOFLINX: https://www.youtube....?v=-BwxsyvU-Y8
- Installing a shaker motor: https://youtu.be/DMwRbsBr_oM
- Installing a Knocker: https://www.youtube....h?v=4XLD2l4DlE0
- Setting up Ultra DMD: https://www.youtube....?v=-igS-TuwVWQ
Best regards
Major Frenchy
Edited by MajorFrenchy, 13 February 2020 - 11:54 PM.


 are all trademarks of VPFORUMS.