Jump to content


Photo

90's Workshop: Buildin' The Table


  • Please log in to reply
369 replies to this topic

#101 ynneBBenny

ynneBBenny

    Benny

  • Charter Member
  • 419 posts
  • Location:Melbourne Australia

  • Flag: Australia

  • Favorite Pinball: Fire Power

Posted 25 May 2009 - 11:04 PM

QUOTE
WWW,
As for speed/time, the Video was quicker, but for me difficulty was a little bit more. I'm trying not to mess up and say the usual "ummmm" kind of thing too much, etc. I did mess up a few times with the instructions and the mention of the CTRL key but I think all in all it's OK (just goes to show you that I didn't rehearse it first).


WOW 25 video views in 24 hours, just goes to show hey.
Umms and errrs ae just like dead pixels on a new monitor. They are enevitable, but doesnt stop a great product from been shipped out. Most people never notice the dead pixels, nor the ummms and errrrs, they are more interested in the big picture.

#102 wtiger

wtiger

    Pinball Fan

  • VIP
  • 1,148 posts
  • Location:Los Angeles, CA

  • Flag: United States of America

  • Favorite Pinball: Junkyard


Contributor

Posted 26 May 2009 - 12:22 AM

WWW,
Thanks again. I'll make another video this coming week for the plastics we will build on the table.

I've been playing around today with the plastics and placing them on my guide image. I believe I figured out where they all go (I'm still not 100% sure about the upper left one though, but I didn't really see any other place where it goes). Below is an image you can use to show where the different pieces go:


Here's the two images I used as a source:


I have to admit, I kind of jumped ahead of myself (and the class). Here's a little teaser of how things will look once we add all the plastic and the apron. NOTE: The plastics are not perfect as some of the edges need to be adjusted in our source guide image as well as my VP objects and the graphic used for the apron is not the greatest, but you'll get the idea of how the overall table will look:


#103 wtiger

wtiger

    Pinball Fan

  • VIP
  • 1,148 posts
  • Location:Los Angeles, CA

  • Flag: United States of America

  • Favorite Pinball: Junkyard


Contributor

Posted 28 May 2009 - 04:19 AM

Let's build the plastics...

I made a video tutorial that should be posted soon by Noah for the steps I go through to take the image that the plastic pieces were placed in and load it into our table and start building the plastic objects. Below is the .psd file that contains all the plastic piece images on separate layers that you can load into The Gimp and play around with. If you happen to have any images that are of better quality you can replace that particular piece in the .psd file and then re-save the file. Don't forget to save a copy as a .jpg to load into your table. I've also posted the .jpg image too in case you are only interested in obtaining that image for your use.

PSD file:

http://www.mediafire...de_plastic1.zip


JPG image:


I'll post a short text of what's in the video tutorial in the next day or so.

Edited by wtiger, 19 February 2010 - 06:59 PM.


#104 faralos

faralos

    VPF Veteran

  • Members
  • PipPipPipPipPipPip
  • 7,838 posts
  • Location:Eastern Pa,USA

  • Flag: United States of America

  • Favorite Pinball: Flash (Williams) 1979, Flash2 Updated


  • Trophies:

Posted 28 May 2009 - 11:10 PM

I still don't even have Gimp installed yet, so can't play around with anything yet. My dad was recently diagnosed with lung cancer and most of my free time in the past few weeks was taken up with finding transportation for him to and from the hospital for his radiation therapy and chemo. I haven't gotten past posts and rubbers yet! So I guess I'm left in the dust so to speak. I'll plod along at my own pace since I'm so far behind anyhow. but without knowing this gimp program, I don't see me going much further with it. It does look interesting, but I have too much else to worry about atm. Thanks though for all the help you have given me here and in past projects.
"Don’t let the noise of others’ opinions drown out your own inner voice.
And most important, have the courage to follow your heart and intuition.”
----Steve Jobs


#105 wtiger

wtiger

    Pinball Fan

  • VIP
  • 1,148 posts
  • Location:Los Angeles, CA

  • Flag: United States of America

  • Favorite Pinball: Junkyard


Contributor

Posted 30 May 2009 - 05:57 PM

This is the text version of the video tutorial that was posted a few days ago. This tutorial goes over the steps to go from your plastic image in The Gimp to creating the plastic objects in VP.

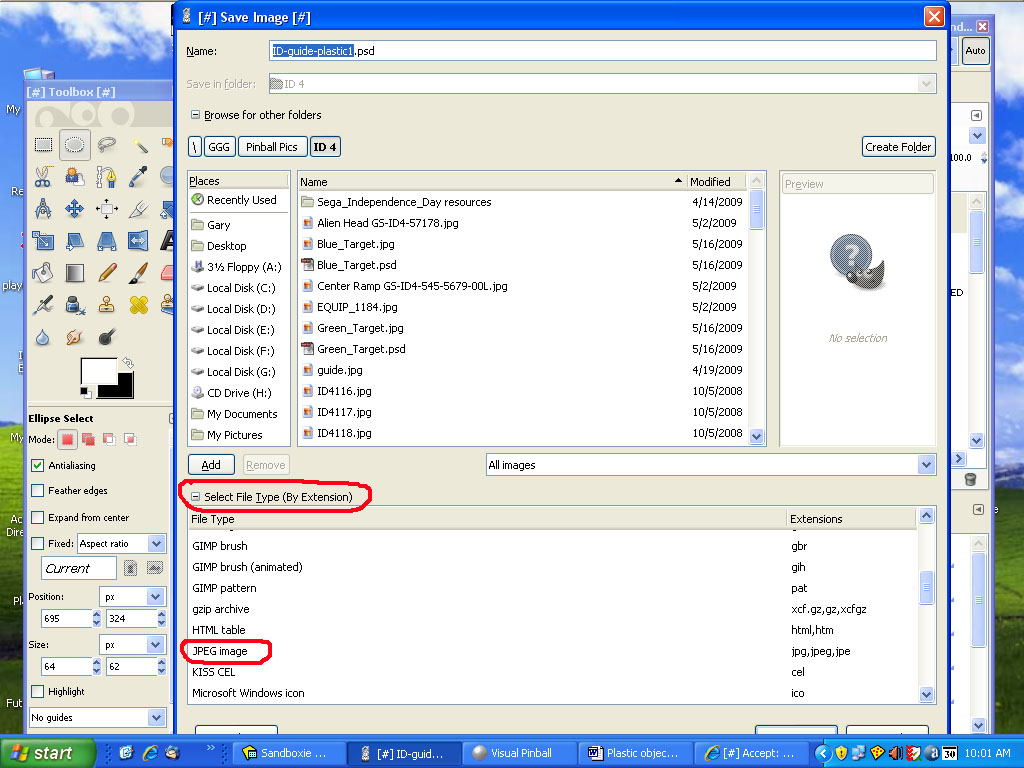
The first thing we need to do is take our plastic image with all the different layers for each plastic piece and save it as a .jpg image. To do this from within The Gimp you go to the File menu, Save As. In the dialog box that comes up click on the little square in front of Select File Type and then select JPEG:


You can name the file ID-Plastic1 and it will automatically append the .jpg to the end. In case anyone needs either the plastic image file with all the layers or the .jpg image so they don’t have to save it themselves, you can get them right below:

PSD file:

http://www.mediafire...de_plastic1.zip


JPG image:


Now what we want to do is start up 
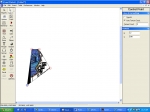
VP and load in your working ID table. Import the plastic .jpg image in (Table, Image Manager, Import). Set the table image to this image. Your table should look like this in the editor:


We will create the one indicated by the red arrow.

I often find it easier to build the plastic pieces on a clean table without any other objects, then simply copy and paste them into my working table. To set this up, create a new table within VP (File, New). Delete all the objects on this new table and turn off Show Grid. Import the plastics image just like you did before and set the table image under Colors and Formatting to this image. We need to set the table width and height to match our working table. The width should already be 1000 but we need to change the height to 2300 (this is under the table physics section).

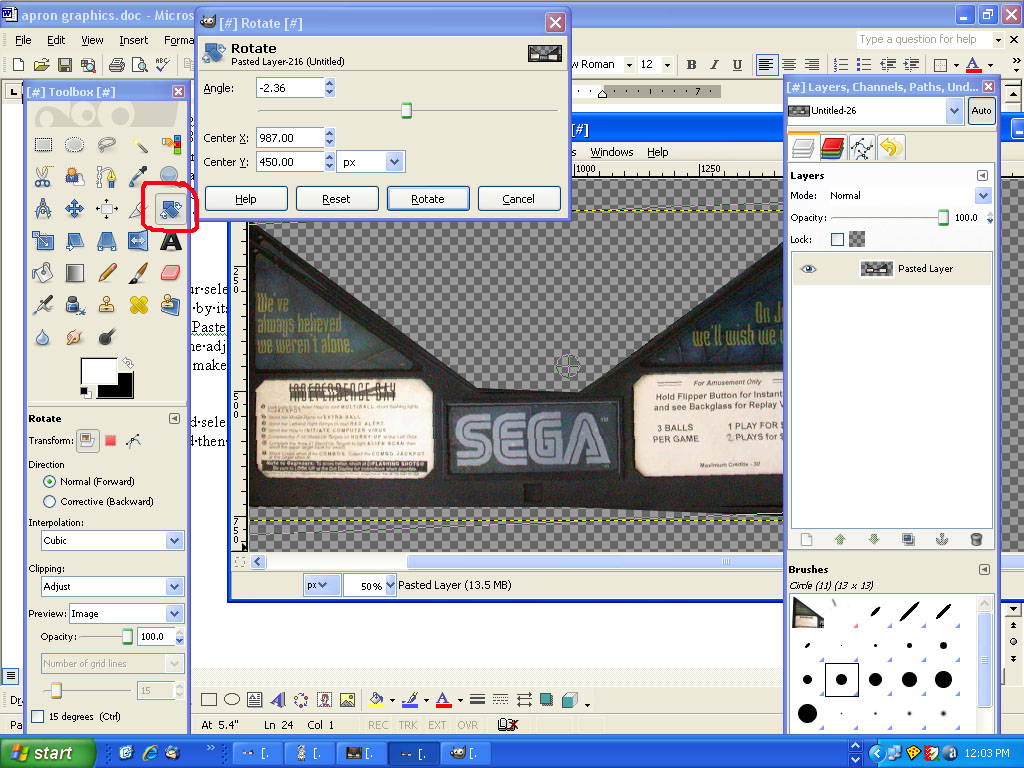
Add a wall image on top of the plastic piece and set the wall’s top image to the plastic image. Turn on display image in editor:


Now turn off the plastic image for the table:


Now move the two bottom control points so you can see where the bottom of the plastic piece is:


Start moving the points into position and add new points where needed:


Continue until you are done. Some points may need to be set to smooth (right click on the point and left click on smooth):


When you are all done, your object should look like this:


To get the piece into our table, simple select it by clicking on it, copy it (CTRL-C or Edit Menu Copy) then go to the Window Menu and select your working table to switch over to it:


Now simply hit paste (CTRL-V or Edit Paste):


The object pastes in exactly in the same position. Change the wall top height to 55, bottom height to 50. You can now turn off the display in editor for the object and switch the table image over to the actual playfield image:
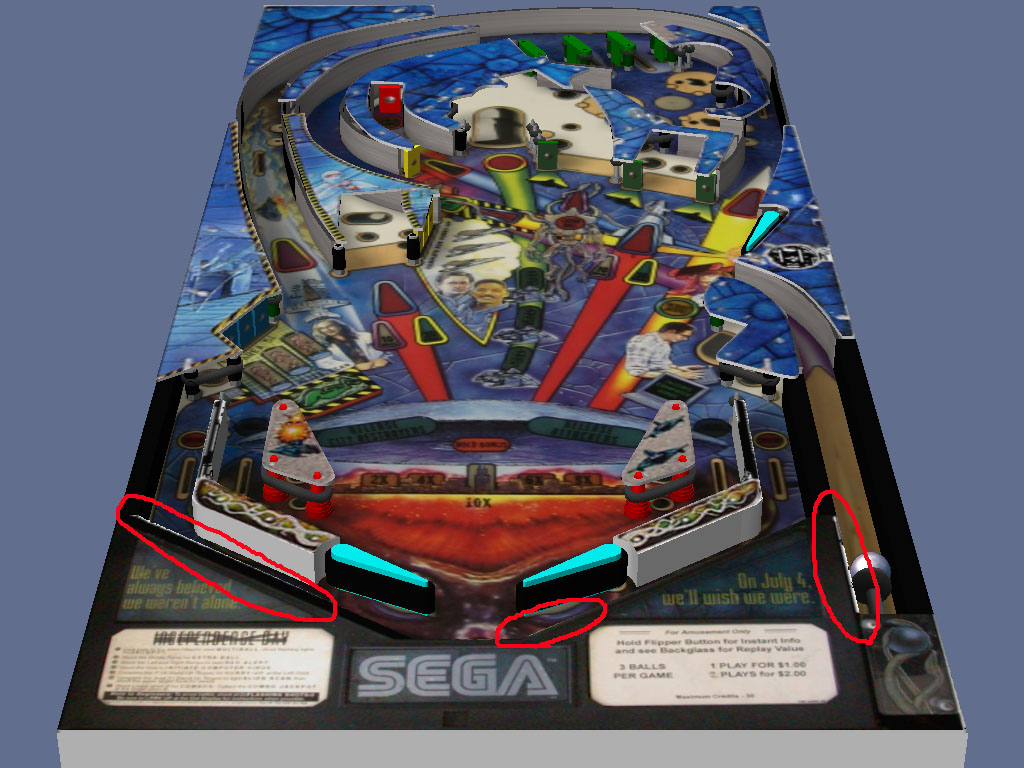


Here’s how it looks when you hit play:


Complete the same process for the rest of the plastic pieces.

Note: You may notice that as you build the plastic pieces they may not line up with the metal guides that were already built on the table. You can go ahead and re-shape the plastic objects to match. This may cause the edges to not have the edge of the plastic image. You may need to go back into The Gimp and extend some of the edges for individual plastic pieces by making that particular layer wider (scale it a little bigger). You will just need to experiment.

#106 wtiger

wtiger

    Pinball Fan

  • VIP
  • 1,148 posts
  • Location:Los Angeles, CA

  • Flag: United States of America

  • Favorite Pinball: Junkyard


Contributor

Posted 30 May 2009 - 08:56 PM

Time to move on to the apron graphics. First we need to find an image to use as a source. I’ve chosen the DSCN1384 image in the Independence Day resources that Destruk posted. Load this image into The Gimp. The image is upside down so we need to orient it correctly. Go to the Image Menu, Transform, Rotate 180 degrees. Now it’s showing properly. Using the Free Select Tool (the one that looks like a rope) we will trace around the edges of the image we want:


Now we need to distort our selection to it’s edges are straight. I found it was easier to work on it in a new image by itself. With the portion we want still selected, copy it (Edit Copy or CTRL-C). Then Paste As and select New Image. We will use the Rotate, Perspective, and Shear tools to make the adjustments. So that we don’t cut off any of the edges when using those tools, we will make our canvas bigger so we have a large border around our image.

Go to the Image Menu and select Canvas Size. Enter 900 for the height (the width will automatically change) and then click on the Center button, then click on Resize:


Let’s use the Rotate tool to make the bottom edge straight. Click on the Rotate tool and click and drag towards the bottom left of the image moving the mouse down until the bottom edge of our image is level:


Now use the Shear tool to adjust the right side of the image so the right edge is in a straight line by mouse clicking a little inside the right edge and dragging to the right a bit:


If necessary use the perspective tool on the left edge to make sure it is straight.

You can save the image once you are satisfied that it is straight all around. Save it in the native Gimp format. Now load in your ID-Plastic1.psd file that has all the plastic layers. We will add our apron image as a new layer. Switch back over to the apron image and do a select all (CTRL-A). Switch over to your plastic image and Paste As then New Layer.

Select the Scale tool and scale the apron layer by about 85% then move it approximately into place:


Now set the transparency to about 50% and continue to scale and move into place so it aligns pretty close to the apron image in our plastics file that was imported from the manual:


Make sure when you are all done that you turn back up the transparency to 100%. Re-save your image (maintaining the .psd format with layers). Now save a copy of the image out as a .jpg (this one will be used to re-import back into VP).

Switch over to your table in VP (or start VP and load in your table if you haven’t already). We now want to import the new ID-Plastic1.jpg image that we’ve added the apron image to. You can use the Table, Image Manager, Reimport button to accomplish this. Once the new image is loaded in click on your apron object and select the ID-Plastic1 image as the top image. Adjust these two points (move them both up, then move the right to the right and the left to the left) so that they are on the edge of our apron image:


They should look like this when done:


Click on the play button and see how things look:


As you can see in the image above, we have some spots that are showing white. Go back into The Gimp and using your ID-Plastic1.psd image with the layers, extend the edges of the apron layer by using the clone tool, copy and paste selection, or painting black. Re-save your .psd file and then re-save a .jpg copy. Reimport the new .jpg file back into VP and things should be fixed.


#107 neoblood

neoblood

    Enthusiast

  • Charter Member
  • 381 posts
  • Location:USA

  • Flag: United States of America

  • Favorite Pinball: bop

Posted 30 May 2009 - 09:21 PM

I just wanted to post an update to my progress. I'm caught up to post #93 atm and hope to get another chunk done this weekend. Thanks! This is getting fun! dblthumb.gif
A Pinball a day takes the boredom away

#108 wtiger

wtiger

    Pinball Fan

  • VIP
  • 1,148 posts
  • Location:Los Angeles, CA

  • Flag: United States of America

  • Favorite Pinball: Junkyard


Contributor

Posted 31 May 2009 - 12:13 AM

QUOTE (neoblood @ May 30 2009, 02:21 PM) <{POST_SNAPBACK}>
I just wanted to post an update to my progress. I'm caught up to post #93 atm and hope to get another chunk done this weekend. Thanks! This is getting fun! dblthumb.gif


Cool!

I'll probably wait a few days and have some minor tweaks/additions, then I think we will start the ramps.

If anyone needs it, here's my latest ID-Plastics1.psd file which has the apron image (8mb):

http://www.savefile.com/files/2121410

Try not to use it unless absolutely necessary!

#109 1up

1up

    Enthusiast

  • Charter Member
  • 192 posts
  • Location:Adelaide, Australia

  • Flag: Australia

  • Favorite Pinball: monopoly

Posted 31 May 2009 - 12:23 AM

here's my update also, i'm probably a few steps behind also as i've had a flat out week at work, but give me a day or two and i should be back on track again. also thanks for taking the time to go through this step by step wtiger!

#110 wtiger

wtiger

    Pinball Fan

  • VIP
  • 1,148 posts
  • Location:Los Angeles, CA

  • Flag: United States of America

  • Favorite Pinball: Junkyard


Contributor

Posted 31 May 2009 - 01:32 AM

QUOTE (1up @ May 30 2009, 05:23 PM) <{POST_SNAPBACK}>
here's my update also, i'm probably a few steps behind also as i've had a flat out week at work, but give me a day or two and i should be back on track again. also thanks for taking the time to go through this step by step wtiger!


You're welcome! Glad to hear your progress as well.

#111 kruge99

kruge99

    Pinball Wizard

  • VPF Staff
  • 3,901 posts
  • Location:Markham, Ont.

  • Flag: Canada

  • Favorite Pinball: Black Knight, High Speed and Pin*Bot


Posted 31 May 2009 - 10:35 PM

Hi Everyone,

My name is Todd and I've been following the 90's workshop tutorial since around Tuesday last week when I decided after 9 years of playing visual pinball that it was time I learned something more about it aside from just being able to play visual pinball. I joined the 90's workshop by random choice and I'm glad I did. I have never used graphics tools like photoshop or the gimp before and everything I've read so far has been incredible. I am caught up to the point where I've added the apron to the table and I can't wait for the next step in the project. Here is a screenshot of what my table looks like so far.


Some of you may have seen my "plea for help" in the VP9 forum and I have made some progress since that time. I have even received some help from Wtiger on how to use the clone tool in gimp to improve the look of my table somewhat. Well that's all for now. Take care everyone!


Best Regards,
Todd.

Edited by kruge99, 11 July 2009 - 01:17 PM.

[proud owner of a Williams Solar Fire]

- It's called "The American Dream" because you have to be asleep to believe it.
George Carlin
- Truly great madness cannot be achieved without significant intelligence.
Henrik Tikkanen
- "Reality check, Michelle, Talk about composure, Total lack of. He's a man-- About-- 12 Feet Tall--"
Carrie Kelly
Posted Image

#112 kruge99

kruge99

    Pinball Wizard

  • VPF Staff
  • 3,901 posts
  • Location:Markham, Ont.

  • Flag: Canada

  • Favorite Pinball: Black Knight, High Speed and Pin*Bot


Posted 03 June 2009 - 01:17 PM

Hey everyone, here's my table on youtube:


Best Regards,
Todd.

[proud owner of a Williams Solar Fire]

- It's called "The American Dream" because you have to be asleep to believe it.
George Carlin
- Truly great madness cannot be achieved without significant intelligence.
Henrik Tikkanen
- "Reality check, Michelle, Talk about composure, Total lack of. He's a man-- About-- 12 Feet Tall--"
Carrie Kelly
Posted Image

#113 wtiger

wtiger

    Pinball Fan

  • VIP
  • 1,148 posts
  • Location:Los Angeles, CA

  • Flag: United States of America

  • Favorite Pinball: Junkyard


Contributor

Posted 05 June 2009 - 03:19 AM

I will hopefully post the next class exercise tomorrow.

#114 kruge99

kruge99

    Pinball Wizard

  • VPF Staff
  • 3,901 posts
  • Location:Markham, Ont.

  • Flag: Canada

  • Favorite Pinball: Black Knight, High Speed and Pin*Bot


Posted 05 June 2009 - 10:26 AM

I can hardly wait for the next topic! I tried placing generic ramps to get an idea about how they work but I always deleted them because I just couldn't get them right. Also, I have noticed intermittently that visual pinball definitely has rendering issues with my ATI cards. Basically, stuff that has been resized, like the flippers or perhaps if anyone has tried putting bumpers on their table, the object "functions" but the picture/color that is rendered on top of the bumper is a transparent "fish-net" is the best way to describe it. Sometimes it's there, sometimes it's not. Sometimes, deleting the object and replacing it with another fixes it temporarily. i'm not complaining!! just providing info in case others experience similar issues.


Best Regards,
Todd.
[proud owner of a Williams Solar Fire]

- It's called "The American Dream" because you have to be asleep to believe it.
George Carlin
- Truly great madness cannot be achieved without significant intelligence.
Henrik Tikkanen
- "Reality check, Michelle, Talk about composure, Total lack of. He's a man-- About-- 12 Feet Tall--"
Carrie Kelly
Posted Image

#115 wtiger

wtiger

    Pinball Fan

  • VIP
  • 1,148 posts
  • Location:Los Angeles, CA

  • Flag: United States of America

  • Favorite Pinball: Junkyard


Contributor

Posted 06 June 2009 - 03:42 AM

When you launch the ball, it should move freely up and across the table and end up in the lane guides at the top of the table:


If the ball doesn’t flow like the arrows in the above image, you will need to adjust the two end points on the upper shooter lane wall object (in the area that is circled above) until the ball flows properly. In order to adjust the points, you will probably need to move the plastic object out of the way to make it easier. You can accomplish this by right clicking on the plastic object and select translate. Translate it 100 units in the X direction. When you are all done you simply translate it -100 units in the X direction and it will move back into place.


Now let’s add a gate object at the end of the shooter lane. This will prevent the ball from coming back down the lane. Add the object to approximately where it needs to go. Change the length to 60 and the rotation to -60:


Now we’ll make some screws. Add a light object down near the plunger but off to the right of your table:


Set the radius to 8. Now go to one of the circle objects that make up one of the pegs and copy it and paste it near the light object. Make sure that the side visible is on (most of the various peg circle object have it turned off). Scale this new circle object to match the size of your 8 radius light. Set the top and bottom colors to a medium silver (Red=192, Blue=192, Green=192). Set the bottom height to 50 and the top height to 54.

Add another light object and set it’s radius to 5. Add 9 light objects of radius 1 (use a different color than the default yellow so they will show up) in a cross pattern in the center of the 5 radius light. Now make a wall object that forms the cross shape. Set the top and bottom colors to black and the bottom height to 54 and the top height to 55.


Now move the cross object into the circle object. Copy both objects and paste four copies in the areas that are circled in the image below:


For proper placement of the two in the apron area, you make want to click on the apron object first and select the display image in editor option so you can see exactly where to place the screws. When you are done, turn off the display image in editor (otherwise things will move slowly when working in the editor).


Let’s add the three bumpers. Download the following BMP image:


Import the image into your table and set the transparency to white. Add three bumper objects to your table at the following X and Y positions:

X=685.5, Y=410
X=852.5, Y=300
X=867.5, Y=492

Set all three to color white and to use the bumper-clear image. Set the force to 7:


I think it’s time to change the ball. Download the following image and import it into your table:


Click in your table and set the ball image to this image we just imported:


One final thing. Let’s fix the lower lane guides. Start with the left. Click on it to select it:


Change the bottom height to 48 (leave the top height at 50). Now copy it, and paste a new copy. The new copy is not selected. Change the bottom height to 26 and the top to 29. Change the top image to none and select a medium silver for both top and side colors. Do the same for the right lane guide.

If you want to get fancy, you can add three circle objects to each guide that go from bottom height 0 to top height of 50 and make them a dark silver color. You can even add screws to the tops as well (scale them down by .80):


Here’s how your table should look:


I think that’s it for now…


#116 wtiger

wtiger

    Pinball Fan

  • VIP
  • 1,148 posts
  • Location:Los Angeles, CA

  • Flag: United States of America

  • Favorite Pinball: Junkyard


Contributor

Posted 07 June 2009 - 02:21 AM

I'm working on the ramps right now. I suck at ramps and hate them with a passion. This table has quite a few places where you have to make sure the height is high enough to allow the ball to be able to roll on the ramp below. Good thing there is already an ID table as I am studying it quite a bit as to how the ramps were done. I'm somewhat close as all three ramps seem to work now without any balls getting stuck. There are quite a few times where the ball jumps off the ramps (possibly can be fixed with the max ball speed that JP mentioned and a few walls at the entry to the ramps).

Here's how things are looking so far. I will probably need to take a few more days then I will go over how to create them.


#117 neoblood

neoblood

    Enthusiast

  • Charter Member
  • 381 posts
  • Location:USA

  • Flag: United States of America

  • Favorite Pinball: bop

Posted 07 June 2009 - 02:34 AM

It's looking great wtiger. Take all the time you need. I'm distracted on some other things atm but am catching up a little bit. This exercise will definitely be one that will improve all our skills and understanding biggrin.gif
A Pinball a day takes the boredom away

#118 wtiger

wtiger

    Pinball Fan

  • VIP
  • 1,148 posts
  • Location:Los Angeles, CA

  • Flag: United States of America

  • Favorite Pinball: Junkyard


Contributor

Posted 07 June 2009 - 03:51 AM

Thanks neoblood. I decided to take a break from the ramps for a bit and decided to add the lockdown bar and side rails. My plan is to go over how to add these tomorrow. After that I'll work on the ramps some more. Here's a sneak peak at what's coming tomorrow (minus the ramps):


Table is angle independent (except for the ship at the momemt):


#119 kruge99

kruge99

    Pinball Wizard

  • VPF Staff
  • 3,901 posts
  • Location:Markham, Ont.

  • Flag: Canada

  • Favorite Pinball: Black Knight, High Speed and Pin*Bot


Posted 07 June 2009 - 06:49 PM

Indeed! I agree 100% neoblood, this is shaping up to one fancy table! It's looking excellent!! Great work wtiger!

Todd.

[proud owner of a Williams Solar Fire]

- It's called "The American Dream" because you have to be asleep to believe it.
George Carlin
- Truly great madness cannot be achieved without significant intelligence.
Henrik Tikkanen
- "Reality check, Michelle, Talk about composure, Total lack of. He's a man-- About-- 12 Feet Tall--"
Carrie Kelly
Posted Image

#120 kruge99

kruge99

    Pinball Wizard

  • VPF Staff
  • 3,901 posts
  • Location:Markham, Ont.

  • Flag: Canada

  • Favorite Pinball: Black Knight, High Speed and Pin*Bot


Posted 08 June 2009 - 01:35 AM

[in my sleep last night I figured out how to make this better - I'll work on it some more and upload another one soon.]

While I was waiting for the next lesson from wtiger, I decided to work a little bit on improving my skill with The GIMP so I spent some time improving the black and yellow "warning tape" that was around the edge of the plastics. I'm not sure if anyone will use it but here's a link to download a copy of the .JPG file.

here is the new version

and for comparison:

here is the old version


Todd

Edited by kruge99, 11 July 2009 - 01:20 PM.

[proud owner of a Williams Solar Fire]

- It's called "The American Dream" because you have to be asleep to believe it.
George Carlin
- Truly great madness cannot be achieved without significant intelligence.
Henrik Tikkanen
- "Reality check, Michelle, Talk about composure, Total lack of. He's a man-- About-- 12 Feet Tall--"
Carrie Kelly
Posted Image