since the last few lessons, there's a few questions i've been meaning to ask...
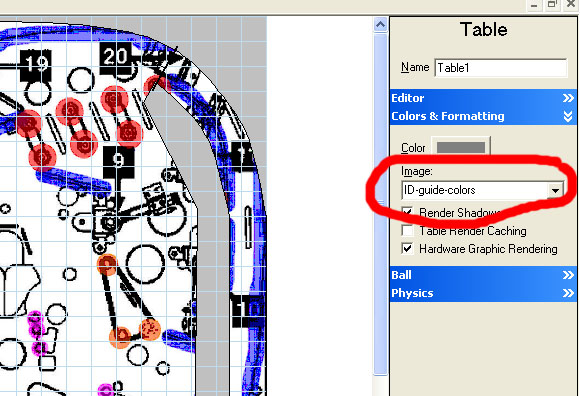
1. is there a rule of thumb about which playfield image to use from the manuals to measure and get the correct playfield size?
2. is there a list of all/most playfield width & height measurements or even a place to get this info? maybe someone has collected a list they'd be willing to share. this would be useful for any authors trying to do a pinball remake.
3. why does the playfield have to be saved in JPG format and not BMP or any other format? what would happen? and does any decal images have to be in JPG or can they be in BMP?
Answers as best I know them:
1. From what I remember from various posts the playfield images in manuals are not very accurate. I've never really compared several, so my guess would be it doesn't matter.
2. I have a text file from the old forum that has this information. See below.
3. A JPG image is a lot smaller than a BMP so your file size will be different. I kind of seem to remember something Destruk posted about possibly BMP files taking up less video card memory, but I'm not sure if I'm remembering correctly. For decal images if you want to have any transparency you need to save it in BMP. BMP is not compressed so your colors won't be changed when you save the file. JPG uses compression and is a a lossy format so you will lose some quality and if you painted a section with pure white so you could set the transparency to white in
VP, after you save the file your white may not be pure white anymore (it may look to you as white, but the hex value will be slightly off) and therefore
VP won't know that it is white and the transparency won't work.
Here's the info I have on playfield sizes. I'm not sure if the first part is from Scapino or someone else:
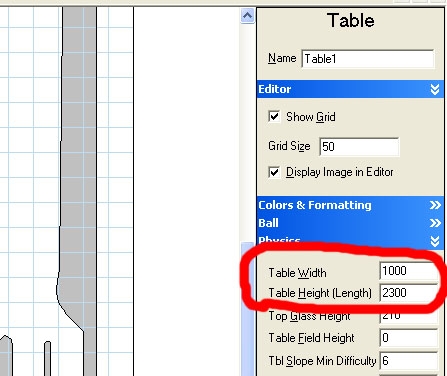
I did a little experiment, made a table 1000 units wide, had a ball roll to the flat bottom, copied to photoshop, and duplicated the balls from edge to edge along the bottom, and I came up with, based on the known fact that pinballs are 1 1/16" in diameter...
1000
VP units = 21.25" or 539.75 mm
therefore...
1 vp unit = .53975 mm
therefore...
Early Bally Wide body table playfield i.e. future spa is....
1167.2
VP Units Wide x 1908.3
VP units long.
Of coarse I could be wrong.
=========================================================
EMs
Bally 70s EM - standard = 20.25" x 41.00" = 952 x 1927 vpus = 506 x 1024 bestpic size
G 70s EM - standard = 20.25" x 41.00" = 952 x 1927 vpus = 506 x 1024 bestpic size
Early SSs
*G System 1 - standard = 20.25" x 42.00" = 952 x 1974 vpus = 494 x 1024 bestpic size
Early SS Stern - widebody = 23.875" x 45.00" = 1122 x 2115 vpus = 543 x 1024 bestpic size
Zaccaria - standard SS - 20.25" x 42.00" = 952 x 1974 vpus = 494 x 1024 bestpic size
*Pre WMS Bally - standard = 20.25" x 42.00" = 952 x 1974 vpus = 494 x 1024 bestpic size
*Pre WMS Bally - widebody = 26.75" x 40.50" = 1257 x 1904 vpus = 676 x 1024 bestpic size
*WMS System 1-11 - standard = 20.25" x 42.00" = 952 x 1974 vpus = 494 x 1024 bestpic size
WMS System 1-11 - widebody = 27.00" x 42.00" = 1269 x 1974 vpus = 658 x 1024 bestpic size
*Atari - widebody = 27.00" x 45.00" = 1269 x 2115 vpus = 614 x 1024 bestpic size
*G System 80 - standard = 23.75" x 46.50" = 1116 x 2186 vpus = 524 x 1024 bestpic size
*G System 80 - widebody = 26.75" x 46.50" = 1258 x 2186 vpus = 590 x 1024 bestpic size
Modern SSs
Capcom tables = 20.25" x 46.00" = 952 x 2162 vpus = 451 x 1024 bestpic size
*Data East - standard = 20.25" x 46.00" = 952 x 2162 vpus = 451 x 1024 bestpic size
Data East - widebody = 25.00" x 51.75" = 1175 x 2432 vpus = 494 x 1024 bestpic size
*Safecracker = 16.50" x 41.50" = 776 x 1950 vpus = 408 x 1024 bestpic size
*WPC (through 1987) - standard = 20.50" x 42.00" = 964 x 1974 vpus = 500 x 1024 bestpic size
*WPC (1987 on) - standard = 20.50" x 46.00" = 964 x 2162 vpus = 457 x 1024 bestpic size
**Apparently at least one of these is not like the others.. I measured the Drac PF and it was/is 20.25" x 45.00" = 952 x 2115 vpus = 461 x 1024 bestpic size
*WPC - superpin = 23.25" x 46.00" = 1093 x 2162 vpus = 518 x 1024 bestpic size
*Pin2K tables = 20.50" x 43.00" = 964 x 2021 vpus = 488 x 1024 bestpic size
---------------------------------------------
From WMS site
"Williams' standard playfield length increased from 42" to 46" in 1988"
===========================================================
just remember the ball=50 units=1.0625"=.54054mm and most any dimension should come out fine
===========================================================
Williams Varkon (1982)
24" across x 21" deep!
(Yes, it is wider than it is long. Plays like a cocktail table.)
===========================================================
According to the press info and documentation, the Hercules playfield took up 18 square feet, or 36 by 72 inches.
Actual cabinet size was 39" by 93", and 83" tall.
===========================================================
A few examples from Plumb's size conversion sheet:
-----------------------------------------------------------------
Pre WMS Standard Size Bally: 952 x 1974
Standard Williams through 1987: 964 x 1974
Standard Williams after 1987: 964 x 2162
Super Wide WPC: 1093 x 2162
===========================================================


 Contributor


 are all trademarks of VPFORUMS.