Jump to content


Photo
- - - - -

UWQHD (3440x1440) 21:9 Playfield Cabinet Build Log

21:9 UWQHD Cabinet Build Log

  • Please log in to reply
100 replies to this topic

#41 Itchigo

Itchigo

    Pinball Wizard

  • Members
  • PipPipPipPipPip
  • 2,773 posts
  • Location:Chicago, Illinois

  • Flag: United States of America

  • Favorite Pinball: All


  • Trophies:

Posted 13 December 2025 - 02:22 AM

Looking good Boltbait!!


Tesla, I still sport one of these... (after a new HDD and battery).


I agree with you (mostly).


That's why I try to up-cycle my old computers and devices into secondary roles (pinball cabinet, Kodi-boxes, etc.).


But it needs to be a viable solution and not something I have to keep jacking-with every year. It can't be an attack-vector or weak-spot in my network (as I have mission-critical computers running on the same network and using same accounts).


All technology and software moves forward and that's why it's even a thing. No reason to think what you ended-up with (Windows-7) is the "best final version of a Windows-OS".


Windows-11, is just Windows-10 v.2.0 ... Windows-10 is Windows-8 v2.0, etc.


Also, they are stepping-stones ... we would not have Intel-i9's today without Pentiums. No iPhone 16's without iPhone-3 or even first Macs.


img_20190919_185522347.jpg


Founder of Rogue Pinball! https://roguepinball.com/index.php                 Making Pinball great again!!


partylikeits1776-.jpg


#42 jarr3

jarr3

    Enthusiast

  • Platinum Supporter
  • 203 posts
  • Location:Frankfurt, Germany

  • Flag: Sweden

  • Favorite Pinball: Medieval Madness

Posted 13 December 2025 - 10:13 AM

Windows 10? That OS is already end of life, recommend you go Win 11, I just reinstalled and chose the Windows 11 IoT Enterprise 2024 Edition which omits a lot of bloatware in the first place, runs like a charm


And win 11 IoT LTSC has NO cpu or tpm restrictions…


Sent from my iPhone using Tapatalk

#43 jarr3

jarr3

    Enthusiast

  • Platinum Supporter
  • 203 posts
  • Location:Frankfurt, Germany

  • Flag: Sweden

  • Favorite Pinball: Medieval Madness

Posted 13 December 2025 - 11:56 AM

No thanks. We are now in the golden age of Windows 10, where you don't have to worry about some half-baked update screwing up your carefully configured installation. When I did a reinstallation earlier this year on my previous cab system, which up to then was disconnected from the internet, I found that some of the hardware was no longer supported by the current Windows 10!

I beleive you have misunderstood something here...
 

Why should you want to install  "Windows 11 IoT Enterprise LTSC"?

According to Microsofts webpage:

Overview

Windows 11 IoT Enterprise LTSC is built on the popular Windows operating system and delivers the same compatibility, management, security, and servicing that you are already familiar with.   
This software is intended to facilitate IT professionals, device makers and software developers in the evaluation of Windows 11 IoT Enterprise LTSC for use in building or deploying long-lifecycle, fixed-function, specialized Windows devices in their environment.


Description
Windows 11 IoT Enterprise LTSC is intended for fixed-function, special-purpose devices that require a long support lifecycle of 10 years. These devices are typically found in industries including banking, quick-service restaurants, healthcare, hospitality, manufacturing, and retail.

Windows IoT Enterprise LTSC is based on the same foundation as Windows Professional and Windows Enterprise, delivering the same compatibility, security and management capabilities required for commercial deployments. Windows 11 IoT Enterprise LTSC provides additional capabilities to lockdown the device experience for public facing or employee facing scenarios along with the ability to customize the operating system footprint.

Windows 11 IoT Enterprise LTSC is available for both x64 and ARM64 architecture.


IMHO, the description above, coming from Microsoft, it is exacly what you would want from an installed Virtual Pinball cabinet.
 
- I do not need any functionallity updates, only security related
- I do not want any new surprises each time I start my cabinet.
- I still want to have a safe environment with security updates.
 
- Get rid of the weird boot questionaire coming once in a while


Additionally there are some nice things coming with this version:
 
- It does not have the TPM and higher CPU requirements (!) that win 11 has now (without tricks, which we do not know how long they will work)
- You should not have to hassle with any new windows versions for the next 10 years!
 
Before you now read this and want to comment, that it isn't possible to buy a license.
 
I was told from a local official Microsoft Dealer, that I can buy a  "Windows 11 IoT Enterprise LTSC" license without a problem!


Here is the full experience I have had sofar with win11 Iot LTSC at VPU

Edited by jarr3, 13 December 2025 - 12:32 PM.


#44 deadmanworking

deadmanworking

    Enthusiast

  • Members
  • PipPipPip
  • 231 posts

  • Flag: Germany

  • Favorite Pinball: Pinbot, Attack From Mars, Cactus Canyon

Posted 13 December 2025 - 01:51 PM

Thanks for chiming in @jarr, whose post gave me the idea initially, so all props to him, 

I agree 100% to what's outlined above (and also, "golden age of Win 10" had me snickering a bit ;)


To add, it's fairly easy to fully activate the IoT edition via command line, Gemini walked me through those steps..  the install and general OS handling are really uncharactaristically lean and mean, just shows what we have become accustomed over the last few decades getting nagged by our OSs constantly, haha. 


#45 Tesla

Tesla

    Pinball Fan

  • Silver Supporter
  • 1,421 posts
  • Location:Texas, USA

  • Flag: United States of America

  • Favorite Pinball: Star Trek - TNG

Posted 13 December 2025 - 04:33 PM


Additionally there are some nice things coming with this version:
 
- It does not have the TPM and higher CPU requirements (!) that win 11 has now (without tricks, which we do not know how long they will work)
- You should not have to hassle with any new windows versions for the next 10 years!
 
Before you now read this and want to comment, that it isn't possible to buy a license.
 
I was told from a local official Microsoft Dealer, that I can buy a  "Windows 11 IoT Enterprise LTSC" license without a problem!


Here is the full experience I have had sofar with win11 Iot LTSC at VPU


Thanks @Jarr3 . I read and captured all that.


I've been doing Windows-11 Pro 64-bit "Server-Installs" on my supposedly un-qualified hardware (including my current VPX cabinet computer that runs a nice Intel i7-7700K 7th-Gen). But I've also done it to even older laptops and desktops that were still perfectly fine and useful. They are all now on Win-11 v24H2. My way also works as an Overlay-Upgrade. No 3rd-party utilities are used (only Microsoft.com sourced ISO and a special command-line).


This way you found looks like it might only work as a clean-install. If I ever have the opportunity to need a clean-install to bare-metal I will certainly try it. Thanks again.


Oh, here is the official DL page:

https://www.microsof...enterprise-ltsc


So, you say this will Activate as legit with any Windows-11 Pro (64 bit) key?


To me, it sounds like they want to sell me a special key. I wonder how much it is?


Edited by Tesla, 13 December 2025 - 05:48 PM.


#46 BoltBait

BoltBait

    Software Developer

  • Members
  • PipPipPip
  • 456 posts
  • Location:Sacramento, CA

  • Flag: United States of America

  • Favorite Pinball: Elvira, Whitewater, Big Bang Bar, Fun House and All the old EM tables of the 70s that I played as a kid (including Buccaneer, Spirit of 76, and King Kool)

Posted 14 December 2025 - 06:28 AM

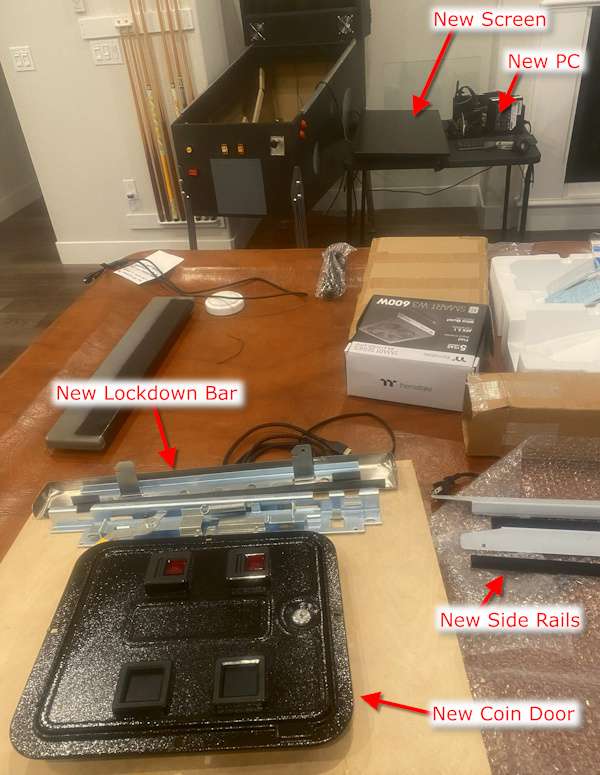
Christmas came early to the BoltBait household!  Look what just arrived:


EarlyChristmas.jpg


I think I'm going to make a trip to Home Depot tomorrow to buy some wood so I can start making the new cabinet!


Now that I have the new lockdown bar, I know EXACTLY how wide the machine needs to be. And, with the the new screen, I know how deep the machine will be.  (I may need to trim the side rails. Boy, those things are long!)


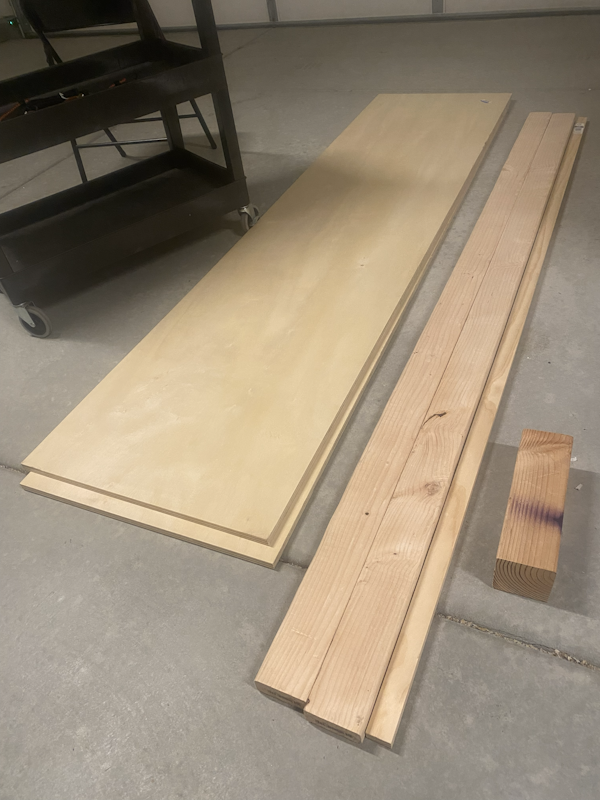
I went to Home Depot and bought some wood: (4x8' sheet of 3/4" plywood (sanded on both sides, cut down the middle so it would fit in the car), some 2x4s, and a scrap of 4x4)*


Lumber.png


I love the smell of freshly cut wood.   :tup:


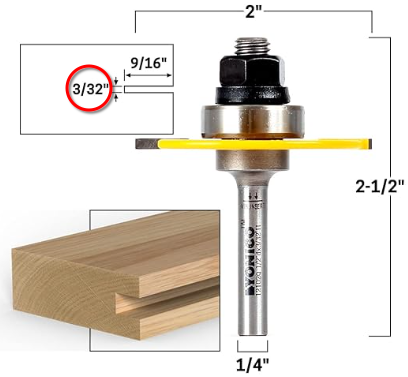
While I was there, I looked for a T-molding slot cutter (router bit).  No luck. So, I ordered one on Amazon.  This should arrive tomorrow:


TMouldingBit.png

(Just another thing I lost in the fire and I'd forgotten to replace.)


I'm designing the cabinet tonight and will start construction tomorrow (Sunday).


* If you've read my blog, you'll know what the 4x4 is for.  :D


Edited by BoltBait, 14 December 2025 - 06:34 AM.

How I built my B2S Pinball Cabinet, step-by-step, with pictures!  Full-sized cabinet for ~$700. Believe me, if I can do it, so can you!

"Making anything with your hands goes wonderfully with whatever in your life you would consider your grind." ~Nick Offerman


#47 jarr3

jarr3

    Enthusiast

  • Platinum Supporter
  • 203 posts
  • Location:Frankfurt, Germany

  • Flag: Sweden

  • Favorite Pinball: Medieval Madness

Posted 14 December 2025 - 07:42 AM


Thanks @Jarr3 . I read and captured all that.


I've been doing Windows-11 Pro 64-bit "Server-Installs" on my supposedly un-qualified hardware (including my current VPX cabinet computer that runs a nice Intel i7-7700K 7th-Gen). But I've also done it to even older laptops and desktops that were still perfectly fine and useful. They are all now on Win-11 v24H2. My way also works as an Overlay-Upgrade. No 3rd-party utilities are used (only Microsoft.com sourced ISO and a special command-line).


This way you found looks like it might only work as a clean-install. If I ever have the opportunity to need a clean-install to bare-metal I will certainly try it. Thanks again.


Oh, here is the official DL page:

https://www.microsof...enterprise-ltsc


So, you say this will Activate as legit with any Windows-11 Pro (64 bit) key?


To me, it sounds like they want to sell me a special key. I wonder how much it is?


That download page will not work. Microsoft does not want us to buy this version of Windows and makes it a little more difficult. (They rather want us to buy new hardware again and then use the latest and greatest)


A normal windows license will not work, so you have to buy a license by searching "Shop Windows 11 IoT LTSC". I found some shops selling for between 15 - 60 EUR. They will supply with the ISO.


#48 Tesla

Tesla

    Pinball Fan

  • Silver Supporter
  • 1,421 posts
  • Location:Texas, USA

  • Flag: United States of America

  • Favorite Pinball: Star Trek - TNG

Posted 14 December 2025 - 05:22 PM


1. That download page will not work.

2. Microsoft does not want us to buy this version of Windows and makes it a little more difficult.

3. They rather want us to buy new hardware again and then use the latest and greatest.

4. A normal windows license will not work, so you have to buy a license by searching "Shop Windows 11 IoT LTSC". I found some shops selling for between 15 - 60 EUR. They will supply with the ISO.


1. It worked fine for me.

2. If you mean non-business people, I suppose.

3. For Consumers, they are probably right on that in a majority of situations

4. Thanks for verifying that.


I went to Home Depot and bought some wood: (4x8' sheet of 3/4" plywood (sanded on both sides, cut down the middle so it would fit in the car), some 2x4s, and a scrap of 4x4)*


I love the smell of freshly cut wood.   :tup:


While I was there, I looked for a T-molding slot cutter (router bit).  No luck. So, I ordered one on Amazon.  This should arrive tomorrow:


Yeah, I've also often tried to pick-up tools and supplies at HomeDepot/Lowes ... locally to support local-businesses. Only to find they didn't have it and ultimately ordered it from Amazon anyway. 


I like how your build-guides show the craftsmanship items, wood-working, and actual detailed building steps.


#49 jarr3

jarr3

    Enthusiast

  • Platinum Supporter
  • 203 posts
  • Location:Frankfurt, Germany

  • Flag: Sweden

  • Favorite Pinball: Medieval Madness

Posted 15 December 2025 - 05:27 AM


1. That download page will not work.

2. Microsoft does not want us to buy this version of Windows and makes it a little more difficult.

3. They rather want us to buy new hardware again and then use the latest and greatest.

4. A normal windows license will not work, so you have to buy a license by searching "Shop Windows 11 IoT LTSC". I found some shops selling for between 15 - 60 EUR. They will supply with the ISO.


1. It worked fine for me.

2. If you mean non-business people, I suppose.

3. For Consumers, they are probably right on that in a majority of situations

4. Thanks for verifying that.

for 1: I meant that the download is just a 90 day test version. I assume you will need the real iso, once the 90 days has past. But I am glad if you prove me wrong...


Edited by jarr3, 17 December 2025 - 06:22 PM.


#50 BoltBait

BoltBait

    Software Developer

  • Members
  • PipPipPip
  • 456 posts
  • Location:Sacramento, CA

  • Flag: United States of America

  • Favorite Pinball: Elvira, Whitewater, Big Bang Bar, Fun House and All the old EM tables of the 70s that I played as a kid (including Buccaneer, Spirit of 76, and King Kool)

Posted 18 December 2025 - 08:24 AM

I had wanted to redesign my cabinet to make it more like a real pinball machine. I worked on designs and just ended up making the same design as my original cabinet.


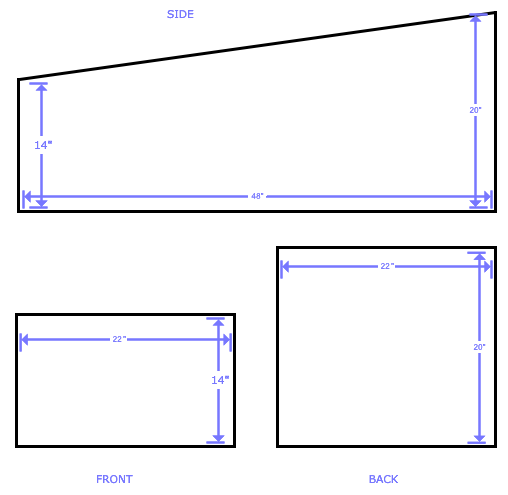
So, here's my basic design:


RevisedDesign.png

Once I finalized that, I started the woodworking.


I cutout a piece of plywood for the back and drilled a hole for the power cord.

Then, I cutout a piece for the front and started designing where the buttons/door/plunger would go.


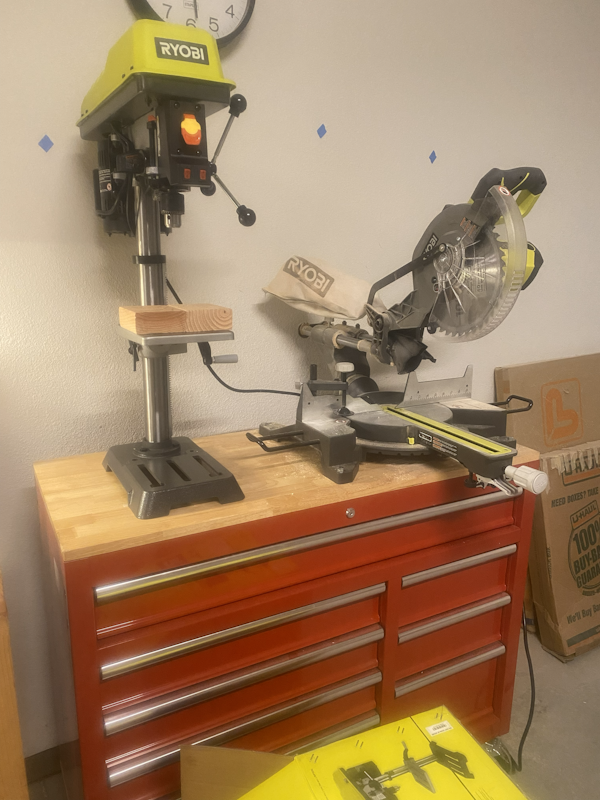
Once I designed that, I setup my drill press.  I'll be needing that soon:


SetupDrillPress.png


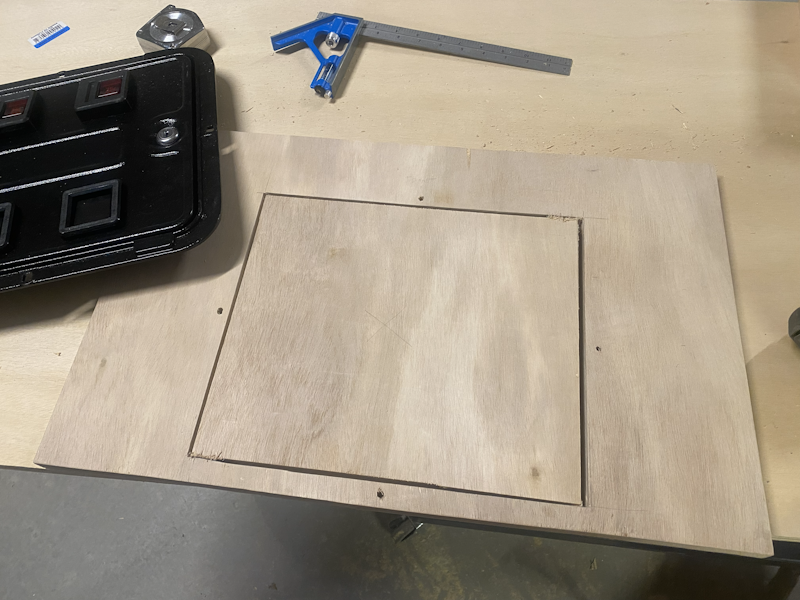
Now that I have that setup, I used the saw to cut out a spot for the coin door:


CutoutDoor.png


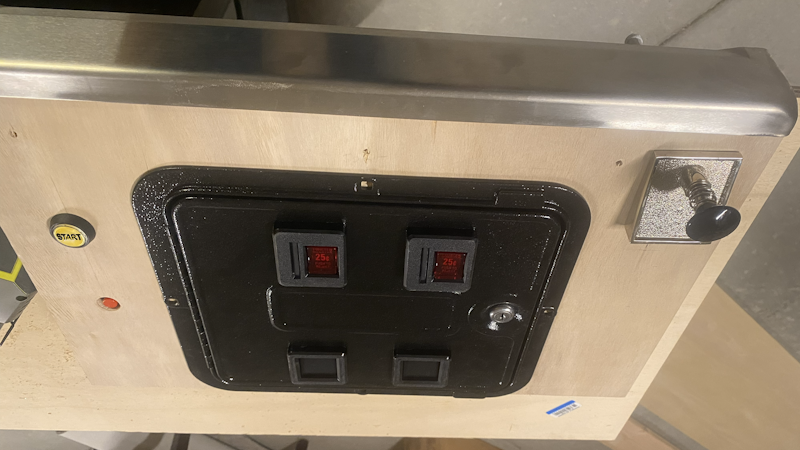
Next, I drilled holes for the two front panel buttons (START and MENU) and the plunger:


PlaceButtonsFront.png


Everything is just sitting together on the bench. But, this is how it will look once finished.


The menu button is counter sunk so you won't press it accidentally.  The coin return buttons on the coin door will active the "coin in" circuit.


Next, I'll cut out the sides and bottom pieces.


How I built my B2S Pinball Cabinet, step-by-step, with pictures!  Full-sized cabinet for ~$700. Believe me, if I can do it, so can you!

"Making anything with your hands goes wonderfully with whatever in your life you would consider your grind." ~Nick Offerman


#51 Itchigo

Itchigo

    Pinball Wizard

  • Members
  • PipPipPipPipPip
  • 2,773 posts
  • Location:Chicago, Illinois

  • Flag: United States of America

  • Favorite Pinball: All


  • Trophies:

Posted 18 December 2025 - 08:44 PM

I saw that picture and was reminded of this. I repurposed an old Sharpshooter cab for my cab, so the hole for the plunger was already there. But I had to shorten my plunger because it was hitting the side of the tv.


img_20190727_204642529.jpg


Founder of Rogue Pinball! https://roguepinball.com/index.php                 Making Pinball great again!!


partylikeits1776-.jpg


#52 BoltBait

BoltBait

    Software Developer

  • Members
  • PipPipPip
  • 456 posts
  • Location:Sacramento, CA

  • Flag: United States of America

  • Favorite Pinball: Elvira, Whitewater, Big Bang Bar, Fun House and All the old EM tables of the 70s that I played as a kid (including Buccaneer, Spirit of 76, and King Kool)

Posted 19 December 2025 - 12:14 AM

[snip] I had to shorten my plunger because it was hitting the side of the tv.


Won't be a problem for me as my screen is not as wide as the cabinet.


Here's a picture of the old screen I was using as a playfield:


OldTVWidth.png


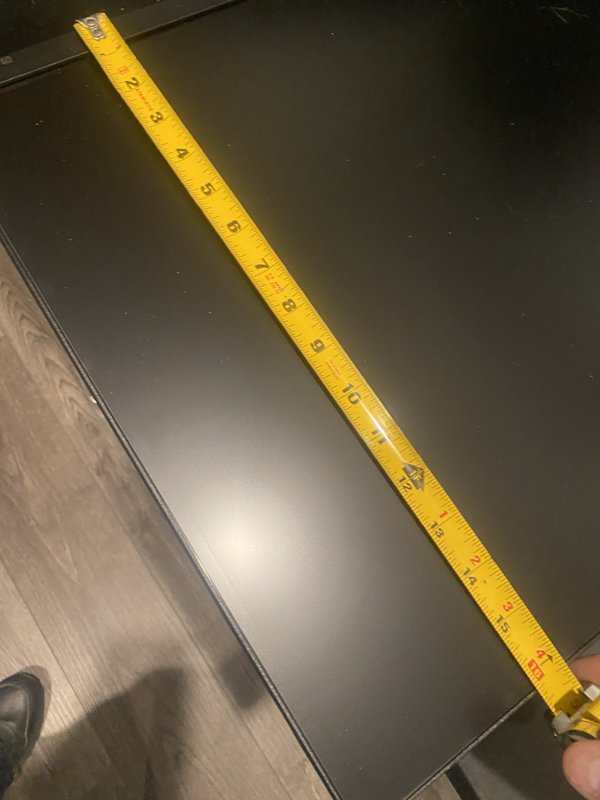
As you can see it was a little over 21" (53cm) wide.


The new screen has a much smaller width:


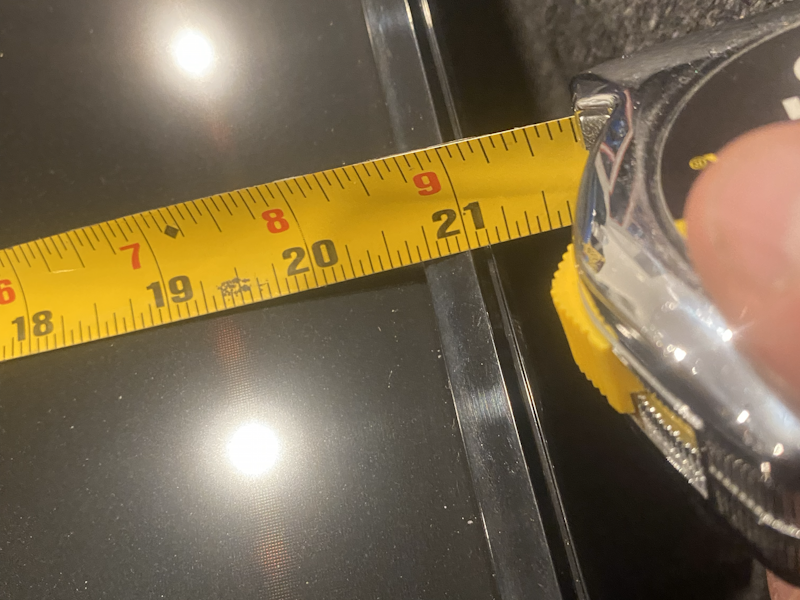
NewScreenWidth.png


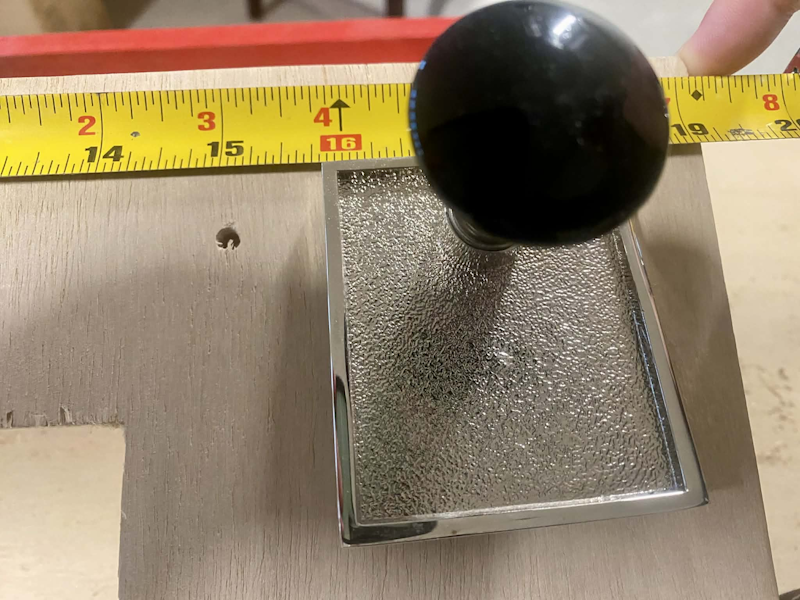
Right around 16 1/4" (41cm).  So, holding the tape with 8" right at the center point of the cabinet, here's the detail of how wide the screen will be compared to the plunger placement:


NewCabinetWidth.png


This is one of those good news/bad news things.


The good news is that the screen shouldn't interfere with the plunger at all.


The bad news is that I'm going to have to deal with the empty space between the monitor and the side of the case (on both sides) somehow.  That's about 2.5"-3" (6-8cm) on each side.  I'll cross that bridge when I get to it!


Edited by BoltBait, 19 December 2025 - 03:17 AM.

How I built my B2S Pinball Cabinet, step-by-step, with pictures!  Full-sized cabinet for ~$700. Believe me, if I can do it, so can you!

"Making anything with your hands goes wonderfully with whatever in your life you would consider your grind." ~Nick Offerman


#53 BoltBait

BoltBait

    Software Developer

  • Members
  • PipPipPip
  • 456 posts
  • Location:Sacramento, CA

  • Flag: United States of America

  • Favorite Pinball: Elvira, Whitewater, Big Bang Bar, Fun House and All the old EM tables of the 70s that I played as a kid (including Buccaneer, Spirit of 76, and King Kool)

Posted 28 December 2025 - 03:43 AM

Everything's coming together.


Here I'm getting ready to mark and cut the bottom of the cabinet:


Bottomcut.png


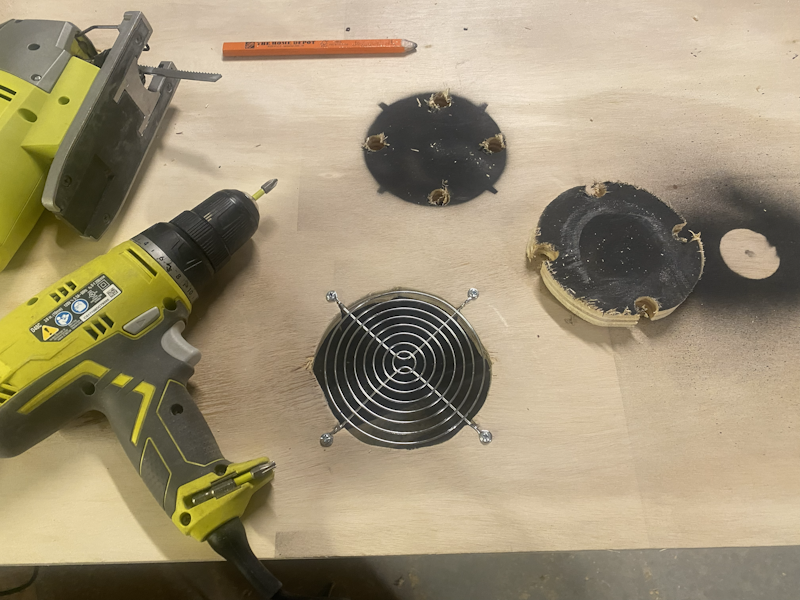
Once I cut the bottom piece to size, I marked and cut the holes in the bottom for the subwoofer and clean air fan:


BottomHoles.png


I place a fan finger guard over the hole to prevent my grandkids from poking their fingers into the fan or the subwoofer:


SubHole.png


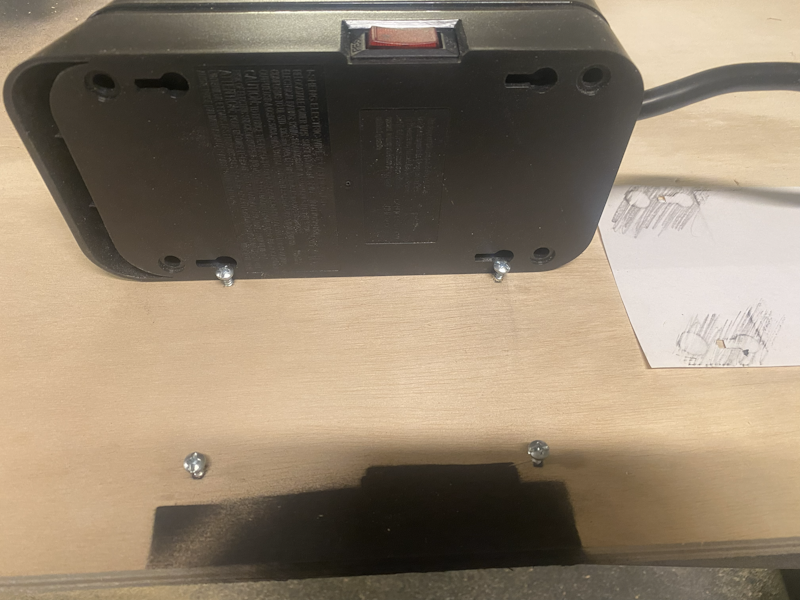
Next, I used paper to mark where the screws should be placed to hold the power strip in place:


PlugPlacement.png


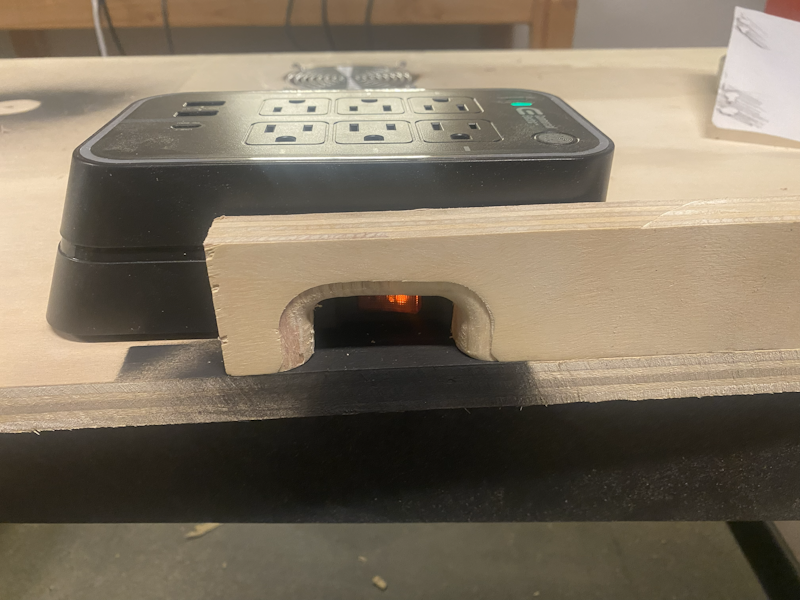
I did a mockup of the access hole for the power strip:


SwitchAccessMockup.png


This time, the power strip is much closer to the front of the machine, so I won't have to go digging between machines to find the power switch.


Finally, I designed two braces to hold the screen; one near the front (just behind the flipper buttons) and one near the back.


ScreenBraces.png


There's a 2 inch gap between the monitor and the side of the cabinet on both sides.  Still haven't thought of how to make that look good... but I'm thinking...


Now that the screen braces are done, I attached the bottom and prepped for painting by filling all the screw holes with wood filler.


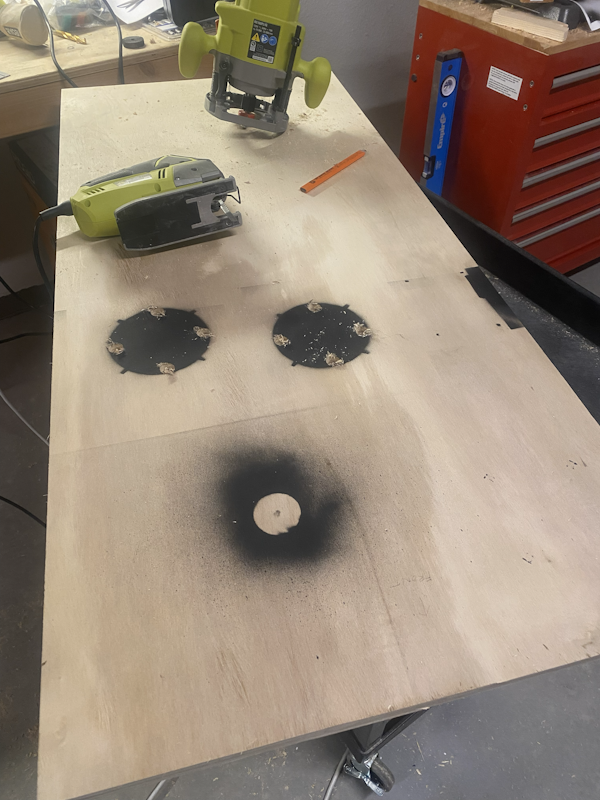
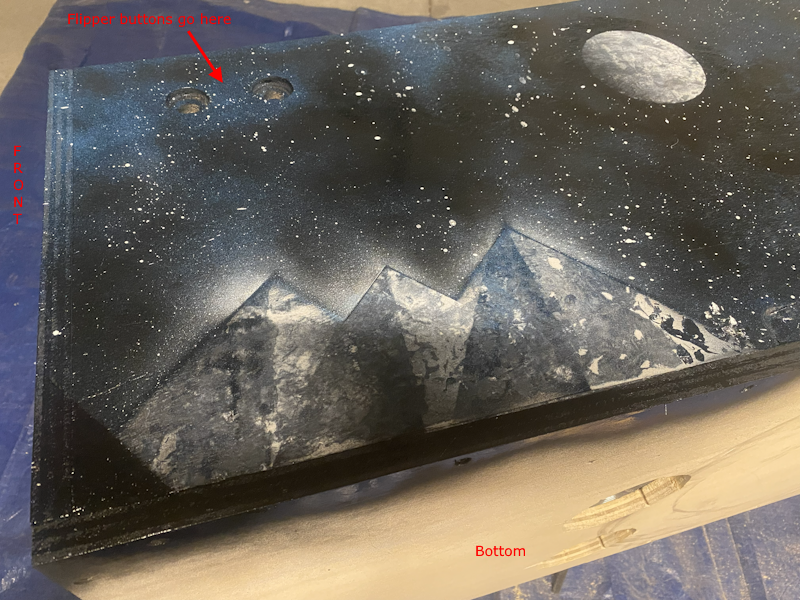
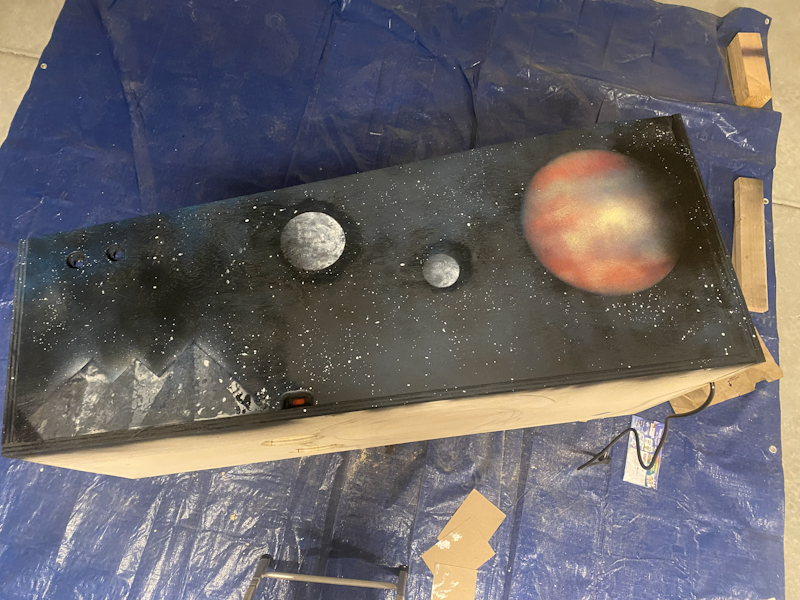
I started by painting the entire cabinet black.  Then, I tipped it on its side and did a spacescape on one side. I'll do the other side tomorrow.


Paint1.png


Paint2.png


If you're curious about the paint job, it is just spray can art.  I did it the same as last time:  https://boltbait.com...l/assemble2.php I just added some pyramids this time.


Edited by BoltBait, 28 December 2025 - 04:01 AM.

How I built my B2S Pinball Cabinet, step-by-step, with pictures!  Full-sized cabinet for ~$700. Believe me, if I can do it, so can you!

"Making anything with your hands goes wonderfully with whatever in your life you would consider your grind." ~Nick Offerman


#54 deadmanworking

deadmanworking

    Enthusiast

  • Members
  • PipPipPip
  • 231 posts

  • Flag: Germany

  • Favorite Pinball: Pinbot, Attack From Mars, Cactus Canyon

Posted 28 December 2025 - 09:35 AM

Why don't you make the cabinet smaller by 10cm in width, just because of the original sized coin door and lockbar?

#55 BoltBait

BoltBait

    Software Developer

  • Members
  • PipPipPip
  • 456 posts
  • Location:Sacramento, CA

  • Flag: United States of America

  • Favorite Pinball: Elvira, Whitewater, Big Bang Bar, Fun House and All the old EM tables of the 70s that I played as a kid (including Buccaneer, Spirit of 76, and King Kool)

Posted 28 December 2025 - 11:48 AM

Why don't you make the cabinet smaller by 10cm in width, just because of the original sized coin door and lockbar?


Yeah, I'm using a standard width lockdown bar.  I really want that real metal feel.  I was never happy with the wooden one I made for my original cab.


How I built my B2S Pinball Cabinet, step-by-step, with pictures!  Full-sized cabinet for ~$700. Believe me, if I can do it, so can you!

"Making anything with your hands goes wonderfully with whatever in your life you would consider your grind." ~Nick Offerman


#56 BoltBait

BoltBait

    Software Developer

  • Members
  • PipPipPip
  • 456 posts
  • Location:Sacramento, CA

  • Flag: United States of America

  • Favorite Pinball: Elvira, Whitewater, Big Bang Bar, Fun House and All the old EM tables of the 70s that I played as a kid (including Buccaneer, Spirit of 76, and King Kool)

Posted 29 December 2025 - 02:33 AM

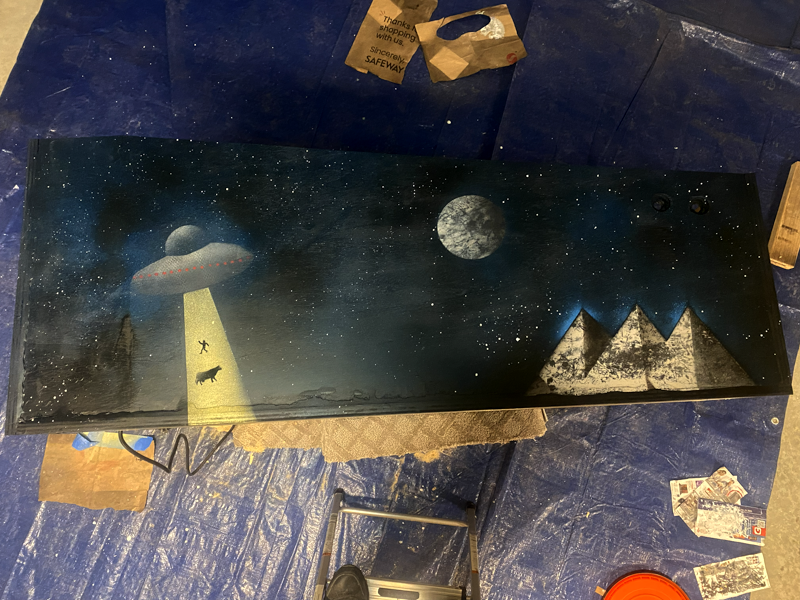
I'll do the other side tomorrow.


And.... it's tomorrow already.  I painted the other side of the main cabinet:


Paint3.png


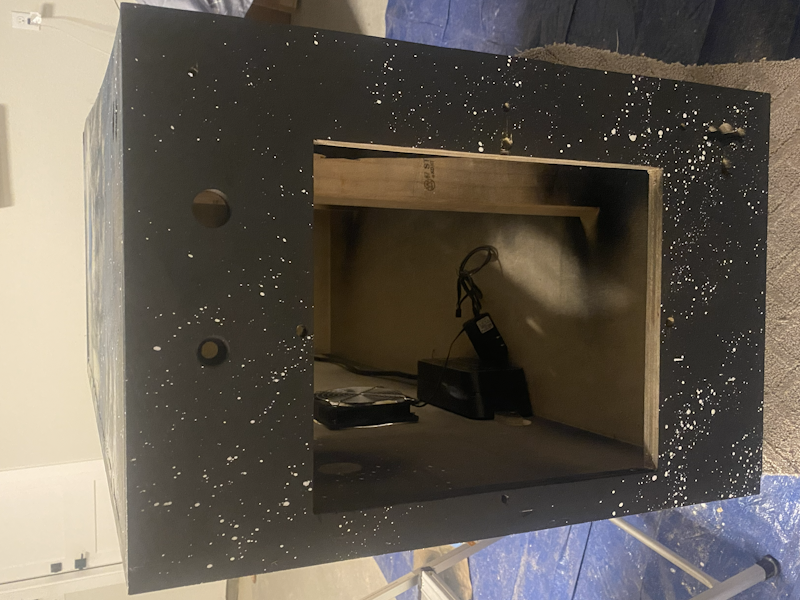
Here's what the front looks like:


Paint5.png


Tomorrow I will start spraying clear coat over the entire box.  Two full coats and then extra around the buttons.  Once that's dry, on go the legs.


Also, I have all the wood ready to assemble the backbox.  After that's put together, I'll have to paint it to match.


How I built my B2S Pinball Cabinet, step-by-step, with pictures!  Full-sized cabinet for ~$700. Believe me, if I can do it, so can you!

"Making anything with your hands goes wonderfully with whatever in your life you would consider your grind." ~Nick Offerman


#57 rickh

rickh

    Enthusiast

  • Gold Supporter
  • 436 posts
  • Location:Raleigh

  • Flag: United States of America

  • Favorite Pinball: I love them all

Posted 29 December 2025 - 01:17 PM

Boltbait, 

I have always admired your artistic prowess.  Your painted graphics are excellent. 


Rickey

Intense Arcade

http://www.intensearcade.com


#58 Smitty2k1

Smitty2k1

    Hobbyist

  • Members
  • PipPip
  • 29 posts

  • Flag: ---------

  • Favorite Pinball: test

Posted 29 December 2025 - 02:23 PM

Thanks for the build details so far. I was planning a 32" build with a 16:9 but now you have me thinking a 40" build with 21:9. Same width as the 32" but longer playfield. The MSI monitor you used and the INNCON 40C1R seem to be reasonable display choices.

#59 BoltBait

BoltBait

    Software Developer

  • Members
  • PipPipPip
  • 456 posts
  • Location:Sacramento, CA

  • Flag: United States of America

  • Favorite Pinball: Elvira, Whitewater, Big Bang Bar, Fun House and All the old EM tables of the 70s that I played as a kid (including Buccaneer, Spirit of 76, and King Kool)

Posted 30 December 2025 - 07:00 AM

Thanks for the build details so far. I was planning a 32" build with a 16:9 but now you have me thinking a 40" build with 21:9. Same width as the 32" but longer playfield.


I think you'll like the longer playfield. But, it depends on what type of tables you play most. I like the old EM tables and they look amazing on the 21:9 monitor. If you like mostly modern wide tables, you may prefer the 16:9 screen.


The MSI monitor you used and the INNCON 40C1R seem to be reasonable display choices.


If I'd seen the INNCON 40C1R, I would have gotten that one.  I like the shape of the screen.  I'm sure the flat shape of that screen will make it MUCH easier to work with than the MSI which is curved on the back.


Did some more work on the cabinet today.  First, I sprayed the entire thing with clear coat; 2 coats plus 4 around the buttons.


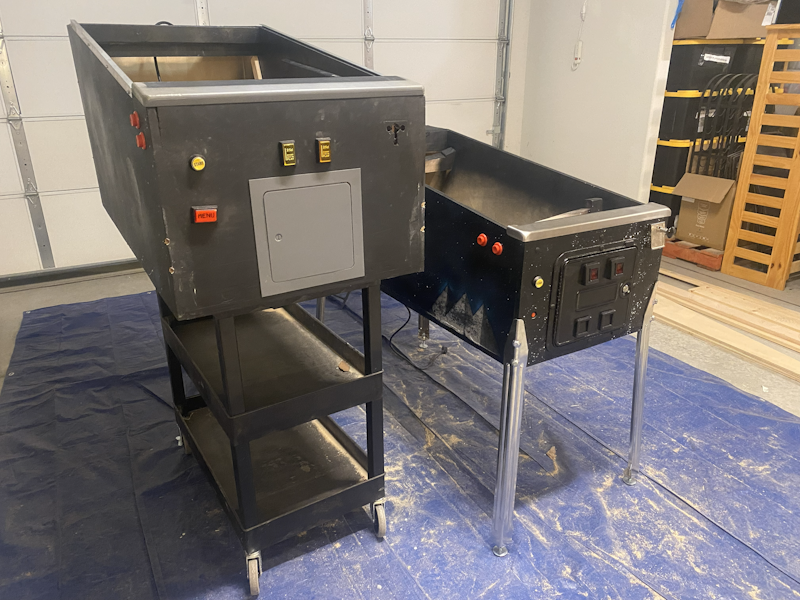
Next up, I transferred the legs from the old box to the new one:


OldVsNew.png


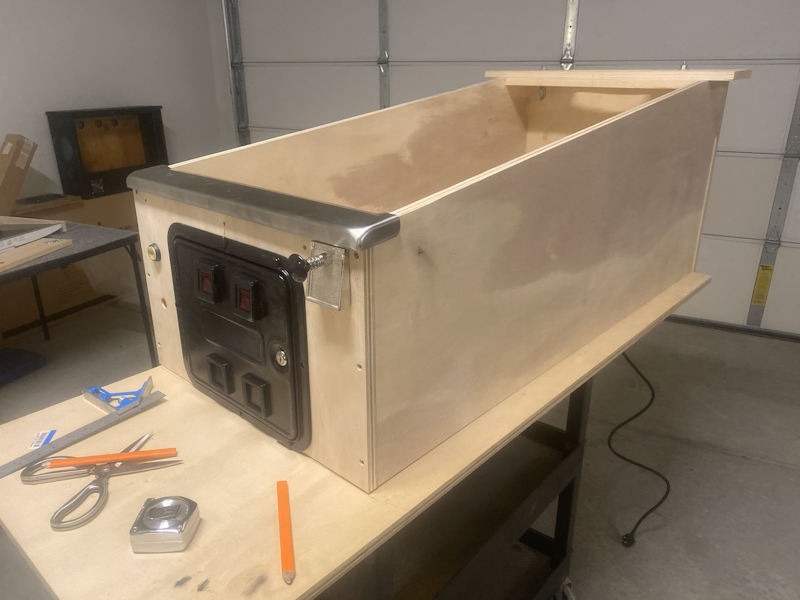
I used to love my first pinball cabinet, but seeing them side-by-side, I think you can see why I wanted to upgrade my pinball experience. 


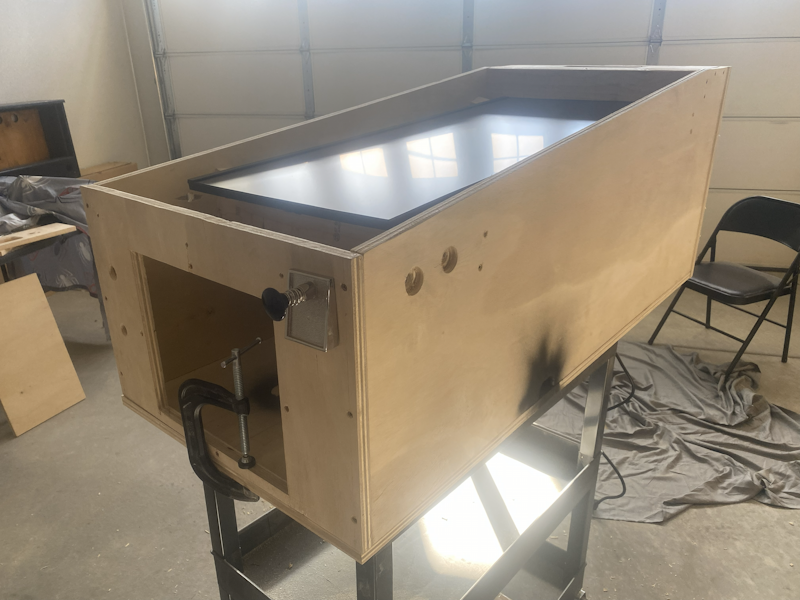
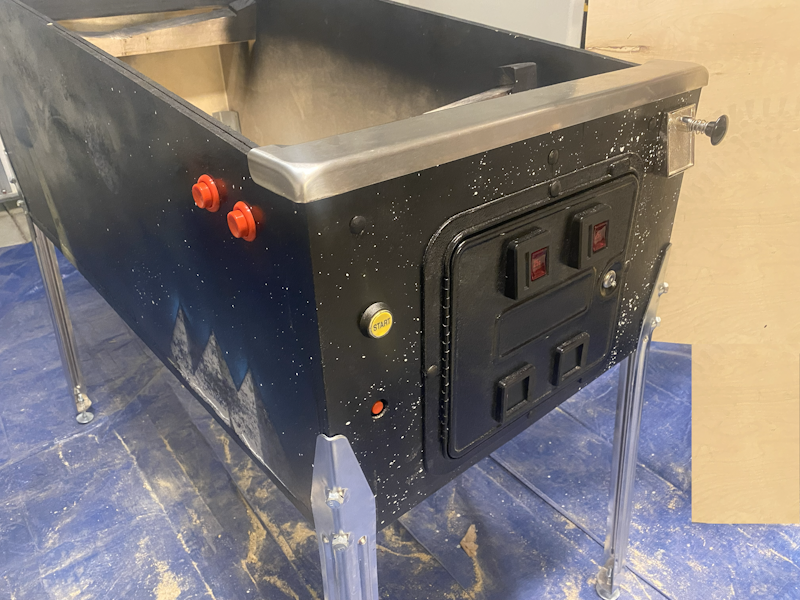
Detail of the new cabinet:


Standing.png


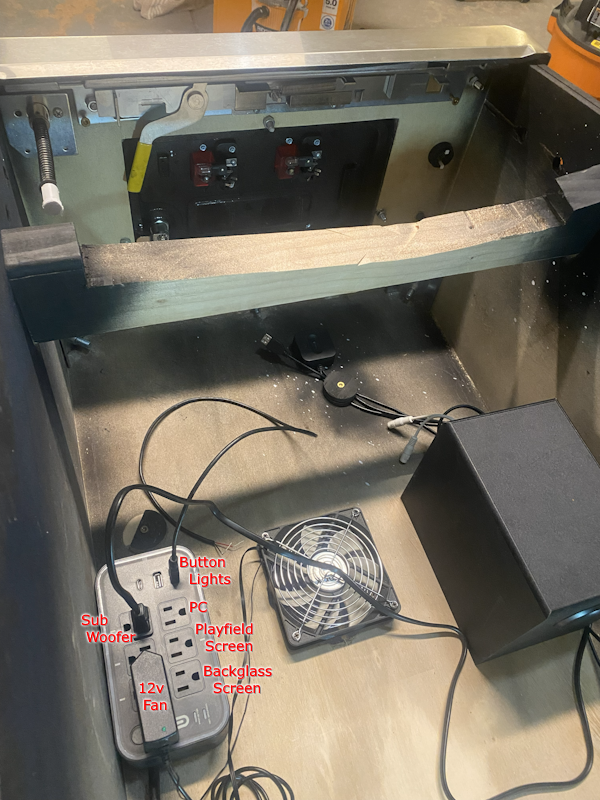
Here's a shot of the inside (showing the plan for power):


Wiring1.png


Next up, build the backbox. I have the lumber ready to go.  I just need to screw it all together.


Then install the PC and controller, and wire up the buttons.


Finally, get a piece of glass.


Only then will I transfer all the tables from the old system to the new system.


Edited by BoltBait, 30 December 2025 - 07:32 PM.

How I built my B2S Pinball Cabinet, step-by-step, with pictures!  Full-sized cabinet for ~$700. Believe me, if I can do it, so can you!

"Making anything with your hands goes wonderfully with whatever in your life you would consider your grind." ~Nick Offerman


#60 Smitty2k1

Smitty2k1

    Hobbyist

  • Members
  • PipPip
  • 29 posts

  • Flag: ---------

  • Favorite Pinball: test

Posted 31 December 2025 - 05:41 PM

Yeah but that MSI monitor is only $340 at Costco and then you get all the extra Costco goodness like easy returns and warranty replacements.
PS: that paint job is lovely. Great to see something that isn't just a copy of a real cab or some sort of multi pin collage of characters.