Jump to content


Photo

90's Workshop: Buildin' The Table


  • Please log in to reply
369 replies to this topic

#41 wtiger

wtiger

    Pinball Fan

  • VIP
  • 1,148 posts
  • Location:Los Angeles, CA

  • Flag: United States of America

  • Favorite Pinball: Junkyard


Contributor

Posted 23 April 2009 - 02:07 AM

QUOTE (faralos @ Apr 22 2009, 02:14 PM) <{POST_SNAPBACK}>
Can one put them together in a collection saving them as a group with that command? I don't know all too much with coding either, just thought I'd ask.


To be able to manipulate them in the editor as one (which I believe was what the original question was meaning) - the answer is no.


#42 faralos

faralos

    VPF Veteran

  • Members
  • PipPipPipPipPipPip
  • 7,838 posts
  • Location:Eastern Pa,USA

  • Flag: United States of America

  • Favorite Pinball: Flash (Williams) 1979, Flash2 Updated


  • Trophies:

Posted 23 April 2009 - 04:14 AM

Yup That IS what I'd meant. Thanks then pardon.gif
"Don’t let the noise of others’ opinions drown out your own inner voice.
And most important, have the courage to follow your heart and intuition.”
----Steve Jobs


#43 wtiger

wtiger

    Pinball Fan

  • VIP
  • 1,148 posts
  • Location:Los Angeles, CA

  • Flag: United States of America

  • Favorite Pinball: Junkyard


Contributor

Posted 23 April 2009 - 04:38 AM

Is everyone ready to build some rubber for our posts? I take no credit for these as they are from JP Salas. If anyone has a different technique, please share with us. Also, I’m not the best at writing, so if any of it doesn’t make sense, or is confusing, post your comments.

In looking at the various pictures I have of Independence Day, it looks like the rubbers are black, so that’s what we will do in this exercise.

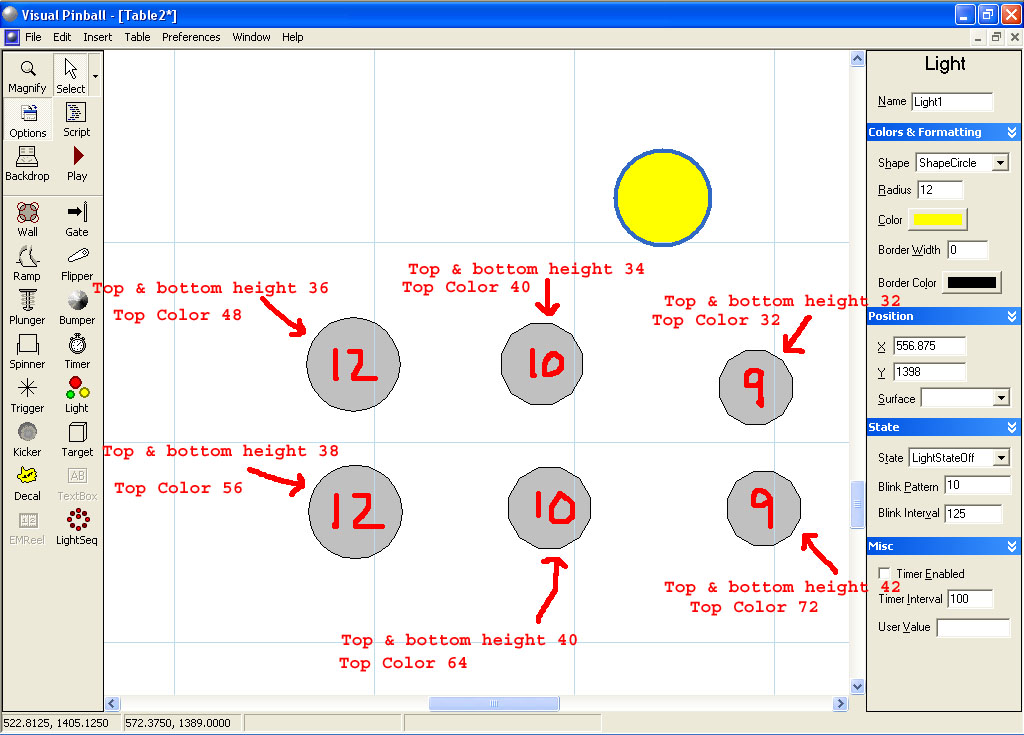
The rubber we will create consists of 6 circles with varying heights, colors, and sizes. We have two with a radius of 12, two with a radius of 10, and lastly two with a radius of 9. They will be set as follows:

Radius 12 – bottom height 36, top height 36, top color 48, 48, 48.
Radius 12 – bottom height 38, top height 38, top color 56, 56, 56
Radius 10 – bottom height 34, top height 34 top color 40, 40, 40
Radius 10– bottom height 40, top height 40 top color 64, 64, 64
Radius 9 – bottom height 32, top height 32 top color 32, 32, 32
Radius 9 – bottom height 42, top height 42 top color 72, 72, 72

Start up 
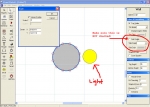
VP and create a new table. Add a light object to our table. Change the radius to 12 and zoom in three or four times on the light. Grab one of the numerically perfect circles you created in the previous exercise and copy/paste it in to your working table. Change the default elasticity from .3 to .45 or .50. Move it over the light object. Scale it down to match the size of the light.


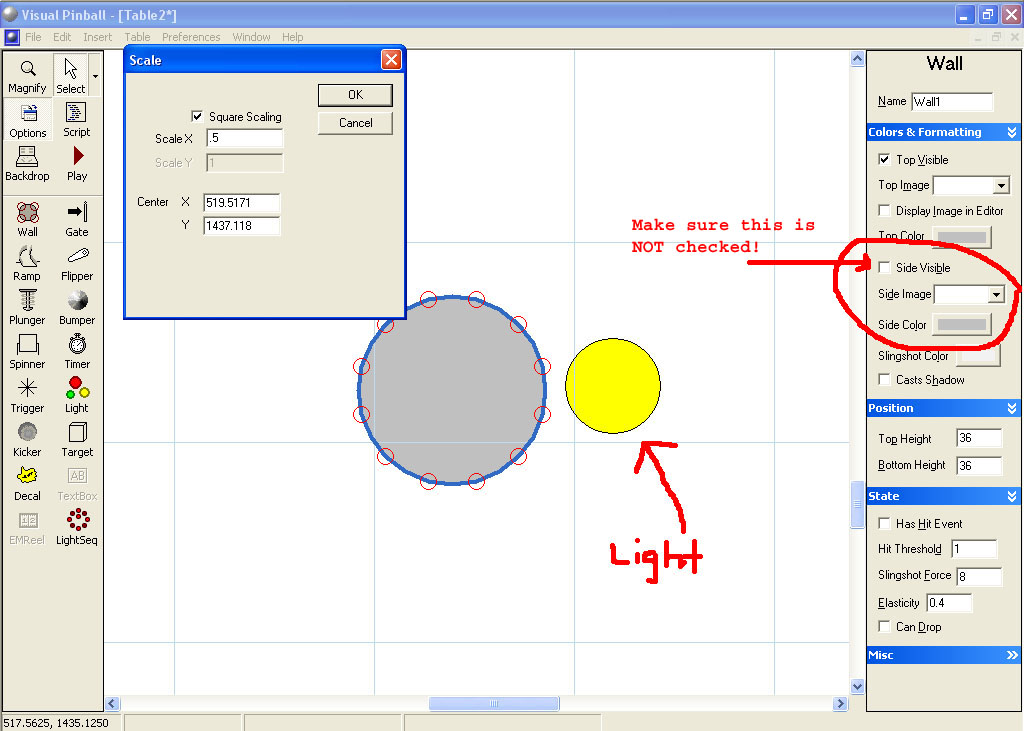
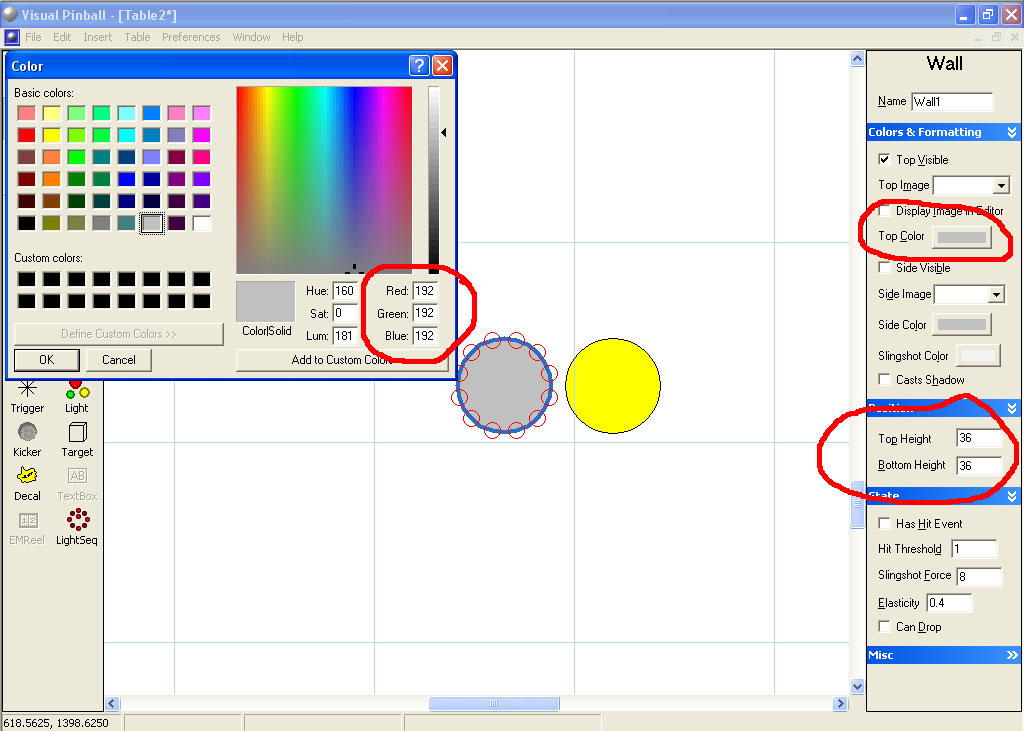
Set the top height to 36 and the bottom height to 36. Click on the top color button and set the Red to 48, Green to 48, and Blue to 48. Click OK. Uncheck the side visible for this object on the right side of the screen.


Make a copy of your circle (copy, then paste). Set the copy’s top height to 38 and bottom height to 38. For the top color, set all three values to 56.

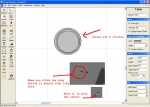
Now take your light object and change the radius from 12 down to 10. Move it away from the circle objects we just created. Now take one of the circle objects and copy/paste it and move it near the light object. Scale it down so it matches our light object (scale by .9 or .8, etc until you get it to match). Set the bottom height to 34 and the top height to 34. Set top color to 40 for all three values. Now make a copy of the circle and set the copy’s bottom height to 40 and the top height to 40. Set the top color to 64 for all three values.

Take your light object and change the radius to 9. Scale a copy of one of your light objects down to match the size of the light object. Set the top height to 32 and the bottom height to 32. Set the top color to 32 for all three values. Lastly, make a copy of this circle object and set the top height to 42, bottom height to 42 and the top color to 72 for all three values.


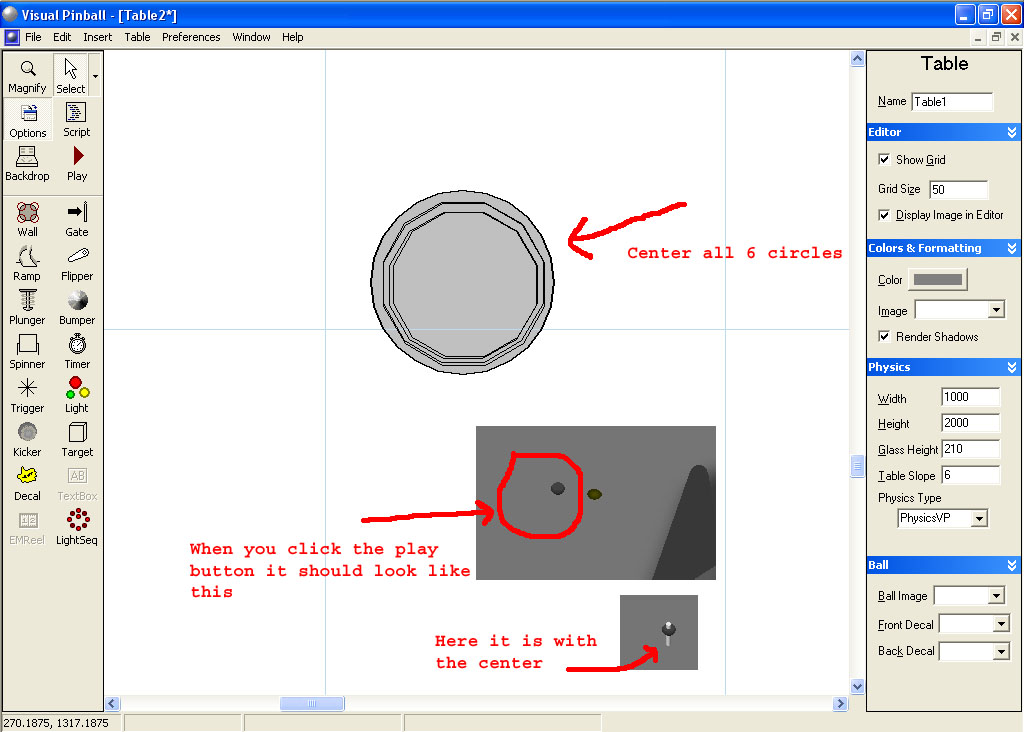
Now move all 6 circle objects so that they are all centered within each other.

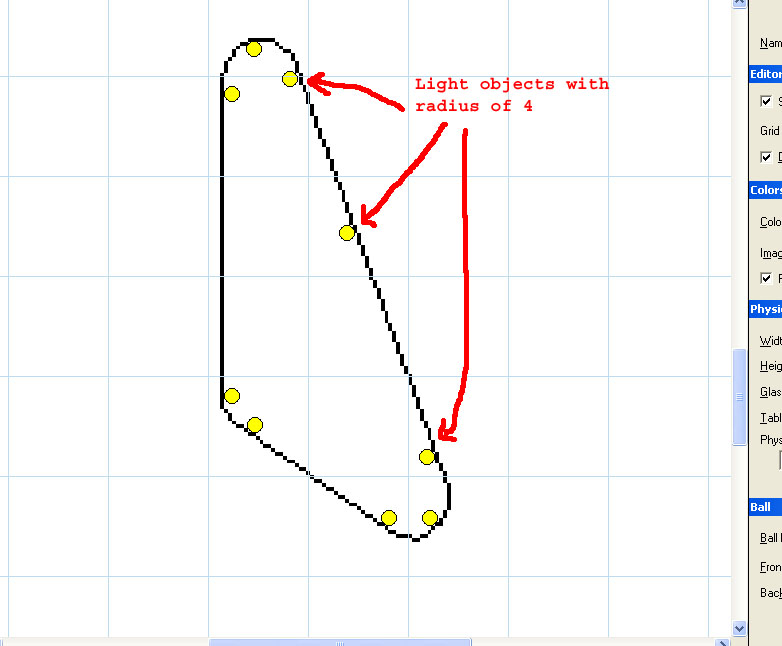
Lets add a center piece to it so it looks a little better. Make your light object 4 for the radius. Copy one of your circle objects and scale it down so it matches the light size. Now make the side for this object visible by clicking on the Side Visible o the right side of the screen. Set the top and side colors to white.


Edited by wtiger, 24 April 2009 - 04:37 AM.


#44 wtiger

wtiger

    Pinball Fan

  • VIP
  • 1,148 posts
  • Location:Los Angeles, CA

  • Flag: United States of America

  • Favorite Pinball: Junkyard


Contributor

Posted 24 April 2009 - 04:34 AM

I will post on Saturday the next exercise in which we will make the slingshot rubber in a similar manner. Following that we'll be sizing the playfield and obtaining a blueprint from the manual and hopefully matching them up. I hope everyone is doing their homework. We're getting pretty close to the start of the actual VP table. I just wanted to lay the ground work first.

One other thing. In my previous post (for the post rubber) you should change the default elasticity of the rubber circles (all 6 of them) from .3 to .45 or .50

Edited by wtiger, 24 April 2009 - 04:36 AM.


#45 wtiger

wtiger

    Pinball Fan

  • VIP
  • 1,148 posts
  • Location:Los Angeles, CA

  • Flag: United States of America

  • Favorite Pinball: Junkyard


Contributor

Posted 25 April 2009 - 01:07 AM

You can grab some images of the plastics here:

http://cgi.ebay.com/...ay-...:2|294:50

Never hurts to have more pictures.

#46 neoblood

neoblood

    Enthusiast

  • Charter Member
  • 381 posts
  • Location:USA

  • Flag: United States of America

  • Favorite Pinball: bop

Posted 25 April 2009 - 04:15 PM

Nice find !
A Pinball a day takes the boredom away

#47 1up

1up

    Enthusiast

  • Charter Member
  • 192 posts
  • Location:Adelaide, Australia

  • Flag: Australia

  • Favorite Pinball: monopoly

Posted 26 April 2009 - 01:40 PM

just a question, what does default elastisity actually do when you change it from .3 to .5?

anyway, i haven't been as active lately as my wife had a baby on tuesday. so things have been a bit hectic since then, i'm back on track now, made my assortment of different types of posts and rubbers and now ready for the next step...


#48 neoblood

neoblood

    Enthusiast

  • Charter Member
  • 381 posts
  • Location:USA

  • Flag: United States of America

  • Favorite Pinball: bop

Posted 26 April 2009 - 05:18 PM

QUOTE (1up @ Apr 26 2009, 09:40 AM) <{POST_SNAPBACK}>
just a question, what does default elastisity actually do when you change it from .3 to .5?

anyway, i haven't been as active lately as my wife had a baby on tuesday. so things have been a bit hectic since then, i'm back on track now, made my assortment of different types of posts and rubbers and now ready for the next step...


O wow congratulations! Is this your first? Tons o' fun from here on out. If you build a nice vp table you can show it off to your kid when it gets older and it can see what you were up to when it was born biggrin.gif
I assumed the elasticity was related to the physics if the ball bounced into it but I could be wrong.

A Pinball a day takes the boredom away

#49 wtiger

wtiger

    Pinball Fan

  • VIP
  • 1,148 posts
  • Location:Los Angeles, CA

  • Flag: United States of America

  • Favorite Pinball: Junkyard


Contributor

Posted 26 April 2009 - 06:13 PM

1up, congrats!

Elasticity is how bouncy an object is. The lower the number, the object will be like the ball is hitting metal (not very much bounce off of it). The higher the number, the more bounce you will have. Try this experiment. Take a look at the attached image. Start up VP and make a new blank table. Make a wall similar to the wall in the image and in about the same position. Set the elasticity to .1 and launch the ball. Notice not much bounce. Now go back into the editor and change the wall's elasticity to 1 and then launch the ball again. Notice now how much bounce you get off the wall.

Attached Files


Edited by wtiger, 26 April 2009 - 06:15 PM.


#50 wtiger

wtiger

    Pinball Fan

  • VIP
  • 1,148 posts
  • Location:Los Angeles, CA

  • Flag: United States of America

  • Favorite Pinball: Junkyard


Contributor

Posted 27 April 2009 - 03:28 AM

I probably won't post the exercise on the slingshot rubber until Tuesday. My in-laws just came in this evening from out of the country and I am tied up tomorrow evening after work. I have most of it done, but I need to go over what I wrote and all. I had hoped to also follow it up with a video tutorial using Camstudio (I played around with it a bit yesterday). I might be able to work on that on Saturday.

#51 neoblood

neoblood

    Enthusiast

  • Charter Member
  • 381 posts
  • Location:USA

  • Flag: United States of America

  • Favorite Pinball: bop

Posted 27 April 2009 - 04:25 AM

Sounds good, good luck with the in-laws 8 )

A Pinball a day takes the boredom away

#52 1up

1up

    Enthusiast

  • Charter Member
  • 192 posts
  • Location:Adelaide, Australia

  • Flag: Australia

  • Favorite Pinball: monopoly

Posted 27 April 2009 - 02:08 PM

QUOTE (neoblood @ Apr 26 2009, 05:18 PM) <{POST_SNAPBACK}>
O wow congratulations! Is this your first? Tons o' fun from here on out. If you build a nice vp table you can show it off to your kid when it gets older and it can see what you were up to when it was born biggrin.gif

QUOTE (wtiger @ Apr 26 2009, 06:13 PM) <{POST_SNAPBACK}>
1up, congrats!


thanks guys, this is our third, so we've had a bit of practice before. wink.gif


QUOTE (wtiger @ Apr 27 2009, 03:28 AM) <{POST_SNAPBACK}>
I probably won't post the exercise on the slingshot rubber until Tuesday. My in-laws just came in this evening from out of the country and I am tied up tomorrow evening after work. I have most of it done, but I need to go over what I wrote and all. I had hoped to also follow it up with a video tutorial using Camstudio (I played around with it a bit yesterday). I might be able to work on that on Saturday.


ok, no probs. just make sure your well behaved for the in-laws wink.gif


#53 faralos

faralos

    VPF Veteran

  • Members
  • PipPipPipPipPipPip
  • 7,838 posts
  • Location:Eastern Pa,USA

  • Flag: United States of America

  • Favorite Pinball: Flash (Williams) 1979, Flash2 Updated


  • Trophies:

Posted 27 April 2009 - 10:42 PM

another thing on slingshot rubbers, if it's real bouncy it will actually resemble a real sling in the fact that the rubber itself comes forward and looks like it is stretching, rather than the ball just hitting it and bouncing off it and it stays still, did I explain that right? so take that into effect too when placing walls with elasticity on them, I've found out that a wall that looks rubbery and stretches on ball impact detracts from its realism. I'm sure there are ways around this, but that's my limit of knowledge for ya' (" Hey Teach, IS there a way around that?") with vp9?

Oh in VP9 how do I get the flippers to show up? and the plunger, too, they work, but are invisible! I've searched the physics, but can't find anything that makes them appear.!
"Don’t let the noise of others’ opinions drown out your own inner voice.
And most important, have the courage to follow your heart and intuition.”
----Steve Jobs


#54 Noah Fentz

Noah Fentz

    'Rasslin' Fan

  • VPF Administrator
  • 12,266 posts
  • Location:South Lyon, MI

  • Flag: United States of America

  • Favorite Pinball: Whitewater

  • PS3 Gamer Tag: noahfentz


Contributor

Posted 28 April 2009 - 05:59 AM

QUOTE (faralos @ Apr 27 2009, 06:42 PM) <{POST_SNAPBACK}>
another thing on slingshot rubbers, if it's real bouncy it will actually resemble a real sling in the fact that the rubber itself comes forward and looks like it is stretching, rather than the ball just hitting it and bouncing off it and it stays still, did I explain that right? so take that into effect too when placing walls with elasticity on them, I've found out that a wall that looks rubbery and stretches on ball impact detracts from its realism. I'm sure there are ways around this, but that's my limit of knowledge for ya' (" Hey Teach, IS there a way around that?") with vp9?

Oh in VP9 how do I get the flippers to show up? and the plunger, too, they work, but are invisible! I've searched the physics, but can't find anything that makes them appear.!


Right click on the control points. Uncheck the "Slingshot" and you won't have the animated sling.

I'm not familiar with your system, so I'm not sure this will work...

Save the table with "Hardware Rendering" checked and close VP. Restart VP, load the table and run it. You should now be able to see the flippers and plunger.

IdleReel.gif RumbleDMD.jpg HS2-DMD.jpg SBM.jpg ww_logo.jpg EK.jpg

 
T2.jpg Sorcerer.jpg Breakshot.jpg Firepower.jpg GorGar.jpg StarTrek.jpg


My Photobucket Resources
Whether You Believe You Can, Or You Can't, You Are Right." - Henry Ford
The future of pinball lives, it just needs to be nurtured!
If you're here to stab me in the back, you're going to have to get in line.


#55 wtiger

wtiger

    Pinball Fan

  • VIP
  • 1,148 posts
  • Location:Los Angeles, CA

  • Flag: United States of America

  • Favorite Pinball: Junkyard


Contributor

Posted 29 April 2009 - 03:01 AM

Now lets move on to the slingshot rubber. Once again, credit goes to JP Salas for his technique.

This rubber will consist of 6 wall objects stacked on top of each other with different top/bottom heights and different colors.

Start out by creating a new table in VP. Import the image “sling template” below and tell VP to use it for our table image:


Add a light object to the table near the sling outline in the sling template. Change the radius to 4. You might want to zoom in several times for easier placement. Go ahead and add several more light objects by copying the one you added and pasting them at various places just inside the outer line


Now add a wall object over near the slingshot outline. Start adding and moving the points around to make the shape. Some points will need to be set to smooth (right click on them and left click on smooth). Continue until the shape is done (see the reference image attached).


With your wall object selected, set the elasticity to .45 and uncheck “side visible” (we don’t need the side of the object to show).

Set the Top and Bottom height 26, and for the Top Color set:
Red=32
Green=32
Blue=32

Now hit copy and then paste (edit copy, edit paste, or CTRL-C and CTRL-V). This will duplicate the wall object and put a copy directly over the existing one.

Now change the top and bottom height to 28. Set the top color to 40 for all three values (red, green, blue).

Copy and paste again four more times total using the below values for each of the copies (copy/paste, change top and bottom height then change top color then repeat):

Top and Bottom height 30
Top Color:
Red 48
Green 48
Blue 48


Top and Bottom height 32
Top Color:
Red 56
Green 56
Blue 56


Top and Bottom height 34
Top Color:
Red 62
Green 62
Blue 62


Top and Bottom height 36
Top Color:
Red 70
Green 70
Blue 70

When you are done, you should end up with 6 wall objects stacked on top of each other. You can go ahead and delete your light objects that were used as the thickness reference. Your rubber should look like the image at the bottom right of the attached reference picture.

I made a video tutorial for this as well. View it here:

http://vpforums.org/...d...l&f_id=2310


The above is for black rubber which will be used in our Independence Day table. If you wanted to make the rubber white, use the following color values:

For the wall with a height of 26, set the top color values for Red, Green, and Blue to 160
For the wall with a height of 28, set the top color values for Red, Green, and Blue to 176
For the wall with a height of 30, set the top color values for Red, Green, and Blue to 192
For the wall with a height of 32, set the top color values for Red, Green, and Blue to 208
For the wall with a height of 34, set the top color values for Red, Green, and Blue to 224
For the wall with a height of 36, set the top color values for Red, Green, and Blue to 240

Edited by wtiger, 29 April 2009 - 04:04 AM.


#56 neoblood

neoblood

    Enthusiast

  • Charter Member
  • 381 posts
  • Location:USA

  • Flag: United States of America

  • Favorite Pinball: bop

Posted 30 April 2009 - 12:42 AM

Thanks a lot for the video! I'm limited on time as I have a deadline for work this week but I'm watching!
A Pinball a day takes the boredom away

#57 wtiger

wtiger

    Pinball Fan

  • VIP
  • 1,148 posts
  • Location:Los Angeles, CA

  • Flag: United States of America

  • Favorite Pinball: Junkyard


Contributor

Posted 01 May 2009 - 02:15 AM

What table angle/view does everyone want to use?

#58 wtiger

wtiger

    Pinball Fan

  • VIP
  • 1,148 posts
  • Location:Los Angeles, CA

  • Flag: United States of America

  • Favorite Pinball: Junkyard


Contributor

Posted 01 May 2009 - 09:13 PM

For this next exercise we will be sizing the playfield image and overlaying it on a playfield guide from the manual.

Download the stripped playfield image for Independence Day form the resource section http://vpforums.org/...d...l&f_id=2230

In addition, download and install The Gimp (www.gimp.org) and download the manual for the table from the IPDB http://www.ipdb.org/..._Day_Manual.pdf

Load the manual you downloaded into Acrobat Reader and go to page 22 of the file (Section 3 Chapter 2 page 23 of the manual. The title at the top of the page is Playfield Coil Locations). I’m using version 8.1.3 of Acrobat Reader and am assuming whatever version you are using works the same. Left click on the page and it should turn light blue. Now right click and you should get a little window saying Copy_Image. Left click on that window


This will copy the whole page from the pdf file into memory. Start up The Gimp (I’m using version 2.6) and hit CTRL-V to paste the picture in as a new image.


We now must crop the image to just the portion we want. Zoom in to 100% (you can do this by going to the View menu then zoom or you can hit the 1 key on the keyboard for the shortcut). Scroll the image so you can see the top left corner on your screen (if you hold down the spacebar the and move the mouse the image will scroll with the mouse movement). Select the crop tool which looks like the tip of an exacto knife or use the keyboard shortcut Shift-C. Now make a selection around the top portion of our image and make it a little wider than the image and make it start a little above the top edge. Go down a few inches (or if you want, go all the way down to the bottom). Your screen should look something like the following screen:


The purple squares at the four corners that I circled are kind of like handles that you can grab and use to refine your selection. Go ahead and adjust each of the corners so they are on the outer edge line of our playfield. The line color connecting the handles will turn green when it intersects the line.


Now move your mouse into the center of the playfield and left click. This will now crop our image and delete all the unwanted portions leaving us with just the playfield. Your image should now be approximately 463 x 1043:


I’m guessing that most of you will want to use a playfield image larger than this, so lets go ahead and scale our image to 909 x 2048 (Image menu, scale). I guess if you wanted to you can scale it larger, just make sure you scale it maintaining the same aspect ratio.

Now lets load the stripped playfield image in. Go to the file menu and load it in. At first you won’t see the image on the screen. Go to the window menu and select the stripped image:


Within the window for the stripped playfield, select edit and copy then switch back to our guide image from the manual and hit paste. This will now paste in the stripped playfield image over our guide image. Select an opacity of around 60 so we can see through it:


Now we go through several iterations of scaling (keyboard shortcut is SHIFT-T)/moving (keyboard shortcut M) the stripped playfield image so that it aligns to the guide image. If you want the quick numbers, scale it to 913 x 2025 (you will need to click on the little chain link so that it won’t scale maintaining the aspect ratio).

At this point you should go ahead and save your file. Save it in the native GIMP format (xcf) so that it maintains the layers. If you are not satisfied with the overall alignment of the stripped image to the guide, you can continue to play with the scale and move tools along with the perspective tool to fine tune things. Once you are happy with things, turn the opacity all the way back up to 100% and save your file again.

Now we want to save in JPG format the playfield image and separately the guide image. Go to the file menu and select save.as. On the window that pops up, towards the bottom left is Select File Type (just below the add button). Click on the + sign at the left side to expand the selection of image types. Select JPG and save your playfield image as ID-playfield (if it asks you about exporting first, go ahead and say yes as it won’t harm your original image). Now we need to turn off the stripped playfield layer so we can see the guide layer. Over on the right side of the screen under the layers section, click on the icon that has an eye and says pasted layer 1. This will turn off or hide the stripped playfield image.


Now go to file save as and save this now as ID-guide. Make sure that you save it as jpg format.


#59 neoblood

neoblood

    Enthusiast

  • Charter Member
  • 381 posts
  • Location:USA

  • Flag: United States of America

  • Favorite Pinball: bop

Posted 02 May 2009 - 12:57 AM

QUOTE (wtiger @ Apr 30 2009, 10:15 PM) <{POST_SNAPBACK}>
What table angle/view does everyone want to use?


I like the Wide single view like Jpg-pins, but if I ever get moving on a pinball cab I'll appreciate the 16x9's 8 )


A Pinball a day takes the boredom away

#60 wtiger

wtiger

    Pinball Fan

  • VIP
  • 1,148 posts
  • Location:Los Angeles, CA

  • Flag: United States of America

  • Favorite Pinball: Junkyard


Contributor

Posted 02 May 2009 - 02:56 AM

QUOTE (neoblood @ May 1 2009, 05:57 PM) <{POST_SNAPBACK}>
I like the Wide single view like Jpg-pins, but if I ever get moving on a pinball cab I'll appreciate the 16x9's 8 )


I do too, hopefully the others do as well. I will possibly post tomorrow with the start of the actual table in VP.