- View New Content
-
Getting Started
-
Tutorials
Tutorial Categories
Tutorials Main Page Installation and Setup Downloadable TutorialsROM Adjustments
Number of Balls Adjustments Volume Adjustments
-
Visual Pinball Tables
VP 8 Desktop Tables
All VPM Recreations VP Recreations VP/VPM MODs VP Originals ROMsVP 9 Desktop Tables
All VPM Recreations VP Recreations VP/VPM MODs VP Originals ROMsVP9 Cabinet Tables
All Full Screen Cabinet Full Screen B2S Cabinet Spanned Cabinet Tables Media Packs ROMsVPX Tables
All VPinMAME Recreations VPX- - /VPinMAME - MOD Tables VPX Recreations VPX Originals Media Packs ROMs VR
-
Frontend Media & Backglass
Media Packs
Complete Media Packs Wheel Logos VideosBackglasses
dB2S Animated Backglasses UVP Animated Backglasses Topper Images
- Future Pinball Tables
-
Design Resources
Main Resources
Table Templates Playfield Images Image Library Sound Library Key CodesVP Guides
VP8 Guide - English VP8 Guide - Deutsch VP9 Guide - English VP9.1.x Guide - English VP Object Guide VPM DocumentationFuture Pinball Resources
Playfield Images 3D Model LibraryFuture Pinball Guides
FP Script Guide Big Draco Script Guide FP Table Design Guide FP DMD Guide
- Other Features
- Bug Tracker
- Image Gallery
- Blogs
-
More
New Build - Converting a Judge Dredd Cabinet
Started By
gonzonia
, Jul 29 2024 03:44 PM
widebody newbuild
33 replies to this topic
#21
Posted 26 October 2024 - 02:15 PM
Screen is mounted. I think it needs adjusting but to truly fix it probably means rebuilding or at least trimming/redoing some parts with better tools/skill. I also "roughed in" the amps.
One thing I like about my build is how much scrap wood I'm repurposing. There are some pieces I've bought new like the panel for mounting the playfield, but a lot of these little blocks came from the platform that once held a water heater in our garage. It was dismantled when we started using a tankless water heater.
#22
Posted 03 November 2024 - 10:57 PM
This is going to be a long one- I’ve gotten a lot done since the last post.
With the playfield screen now mounted, it was time to make some cuts to the mount for cable access and ventilation. I took my time and planned everything out. I decided I could simplify things but cutting from where the power cable is, all the way to the edge.
Do you see the problem here?
This was not a smart move. With that corner missing, that side was not not resting on the stop block and this caused a lot of flex in the playfield.
That meant I had to redo the playfield mount. I decided I’d let someone else do the cutting this time and I made a note of the measurements. I thought that their giant saws would be better at cutting than me. Yes, and no. While straighter, there was a 1/4 inch difference from end to end on their cuts. Either the piece wasn’t square to begin with or they suck. Considering the store I was in, I’m going to go with, they suck. I’ve got a history there.
This made it very difficult to mount everything again. It was time to get some help. My brother-in-law has a wood shop and the skills so I had him help me re-cut and square up this new piece of wood.
This meant that not only did I now have a straight piece of wood, I could mount things more evenly and straighter! I also made better cuts for the cables and ventilation.
So, now I was back to where I was. Time to move forward.
With all that done I decided I wanted to turn this computer on and make sure that all works. I plugged everything in while the PC was outside the cabinet and hit the switch. I got power. That was a good sign. Then something flashed on the screen. Then nothing.
It’s been so long since I’d built a Windows machine I forgot some of the basics. Like, only connect one monitor when doing the initial setup.
With that out of the way, I got into the BIOS and verified everything was showing up correctly before booting to the USB drive with the Windows installation files.
It worked! Windows was installed, drivers were installed. I had sound where I expected. Things are good. My rear exhaust fans worked great and were quiet. My intake fan was working. The reset switch LED was acting as the HDD LED (that’s how I connected it so that I could have some indication of activity if I needed it).
With the PC on I learned that the little fans I put to add ventilation for the backglass. WAY too loud. Even at their lowest power, I couldn’t stand the whining noise they made. Those will come out eventually, but I’m leaving them in place for the time being.
Unfortunately, I also discovered that the screen I was going to be using for the DMD wasn’t working. It would come on briefly and then go off. It wasn’t really worth spending hours on troubleshooting since I’d had some issues with getting it to fit right. So I ordered a different screen. Of course, when that arrived I found that it uses a different connector (just a different style 30 pin eDP). So i ordered a new cable. That came and I found that the new screen doesn't work with the controller board. I ordered a new one of those now.
With that done, I started to look into how to place everything and realized that the PC was actually sitting exactly where the rear bass shaker was going to be. That triggered me to check on everything else too. I found that I had a similar issue near the front. The flipper solenoids wouldn’t fit in the ideal spot because the amps were too high. They needed to be moved. I lowered them to sit on the cross brace of the lower cabinet.
Remember how much cleaning I did? There was a piece of wood I removed here, you can see how filthy it used to be.
The blocks I was using didn’t quite fit right so I just used some L-brackets as shelf supports for the front and the back rests on the cross brace.
While thinking of placement, I also decided to move a few things outside the cabinet. I put the reset button, USB hub, and IR control for the playfield out the rear bottom ventilation hole and accessible on the back left of the machine.
Next I installed the grounding braid. I had installed an extra grounding wire with the convenience outlet in preparation for this step.
I had to make a couple of adjustments, but I tested everything with a multimeter and there was continuity between the metal and the ground of the plug that will connect to the outlet.
At this point, it’s just a matter of screwing stuff into the cabinet and connecting wires. Suddenly it’s like a sprint to the finish. Everything just fell into place. I was thrilled to discover I could mount the solenoids directly to the playfield. This saved me from more woodworking!
I’ve had to make a bunch of wires. Wires to connect the power supply for the SSF to main power, wires to connect the SSF amps to the power supply, wires for all the SSF exciters, and re-do the quick disconnect ends for some of the front buttons.
Here’s a before and after with the buttons connected.
Rats nest to organized and mounted.
More photos of it all-
#23
Posted 08 November 2024 - 03:38 AM
I’m now at the point where little things keep going wrong. At least they are little.
Here’s the tidied-up cabinet. I’m sure some people would go further, and maybe I will at some point but now I’m trying to not pull that PC out anymore.
With everything inside and connected, it was time to turn it on and get some setup done…but first, let me tell you about that DMD monitor replacement.
You may remember that my original plan was to re-use the original backbox screen from the AtGames Lengends Pinball HD (ALP). In order to do that I needed to get an HDMI Controller to connect the panel to the PC. BuyStuff Arcades sells one and I had ordered it for this purpose. Since the ALP screen wasn’t working correctly, I ordered a new 30 pin screen (they are usually 30 or 40 pin). That arrived and had a different type of 30 pin connector. That meant another day delay while I get a cable that would connect.
The cable arrived and I hooked it up to test, and while the screen was obviously getting power, no signal was getting through. Great. This controller didn’t work with this LCD. I tried to identify one that would and wasn’t finding an exact match. I decided to try one that listed a model with similar numbers. Another delay. Another failure. I went back to trying to find a matching board, with no luck.
Meanwhile, I’m trying to setup the TV and the other monitor. I discovered very quickly that there was a problem when I tried to set the screen to 4K HDR 120Hz. The TV would cut out. After a lot of troubleshooting and multiple HDMI and Displayport cable purchases, I finally figured out the issue. The graphics card does not like running anything at 120Hz when there is any sort of signal conversion happening. The graphics card has 3 Displayport outputs and 1 HDMI. The TV only has HDMI inputs, so that meant I had to use the TV on the HDMI output.
As I tried to find a new panel for the DMD, this was a new wrinkle. I wasn’t finding any controllers that had Displayport inputs so I could go DP>DP. It was hard enough finding a panel that matched with either HDMI controller I already had purchased. After a couple of days of searching (and ordering a portable monitor as a backup to use over USB-C) I found a controller that has DP, and then found a panel on eBay that is listed as compatible. I’m not waiting for those to arrive early next week.
In the meantime, I pulled my second monitor from my desktop setup to use as a temporary screen so I can set everything up.
Back to setting up the hardware with the software.
Fortunately, the Cleaveland Software Design documentation is pretty good. My first install was the tool that interfaces with the PinOne board that acts as the brains for all the buttons, the plunger, the solenoid, the shaker motor, and the knocker. This allowed me to test all the connections. All the buttons worked, but I had some challenges with some of the lights. I eventually got all that sorted (I did have to email Phil at CSD a couple of times though. At first the solenoids, etc weren’t working. The power supply wasn’t coming on for some reason, but after pulling it out to test outside the cabinet and reconnecting it, I was able to test all the solenoids too. While testing I made a spreadsheet of which button was which number in the system.
The next install was Steam. This allowed me to install Zen Pinball FX3 and Pinball FX. After some fiddling with the programming of the layout I thought might work best using the PinOne Configuration tool I fired up FX3 and was able to play some pinball! It wasn’t great. I didn’t have all the controls I wanted accessible. I need to figure out how to change the view mode and set that to a button. Plus, there was no SSF and no solenoids, and so it wasn’t great. But it was progress!!!!
I’ve started the install of Pinup Popper and I’m copying over my backups as I type this.
Until the next update, here are some pretty lights.
#24
Posted 04 December 2024 - 01:31 PM
Wow. I love this thing. I’m having so much fun at this point. Even the minor frustrations that keep popping up aren’t that big a deal. Some of the best games I’ve played to date are while I’m just “testing” a table. It kind of slows the process when that happens.
So, where was I? Oh yeah, installing software while I waited for my new DMD monitor to arrive. While I waited, this was my setup -
Not the prettiest, but it worked. Here’s what the new screen looked like when it arrived.
The eBay seller made good though and refunded my money. I found another replacement on Amazon that took a few more days. But it worked!!! I was able to finally put the whole thing together with a couple of modified 3d printed mirror clips to hold the screen in place.
Now, with the hardware (mostly) out of the way. Back to the software, or so I thought.
I quickly found out that things weren’t working as expected. Solenoids weren’t firing, knocker wasn’t knocking. Easy fixes though. I had just missed the connections and once connected everything worked as expected. Take this a step further a reminder to DOUBLE CHECK EVERY CONNECTION YOU MAKE! That means taking a photo from a better angle, because it might look like it’s plugged in correctly from above, but it’s not.
Oh yeah, and this happened. Thank you very much to Phil at Cleaveland Software Design for sending me a replacement board! (And for all the great support over email and Discord).
Okay, now I can focus on the software, right? YES!
I've got it mostly configured at this point here's what's left to do -
1) Black out glass around screens.
2) Get DOFLinx working. DOF is working fine but DOFLinx is not.
3) Add Apron screen. I'm still trying to decide what to do here.
4) Get sleep working. Right now, the USB ports stay on when in sleep. This is a bug in the Motherboard and I have to wait for an update, or move the PinOne to the hub.
5) Replace lockdown with fire/action button lockdown.
Looking back at my goals, these were all achieved.
- I want everything inside the cabinet.
- More solenoids.
- Access to the inside.
- No LED matrix.
- I’m hoping to keep the graphics as/is.
#25
Posted 25 March 2025 - 09:20 PM
Oh, wow. I haven't updated in a while! I've been posting on substack so I'll copy them over here. There will be a series of updates.
I’ve been playing a lot with software and trying to keep up with various updates.
My main focus has been integrating VPin-Studio so that I can remotely (from downstairs) add and update tables on the machine. This works great! My main gripe is that it’s a Java app and not a native Mac app. Since it’s open source and most of the developers aren’t on Macs, I’m able to work on contributing to get an app working.
I’ve figured out how to make it work for me, but we’re still working on making it work through GitHub's tools so that everyone can download a version for Mac when it’s available and that it gets updated with each release. <NOTE: This was originally written in January on Substack, this has been completed! Mac App available and updating!>
Related to that, I’ve also been trying to get the machine to sleep and then turn off all the lights connected to the PinOne. I’ve set everything so that it should do just that by turning off USB power when in sleep (and not fully shutdown). I could then use the Wake-on-lan function to remotely wake the machine to work on it.
Unfortunately, that’s not working. There is still power supplied to the USB ports. MSI (the motherboard manufacturer) says, “You may need to wait for a new BIOS update to be released and see if it fixes that issue.” The version released since did not fix it. I don’t expect it will ever be fixed. <Note: This still doesn't work >
I did figure out a workaround. I had a spare smart outlet that I wasn’t using. I put that inside the machine connected to the PC. The PC is now set to “Boot on Power” so I can cycle the outlet when I want to work on it. It works, but not the ideal solution. <Note: I've removed this for now. There's an electrical issue with things triggering the AFCI Breaker and until I get that fixed, I need to go up and turn it on manually anyhow.>
I also added a pause button thanks to VPin-Studio. This will allow me to Pause a table mid-play. The pause menu also brings up a high-score card for the table and the info and help details as well as tutorial videos. I put the physical button in the third coin return door. I added a label to that and the Fire button as well.
What I haven’t done is figure out an apron screen or black out any of the glass.
There are always little changes to be made as things tables and software get updated. Here’s the current to-do list. I think most of the table-specific issues are resolved but I keep forgetting to check so they remain on the list. <NOTE: Much of this has been done.>
#26
Posted 26 March 2025 - 02:31 AM
Recently I watched one of Way of the Wrench’s videos where he shows the installation of his LG OLED (similar to the one I used).
Watching this made me decide to move the playfield and scrap the idea of an apron screen. I like the idea of an apron screen, but decided it wasn’t worth the configuration changes that would be required. I’m really liking the POVs that are being created by Rudy’s Arcade. Adding an apron screen (for what I envisioned) would have meant redoing all of those as well as creating some custom images since I never came across any that were what I wanted.
So, today I decided to shift my screen approximately four inches closer to the lockdown bar. Since I was doing this, I also planned on finally blacking out the glass and painting the mounting board so that it was less visible.
How hard could that be, right? Pull the screen out, cut the corners off the mounting panel, move the dowel holders, and paint the board.
This part wasn’t too bad. I disassembled it all, cut the corners, and painted the board. No biggie.
Moving the dowel holders was a little more challenging. After initially moving them the board was not going in straight. Luckily since there was plenty of support I was able to focus on adjusting just one side. I think I did alright.
As you can see, it’s a little close to the lockdown bar. I was able to drill the holes on the mounting board a little bit bigger so that the TV could be shifted slightly back. It’s damn near perfect now.
While I had it out I took the opportunity to clean up some of the rats nest of wires that was under the TV in the back.
One problem with this change- the screen hits the CPU cooler if I’m not careful. I had to cut some of the mounting board off at that end as well to create some more clearance.
had ordered a new DP cable to use for the backbox or DMD. The DMD DP cable was a little too short and I was worried about the tension over time. Since it was all disassembled I wanted to add that too.
And of course, since I was opening the backbox, I should use this opportunity to shift the backbox screen up slightly (I always felt it was too low). Oh, and add a small block under the monitor to fix the slight downward tilt.
This is where things started to go wrong. I pulled the DMD out so I could put the cable from the backbox on the DMD and put the new cable on the backbox. When I went to put the DMD back, the screen just slid out. The screws in my 3D printed corner brackets came out.
I found some longer screws and got it re-mounted. Then I pulled the backbox screen down. I marked and drilled pilot holes. Then I was having trouble getting the french cleat to line up with the holes. Eventually I got it. I went to hang the screen back up and while I was plugging it in, it slipped. Oops.
At least it’s not the playfield but it’s also not a cheap mistake. The mounting position is better though!
BEFORE:
AFTER:
So, now I’m waiting on a new backbox screen (2 days) and then the only step left for me (for the foreseeable future) is to blackout the glass on the edges.
Edited by gonzonia, 26 March 2025 - 02:31 AM.
#28
Posted 11 April 2025 - 12:30 PM
I’m enjoying playing on the machine now. I’ve got everything blacked out, and I’m very happy with how it turned out.
I’ve been going through table by table and testing. Some of the common problems I’m finding are
- I don’t like the loading screen or multiple audio tracks playing while loading.
- There’s a black box on the playfield. Turning the background off on the b2s backglass fixes this.
- The sound isn’t working in some way. Some roms it’s just turned down others there’s a different setting that needs to be adjusted.
- The POV is off. I’m noticing that some of the POVs are out of whack. I don’t know if this is a mismatch with what I downloaded, or something I screwed up at some point.
- The knocker doesn’t always work for a game. I haven’t figured out a fix for this. I see it set up in script and the DOF settings but it isn’t working.
The biggest frustration I have right now is an electrical issue. The room that houses the machine is on a circuit with an AFCI Combo Breaker. I found that having a UPS connected would often trip the breaker. I tried multiple solutions to fix this. First, I tried a different UPS, then I tried an Tripp Lite Isobar ISOBLOK2-0which is supposed to filter line noise. No matter what the breaker would eventually trip. Often in the middle of the night with everything off.
Eventually I added an arc filter that is designed for treadmills. That seemed to be stable. Until it wasn’t. I think I’ve finally narrowed the problem to either the convenience outlet or the rocker switch. I tried swapping the outlet but I still had the problem. Right now I have the internal powerstrip just coming out the back. Everything seems stable this way. I just don’t like the look or the fact that there’s no external power switch.
The remaining hardware things I have on my list are-
- Attach/Reattach the IR sensor for the TV and the reset switch for the PC. This is minor.

- Lower the rails that PC rests on inside the cabinet to allow clearance for raising the monitor. Currently, I have to be very careful when doing that. This could be a challenge.
- Clean up some of the wiring for the PC power and reset switches. When making minor adjustments and when fiddling with the power problem I kept snagging on these.
#29
Posted 03 November 2025 - 07:28 PM
I finally got through testing all my VPX tables. It took a long time to a) find the time, and b) test them while also adding new ones.
Today I tackled my #2 item from my last update and a couple of other things I wanted to address.
Id been putting off opening the cabinet for quite some time. I felt the changes I wanted to make were significant, and I was nervous about how easy it would be, especially considering I needed to remove the playfield and the PC to do it.
It took some time, but I finally got it done.
This morning I pulled off the rails Ive been using to hold the PC. These were part of the original cabinet. They were nailed and glued in place. When they came off, there was some surface wood damage.

I took some scrap wood from the playfield mount and cut a couple of new pieces that were not quite as wide. This dropped the PC about a half inch. That is just enough that the playfield monitor now clears the CPU cooler when its opened. I also made them a little longer so that the PC could be forward a little more and allow better access to the power strip.I took some scrap wood from the playfield mount and cut a couple of new pieces that were not quite as wide. This dropped the PC about a half inch. That is just enough that the playfield monitor now clears the CPU cooler when its opened. I also made them a little longer so that the PC could be forward a little more and allow better access to the power strip.

I also added back in the convenience outlet, but the moment I turned it all on once everything was reconnected, it tripped the circuit breaker, so that came back out. Someday, I hope to figure out which piece is creating the problem, the outlet or the exterior switch.
The next task for today was installing a speaker protection circuit. The goal is to stop the loud pop/thump created when the machine is turned on or off. The circuit creates a delay to the power going to the speakers so that doesnt happen. Unfortunately, it didnt help much with the noise at shutdown.

After that, it was finally time to add the new true leaf buttons. I was hoping to add the dual-action buttons so that I could start implementing staged flippers, but I need to wait until theres a new button board out for that. I knew that might be an issue, which is why I bought two single-action buttons too.
This was fairly easy, though I had to bend the connectors on the left button and angle it differently to get it to fit.
The clearance is pretty tight when the playfield monitor is down.

.
. 
Thats it for now. The buttons definitely have a different feel. I wish I had a real pin to compare to side by side. Hopefully someday.
The current list of things to do:
1) Test Future Pinball Tables (all the VPX tables are working).
2) Test Pinball FX/FX3 (I dont have these showing right now, and I may remove them completely). I don't find myself looking to play those tables at all, but at the same time, I'm a bit of a collector, and so kind of want to show it all off.
Also, some videos of it in action.
https://youtu.be/n7THWAa8YFU
https://youtu.be/NaVy0CfW7S4
https://youtu.be/qMuynQUeVYk
https://youtu.be/bEkkqXT4haI
Edited by gonzonia, 03 November 2025 - 07:32 PM.
#30
Posted 03 November 2025 - 07:50 PM
1. Id been putting off opening the cabinet for quite some time. I felt the changes I wanted to make were significant, and I was nervous about how easy it would be, especially considering I needed to remove the playfield and the PC to do it.
2. The next task for today was installing a speaker protection circuit. The goal is to stop the loud pop/thump created when the machine is turned on or off. The circuit creates a delay to the power going to the speakers so that doesnt happen. Unfortunately, it didnt help much with the noise at shutdown.
Cool build.
1. Yeah, I feel the same way sometimes <smile> . It's working now (before I rip-it apart) ... maybe I should just play it?
2. Just noticed this myself. IMO, it needs attention but just made it to the ToDo List for now.
https://www.vpforums...=55962&p=549089
Edit: Closer examination of pics reveals you already made an effort to add grounding and make more of a grounded chassis (for your "wooden box").
Edited by Tesla, 03 November 2025 - 07:56 PM.
#32
Posted 17 February 2026 - 04:47 AM
In my second post documenting this process, I listed the things that I wanted to make sure were part of this machine. The last thing on the list that I had yet to accomplish was this-
Action/fire button on lockdown bar. The lockdown bar is the piece of metal that covers the top front of the cabinet. It has rounded corners for your hands and is locked in place using a “receiver” inside. I’m still looking for a good source of one that will fit. I found one on VirtuaPin.netthat costs a bit more than I was hoping to spend on this part. I’ll probably end up adding this near the end or later.
A couple of months ago, the virtuoso of virtual pinball, Way of the Wrench, posted a new video showing how to do exactly what I wanted.
The problem was, some of those skills were out of my reach and I’m using a different piece from Cleveland Software Design to drive the fire button RGB. I spent (far too much time) trying to find lights I could use off the shelf or to build something that could connect to the PinOne button board.
Since I don’t have a workshop or somewhere I was confident that I could safely drill through the lockbar, I called on my brother-in-law, who has a full shop and the needed tools and skills. You may recall he helped me fix one of my earlier screw-ups with the monitor mount.
Now that there was a space for the button, of course, I couldn’t leave it open. I decided to figure out how to get a CSD RGB button to work. The trick was to modify the action button housing so that the button would sit higher up. I was worried about how I’d run the wires, but there’s actually a perfect spot that doesn’t interfere with the mechanism of the lockdown receiver at all.

While that worked, it looked weird, and I needed to make sure to disconnect it if I removed the lockbar. So, with at least a plan in place, I started ordering parts.
First, I ordered the button. While Way of the Wrench used Marco Specialties, Pinball Life was a little better for me in this case. I think the shipping was a tiny bit cheaper. I also dig their stickers. They do parodies of famous brands but they say “Pinball Life” instead of the brand. I have a Funyons, PBR, and Cars knock-offs. I think I have another one that might have been the spam design, but I’m not sure where I put it.
Once I had the button, I realized I did not have the right kind of pal nut. I knew from the Way of the Wrench video that I would need a washer too, so I decided to combine the two into a print. I downloaded a file from McMaster-Carr of the nut and merged it with a flanged nut from Thingiverse using Tinkercad. I put it on printables.
The tabs aren’t super strong, but it works…once. If I take it off the tabs usually break and I need to re-print.
I also ordered some lights that looked like they might be small enough from AliExpress. They were small enough, but not the right type. I learned the difference between Common Anode vs. Common Cathode thanks to that mistake. I tried another set, but those were too big. I decided to try to make my own. There were quite a few attempts with both PCBs I bought and 3D printed boards to just add structure. I had some working prototypes, but I don’t think they were really small enough, and the light wasn’t really being directed the right way. I needed a strip like Way of the Wrench used.
Additionally, I was trying to repurpose a leaf switch from an RGB True Leaf Button I had, and that just wasn’t working well. It wasn’t stable and I didn’t want to drill into the receiver. I’m terrified of the little metal shavings getting into other things and I’m also not sure I could do it with my tools. I started looking at other switches and decided to order an actual Stern Action Button switch.
I initially settled on a 5V strip from Amazon that looked like it might work. But the lights weren’t very dense so I’m was a little worried it wouldn’t be bright enough. While I waited for that to arrive, I discovered a different type of strip that was more continuous and looked like it might be brighter.
I’ve had the button for a while, but today the rest arrived and it worked!
I had to take the plastic piece off the switch for the glass to slide off. I initially tried just trimming it down, but the button would then press on the switch when it was in place.
I cut the strip light shorter and soldered some wires in place, here’s the end result hot glued in place.
Edited by gonzonia, 17 February 2026 - 04:50 AM.
#33
Posted 11 March 2026 - 11:05 PM
A few months ago when I bought the RGB leaf-switch buttons from Cleveland Software Design I also bought the dual-action versions. Before that I didn’t know that staged flippers even existed!
I wanted to install them as soon as I got them, but I realized I didn’t have enough inputs available. The PinOne button board is 1-14 and the Service board is 15-22. The main board also has a 23 and 24. I was using 24 for the POV button. This was an easy way to press F12 with a button and bring up the POV/Options menu in VPX.
I was looking at something today and was reminded that I can use a “Shift” button to enable a combination of buttons to do an action. I have my shift button set to my left magna save. I changed things so that when I press the shift button and the help button, it presses input 31, which sends F12. This allowed me to remove the physical POV button and meant I now had inputs 23 and 24 open! As a bonus, it also meant I could shift my pause button so that it was easier to close my coin door.
All this wasn’t without its difficulties. It turns out the JST extension cables I have for the buttons swap the colors when they connect. I spent a long time trying different wiring combinations before I discovered this was the problem.
Once I got it figured out though, it wasn’t too difficult. With the PinOne, only one ground is needed so I kept this on the primary flipper. I connected the primary flipper ground to the middle and the primary flipper switch to the first contact. The staged flipper input was connected to the third contact.
Then I followed the instructions on the CSD documentation page to set up the Addams Family table, and it worked great! I’ve also set up the Whirlwind table. I’m going to see what other tables I can find that use this. I thought about editing tables to use it, but realized that just because it has extra flippers doesn’t mean the original machine used staged flippers. I’ve put together a spreadsheet to document which tables use and don’t use staged flippers, as well as what needs to be changed to make it work. I’ve tried updating a couple of scripts that don’t have it directly implemented, but I wasn’t very successful.
I've got a video over on my substack
Edited by gonzonia, 11 March 2026 - 11:06 PM.
#34
Posted 12 March 2026 - 02:50 AM
> I thought about editing tables to use it, but realized that just because it has extra
> flippers doesn’t mean the original machine used staged flippers.
When in doubt, it's a very good bet that the original machine did have the physical double leaf switch. Any Williams Fliptronics machine with opto flipper buttons definitely does (essentially anything Williams/Bally/Midway from about 1991 and later); all of those machines used the identical part for the opto switches, and those all have double switches. Even the Fliptronics machines without extra flippers use have the double switches, because they all use that same part. The WPC ROM software just ignores the second switch CPU input if there's not a second flipper. Any pre-Fliptronics Williams machine from the 1980s and later with extra flippers also almost certainly has the double switches. If you want to verify that that's really true for a given machine, all of those games have Operations Manuals available, and those all include "Cabinet Wiring" diagrams in the Schematics sections, where you should be able to spot a separate flipper button switch for each flipper coil. But there's not much need to check game-by-game; it seems to have been universal practice among the Williams games to use the double switches, going back to at least the System 7 games.
Edited by mjr, 12 March 2026 - 02:52 AM.
Also tagged with one or more of these keywords: widebody, newbuild
Visual Pinball →
VP Recreations - New Releases →
Samba (LTD do Brasil 1976)[Visual Pinball X]Started by Halen , 24 Sep 2024 |
|
||
Visual Pinball →
VP Recreations - New Releases →
Ipanema (LTD do Brasil 1976)[Visual Pinball X]Started by Halen , 24 Sep 2024 |
|
||
Visual Pinball →
VP & VPM MODs - New Releases →
Amazing Spiderman (Gottlieb, 1980) Sinister Six Edition[Visual Pinball X MOD]Started by xenonph , 04 Jul 2024 |
|
||
Virtual Pinball →
Resources →
The Atarians (Atari 1976) Playfield and Plastics RedrawStarted by Patrick2610 , 02 Oct 2023 |
|
||
Virtual Pinball →
Resources →
Semi-Widebody TemplateStarted by TouchMaster97 , 26 Jan 2022 |
|


Top


_t.jpeg)
_t.jpeg)
_t.jpeg)

_t.jpeg)


are all trademarks of VPFORUMS.
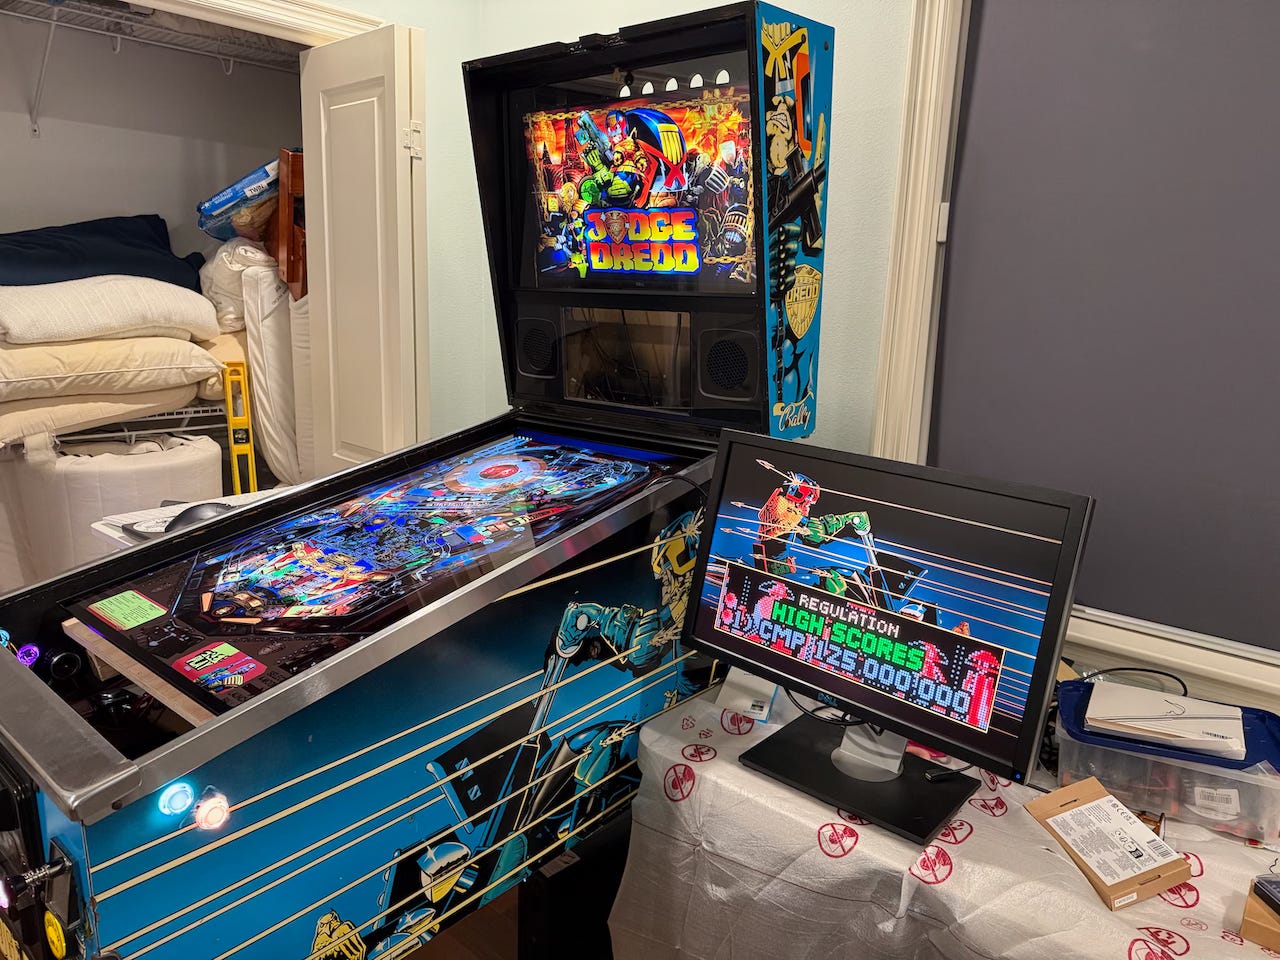