Jump to content


Photo

Advice on MAME cabinet build (Actual build starts on page 3)


  • Please log in to reply
85 replies to this topic

#21 Wiliamo

Wiliamo

    Hobbyist

  • Members
  • PipPip
  • 17 posts
  • Location:North Carolina, USA

  • Flag: ---------

  • Favorite Pinball: Modern

Posted 21 June 2018 - 12:12 AM

On the underside of the black square, there is a plastic knob pointing down on each side of the stick.  I have grooved the Plexiglass so that the knobs cannot be turn more that 45 degrees.  I just turn the black square until it cannot go any further.  Then back again.  It's very secured and doesn't move during play.  You do need a bit of pressure to turn it.


cp4.jpg


#22 BoltBait

BoltBait

    Software Developer

  • Members
  • PipPipPip
  • 392 posts
  • Location:Sacramento, CA

  • Flag: United States of America

  • Favorite Pinball: Elvira, Whitewater, Big Bang Bar, Fun House and All the old EM tables of the 70s that I played as a kid (including Buccaneer, Spirit of 76, and King Kool)

Posted 21 June 2018 - 01:55 AM

I was just thinking... instead of having a piece of plastic at the top of the cabinet with a light behind it, should I have a monitor up there instead that shows the name/logo of the game currently being played (you know, something like a B2S type of setup on my pinball cab)?


I was thinking about one of those programmable LED signs you see in the windows of businesses. It could be programmed to show the name of the currently playing game.


EDIT: Something like this: LED Sign


Edited by BoltBait, 21 June 2018 - 05:26 AM.

How I built my B2S Pinball Cabinet, step-by-step, with pictures!  Full-sized cabinet for ~$700. Believe me, if I can do it, so can you!

"Making anything with your hands goes wonderfully with whatever in your life you would consider your grind." ~Nick Offerman


#23 DDH69

DDH69

    Pinball Wizard

  • Platinum Supporter
  • 3,515 posts
  • Location:DOFLinx HQ, Adelaide

  • Flag: Australia

  • Favorite Pinball: Monster Bash

Posted 21 June 2018 - 02:02 AM

Generally MAME games do not require that many buttons, but I use PiPlay for Nintendo and PS emulation as well, they need the rest of the buttons.  It depends if you just want MAME or lots more.


DOFLinx
Contributions for equipment to help with ongoing DOFLinx development can be made here

#24 STAT

STAT

    Pinball and Arcade Freak

  • VIP
  • 4,978 posts
  • Location:Wels - Austria

  • Flag: Austria

  • Favorite Pinball: Twilight Zone

Posted 21 June 2018 - 06:31 AM

MAME with Wii - Controller as Gun:
 
First you Need 1 Wii Controller (of course) and a Wii Sensor Bar, all you can buy separately, not only original Nintendo.
But for Controller, i recomend 1 Original, because Friends said, this are the Best for good Conection.

I didn't tested others, i also have a Wii and some Controllers.
 
MAME: a Version with RAW Input, i builded my Arcade Cab in 2013, here i only found MAME Plus 0.107,
probably now you will get a newer Version with RAW Input.
 
Bluetooth Adapter for Wii Controller:
You Need a Special (there are some avaiable) BT Dongle for Computer, one is here:
https://de.dolphin-e...ssories-dolphin
Dolphin is also a very good Emulator, where you can Play some Wii and GameCube Games on PC,
also with "Gun Mode" (e.g. Zelda Crossbow, yes it works).
 
And then, you Need the Software Wiinmote: http://onakasuita.org/wii/index-e.html

Instructions how to install and use, also on this Page.


I made the following notes:

BT turn on

Double Click on BT Icon

Press [F5] to search Hardware AND press and hold down 1+2 on Wiimote for about 2 Sec.

Then there should be the Hardware, Double Click on the Hardware, BT Icon should now light "green" ...

Part 1 ready.


Start Wiinmote Programm

Turn on/off Mouse Pointer with "Wii Home" Key on Controller

Test, then turn off

Start MAME, and Game (Terminator 2, Operation Wolf, ...) then turn on again with "Wii Home" ...


I think, before, there is something to check in MAME Options too.

I use Win 7 on my Arcade Cab, maybe there is something different at Win 8/10 ...

And of Course, place the Wii Bar above your Screen.

I saw some Projects, where it works with "Candlelights" too, Google/Youtube ...


Now you should can move Crosshair with Wiimote ...

Also all other Buttons should work, i can Play Wii - Super Mario with this on Dolphin Emu like on a original Wii.


Edited by STAT, 21 June 2018 - 09:09 AM.


#25 BoltBait

BoltBait

    Software Developer

  • Members
  • PipPipPip
  • 392 posts
  • Location:Sacramento, CA

  • Flag: United States of America

  • Favorite Pinball: Elvira, Whitewater, Big Bang Bar, Fun House and All the old EM tables of the 70s that I played as a kid (including Buccaneer, Spirit of 76, and King Kool)

Posted 21 June 2018 - 05:34 PM

Now I'm conflicted...
 
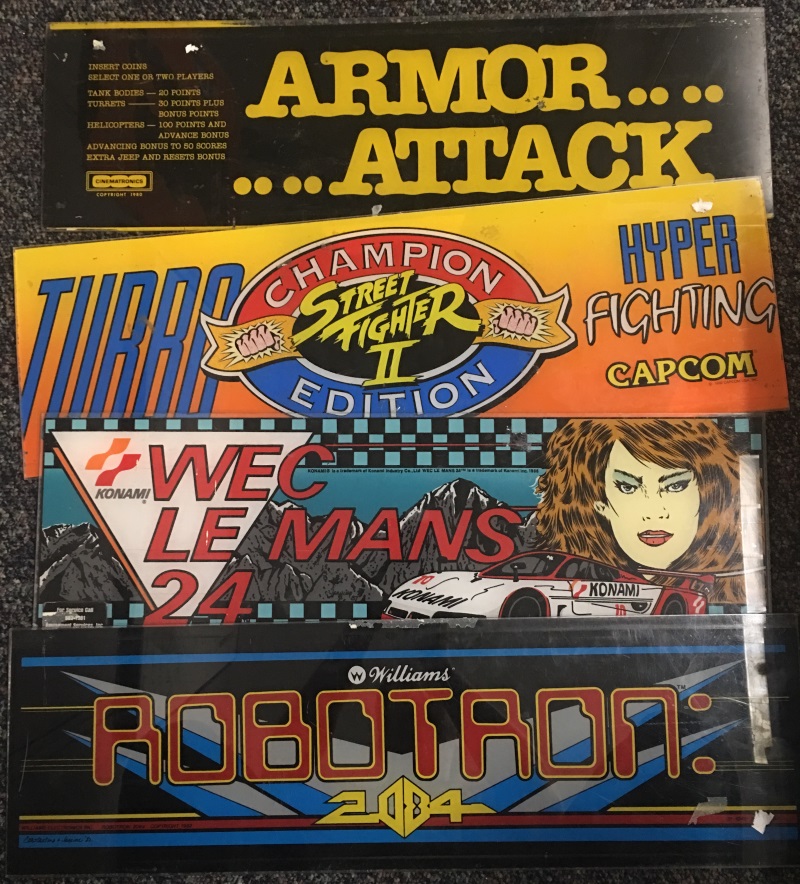
I think the LED sign would be a cool idea, but my friend at work just gave me some plastics he had:
 
Plastics.jpg
 
and that Robotron 2084 is pretty sexy! 
 
Only one problem... my cabinet won't run Robotron as it requires two 8-way joysticks and I'm not including any at all.
 
(Free plastics > $100 LED sign)?

EDIT: my friend suggests that I make light boxes out of the ones I dont use. I think these would look good on the game room walls.

Edited by BoltBait, 22 June 2018 - 01:37 AM.

How I built my B2S Pinball Cabinet, step-by-step, with pictures!  Full-sized cabinet for ~$700. Believe me, if I can do it, so can you!

"Making anything with your hands goes wonderfully with whatever in your life you would consider your grind." ~Nick Offerman


#26 gtxjoe

gtxjoe

    VPF Veteran

  • VIP
  • 5,132 posts

  • Flag: United States of America

  • Favorite Pinball: Medieval Madness, AbraCadabra


Contributor

Posted 21 June 2018 - 07:34 PM

Street Fighter II is one of 6 button games

#27 BoltBait

BoltBait

    Software Developer

  • Members
  • PipPipPip
  • 392 posts
  • Location:Sacramento, CA

  • Flag: United States of America

  • Favorite Pinball: Elvira, Whitewater, Big Bang Bar, Fun House and All the old EM tables of the 70s that I played as a kid (including Buccaneer, Spirit of 76, and King Kool)

Posted 22 June 2018 - 07:03 PM

Found this video on Pole Position with a spinner/steering wheel:


He talks about putting a cover over the spinner when not in use, but he doesn't show putting a standard knob on it for breakout type games.  Anyone know if the standard knob works as easily as the steering wheel in the video?


How I built my B2S Pinball Cabinet, step-by-step, with pictures!  Full-sized cabinet for ~$700. Believe me, if I can do it, so can you!

"Making anything with your hands goes wonderfully with whatever in your life you would consider your grind." ~Nick Offerman


#28 STAT

STAT

    Pinball and Arcade Freak

  • VIP
  • 4,978 posts
  • Location:Wels - Austria

  • Flag: Austria

  • Favorite Pinball: Twilight Zone

Posted 22 June 2018 - 08:48 PM

I have an Ultimarc SpinTrak USB Arcade Spinner - and here you can mount, of Course, a Spinner Wheel,
and also a Steering Wheel: https://www.ebay.at/...it/272718590276


But i haven't the Steering Wheel, unfortunately i mounted the Spinner too near to the Screen.

Pole Position is great with this ! And yes, all other Games working very well !

Arkanoid, Hot Rod, Super Sprint, ...


Edited by STAT, 22 June 2018 - 08:54 PM.


#29 BoltBait

BoltBait

    Software Developer

  • Members
  • PipPipPip
  • 392 posts
  • Location:Sacramento, CA

  • Flag: United States of America

  • Favorite Pinball: Elvira, Whitewater, Big Bang Bar, Fun House and All the old EM tables of the 70s that I played as a kid (including Buccaneer, Spirit of 76, and King Kool)

Posted 22 June 2018 - 10:21 PM

I have an Ultimarc SpinTrak USB Arcade Spinner - and here you can mount, of Course, a Spinner Wheel,
and also a Steering Wheel


I'm sorry, what I meant to ask was if the standard spinner knob is as easy to install as the steering wheel appears to be in the video.


The guy just popped the steering wheel off and on.  I was wondering if you can change from steering wheel to standard knob easily and quickly--no tools required.


How I built my B2S Pinball Cabinet, step-by-step, with pictures!  Full-sized cabinet for ~$700. Believe me, if I can do it, so can you!

"Making anything with your hands goes wonderfully with whatever in your life you would consider your grind." ~Nick Offerman


#30 BoltBait

BoltBait

    Software Developer

  • Members
  • PipPipPip
  • 392 posts
  • Location:Sacramento, CA

  • Flag: United States of America

  • Favorite Pinball: Elvira, Whitewater, Big Bang Bar, Fun House and All the old EM tables of the 70s that I played as a kid (including Buccaneer, Spirit of 76, and King Kool)

Posted 24 June 2018 - 07:31 PM

Well, I started ordering parts!

  • I ordered memory and an SSD for my i3 NUC from Amazon.
  • I ordered a gas pedal (used, all metal), a joystick (new), and a Space Invaders marquee (new) off of eBay. 

Everything should be here by next Friday.


I will be painting the cabinet to match my pinball machine (space theme), so I think the Space Invaders marquee will be a nice touch.


I will be ordering the spinner/steering wheel, trackball, and buttons w/controller soon.


I really want 5 of these buttons, but they're currently sold out.  I sent a message to see when they anticipate having them back in stock... no response yet.


My plan is to purchase the plywood on Friday and start construction that weekend.


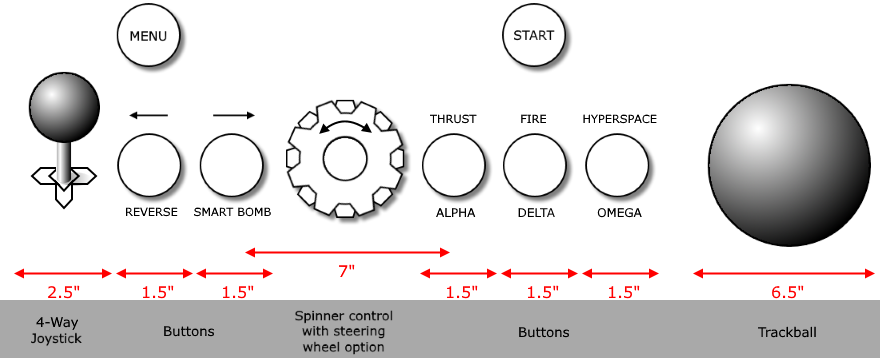
I have decided on this layout for my control panel:


ControlPanelE1.png


"Coin In" button and gas pedal on the front of the cabinet.


Calculating the width of the controls and the width of the marquee, that puts the width of my cabinet at about 24" (61cm).  I can't go more than 26" wide or it won't fit through my doorways. :D Also, my monitor is 21 1/4" wide, so that should fit well with a little strip on each side to frame it in place.


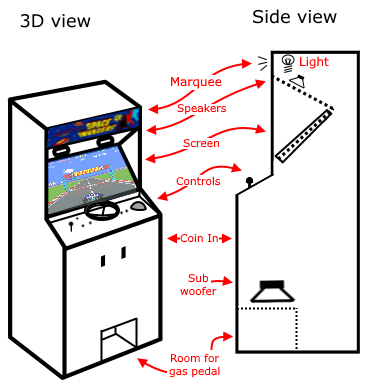
I haven't quite decided on final dimensions yet, but it is going to look something like this (notice, all straight cuts):


BBArcadeE1.png


My pinball machine is 5'4" (162cm) tall, so I want to make this close to that height.


My budget is $700.


Edited by BoltBait, 25 June 2018 - 08:43 PM.

How I built my B2S Pinball Cabinet, step-by-step, with pictures!  Full-sized cabinet for ~$700. Believe me, if I can do it, so can you!

"Making anything with your hands goes wonderfully with whatever in your life you would consider your grind." ~Nick Offerman


#31 STV

STV

    Enthusiast

  • Members
  • PipPipPip
  • 436 posts

  • Flag: United States of America

  • Favorite Pinball: Varies. 140 in the list ATM.

Posted 25 June 2018 - 12:58 AM

I'll advise to put L and R buttons on the left side.   I have some of those buttons that snap into leaf switches, but not the lighted ones so if'n you want some of those just let me know...


#32 BoltBait

BoltBait

    Software Developer

  • Members
  • PipPipPip
  • 392 posts
  • Location:Sacramento, CA

  • Flag: United States of America

  • Favorite Pinball: Elvira, Whitewater, Big Bang Bar, Fun House and All the old EM tables of the 70s that I played as a kid (including Buccaneer, Spirit of 76, and King Kool)

Posted 25 June 2018 - 01:31 AM

I'll advise to put L and R buttons on the left side.


Um.... they are on the left side.  They're labeled with left and right arrows above them.  They are located to the left of the spinner/steering wheel.


I have some of those buttons that snap into leaf switches, but not the lighted ones so if'n you want some of those just let me know...


That's OK.  I appreciate the offer, but if I can't get lighted concave buttons from Groovy Game Gear, I'll just order something similar from Ultimarc.  I would just prefer to get them from GGG as they have the "true leaf pro" style contacts.


Since not all buttons are active for every game, my idea is to light the buttons that are active for the selected game... and light them according to function. So, movement buttons are blue, thrust/jump buttons lit green, and fire button lit red.  If you'll notice on the control layout, the buttons are labeled on both top and bottom of each button for the various games.  Therefore, when Missile Command is playing, the Alpha, Delta, and Omega buttons would be lit red and the trackball would be lit blue.  When Space Invaders is playing, the left and right arrows would be lit blue, the fire button would be lit red.  When Asteroids is playing, left and right would be lit blue, thrust would be lit green, the fire button would be lit red, and the hyperspace button would be lit blue.  Etc.


GGG doesn't sell a lit joystick, so that's why I bought one off eBay.  The only control that can't be lit is the spinner/steering wheel and for that I'll just mount an LED near the control.


The LED Wiz controller from GGG can handle all the button inputs as well as controlling all the LED colors.  If software doesn't exist for controlling the LED's the way I plan, then I'll just write it myself.


Edited by BoltBait, 25 June 2018 - 02:13 PM.

How I built my B2S Pinball Cabinet, step-by-step, with pictures!  Full-sized cabinet for ~$700. Believe me, if I can do it, so can you!

"Making anything with your hands goes wonderfully with whatever in your life you would consider your grind." ~Nick Offerman


#33 STAT

STAT

    Pinball and Arcade Freak

  • VIP
  • 4,978 posts
  • Location:Wels - Austria

  • Flag: Austria

  • Favorite Pinball: Twilight Zone

Posted 25 June 2018 - 06:07 AM

Ah ok, yes the Wheel is easy to put on and off ... and about your Cab, i recomend you to add Flipper Buttons at the Side.


Edited by STAT, 25 June 2018 - 06:08 AM.


#34 BoltBait

BoltBait

    Software Developer

  • Members
  • PipPipPip
  • 392 posts
  • Location:Sacramento, CA

  • Flag: United States of America

  • Favorite Pinball: Elvira, Whitewater, Big Bang Bar, Fun House and All the old EM tables of the 70s that I played as a kid (including Buccaneer, Spirit of 76, and King Kool)

Posted 25 June 2018 - 06:15 AM

... and about your Cab, i recomend you to add Flipper Buttons at the Side.


Flipper buttons?!


If I want to play pinball, I'll just play on my pinball machine. :D


How I built my B2S Pinball Cabinet, step-by-step, with pictures!  Full-sized cabinet for ~$700. Believe me, if I can do it, so can you!

"Making anything with your hands goes wonderfully with whatever in your life you would consider your grind." ~Nick Offerman


#35 Nemo

Nemo

    Pinball Fan

  • Platinum Supporter
  • 1,283 posts
  • Location:Netherlands

  • Flag: Netherlands

  • Favorite Pinball: Monster Bash

Posted 25 June 2018 - 03:14 PM

That just looks like a good setup, now IF i had to nitpick i would suggest that you do install T-molding, it will look professional !

Secondly, make sure you have enough room around your spinner, it's easy to hit a knob while you're playing. And shouldn't the 

gas pedal be more to the right of the cab ?


Gone fishin', no really.......

My F14 Cab http://www.vpforums....showtopic=21820

My Coffee Table http://www.vpforums....topic=25407&hl=

My Jukebox WIP http://www.vpforums....topic=23825&hl=


#36 BoltBait

BoltBait

    Software Developer

  • Members
  • PipPipPip
  • 392 posts
  • Location:Sacramento, CA

  • Flag: United States of America

  • Favorite Pinball: Elvira, Whitewater, Big Bang Bar, Fun House and All the old EM tables of the 70s that I played as a kid (including Buccaneer, Spirit of 76, and King Kool)

Posted 25 June 2018 - 04:46 PM

That just looks like a good setup...


Thanks!  I can't take all the credit... you gave me some valuable feedback about the controls layout. :D


now IF i had to nitpick i would suggest that you do install T-molding, it will look professional !


I'll definitely be doing that.  I'm going to build the whole thing out of plywood--3/4" for the sides and front panel and 1/2" for the top and back.  I'll be putting T-molding on the left and right sides.  (I recently picked up a T-molding bit for my router.)


Secondly, make sure you have enough room around your spinner, it's easy to hit a knob while you're playing. And shouldn't the 

gas pedal be more to the right of the cab ?


Once the controls come, I'll be taking a long time to layout the control board.  I'll probably do a mock-up using cardboard first just to make sure the controls aren't too crowded and the buttons are close enough together to be comfortable.


And, yes, the drawing I gave is just a very rough sketch.  The gas pedal will be located just to the right of the steering wheel.  I will be sure to place it so that it feels comfortable when standing to play.  In fact, I'll probably even move the steering wheel a little closer to the front edge of the control board just to make play more comfortable.


Once I start building the cabinet I'll post more detailed plans.


Edited by BoltBait, 25 June 2018 - 04:48 PM.

How I built my B2S Pinball Cabinet, step-by-step, with pictures!  Full-sized cabinet for ~$700. Believe me, if I can do it, so can you!

"Making anything with your hands goes wonderfully with whatever in your life you would consider your grind." ~Nick Offerman


#37 BoltBait

BoltBait

    Software Developer

  • Members
  • PipPipPip
  • 392 posts
  • Location:Sacramento, CA

  • Flag: United States of America

  • Favorite Pinball: Elvira, Whitewater, Big Bang Bar, Fun House and All the old EM tables of the 70s that I played as a kid (including Buccaneer, Spirit of 76, and King Kool)

Posted 27 June 2018 - 05:12 AM

I really want 5 of these buttons, but they're currently sold out.  I sent a message to see when they anticipate having them back in stock... no response yet.


I got an email from GGG and they won't restock those buttons for a "rather long time". :(


But, they did suggest another of their products that could do what I want.


I sent a response with a few questions that I need answered before I pull the trigger and order $350 worth of stuff from them.


I hope they answer quickly, I'd like to start my cabinet build this weekend.


How I built my B2S Pinball Cabinet, step-by-step, with pictures!  Full-sized cabinet for ~$700. Believe me, if I can do it, so can you!

"Making anything with your hands goes wonderfully with whatever in your life you would consider your grind." ~Nick Offerman


#38 STAT

STAT

    Pinball and Arcade Freak

  • VIP
  • 4,978 posts
  • Location:Wels - Austria

  • Flag: Austria

  • Favorite Pinball: Twilight Zone

Posted 27 June 2018 - 05:36 AM

... and about your Cab, i recomend you to add Flipper Buttons at the Side.

 
Flipper buttons?!
 
If I want to play pinball, I'll just play on my pinball machine. :D


Of Course, i too - but remeber, there are some Pinball Games on MAME, NES have "Pinball", and i also recomend to try DS Emulator with "Metroid Pinball", so These Buttons are maybe "nice to have", if you want to Play Stuff like this.

#39 BoltBait

BoltBait

    Software Developer

  • Members
  • PipPipPip
  • 392 posts
  • Location:Sacramento, CA

  • Flag: United States of America

  • Favorite Pinball: Elvira, Whitewater, Big Bang Bar, Fun House and All the old EM tables of the 70s that I played as a kid (including Buccaneer, Spirit of 76, and King Kool)

Posted 28 June 2018 - 03:59 AM

STAT, I'll have to think about that.


Anyway, I picked up the wood for my cabinet today. Two 4x8 sheets of 3/4" plywood.  Same stuff I built my pinball machine out of.


RAM for the NUC arrived today.  The SSD is scheduled to arrive tomorrow.  Everything else should arrive by Friday.


I still haven't ordered the controls from GGG--slight hiccup.  5 of the switches I'm ordering aren't available yet in their online store.  I have an email out to them on how they want to handle this.  As soon as I hear back, I'll be ordering the spinner/steering wheel, trackball, Game Controller, and lighted buttons.  Even if they arrive late, I'll still start building my cabinet this weekend.  There's still a lot of building and painting before I'll be ready to make the controller board.


I also worked out the final drawing of the cabinet.  It won't be quite as boring as my previous drawings show.  Pics this weekend after I do the wood cutting.


Edited by BoltBait, 28 June 2018 - 04:07 AM.

How I built my B2S Pinball Cabinet, step-by-step, with pictures!  Full-sized cabinet for ~$700. Believe me, if I can do it, so can you!

"Making anything with your hands goes wonderfully with whatever in your life you would consider your grind." ~Nick Offerman


#40 jesperpark

jesperpark

    Enthusiast

  • Silver Supporter
  • 271 posts
  • Location:Edmonton Alberta Canada

  • Flag: Canada

  • Favorite Pinball: Medieval Madness

Posted 28 June 2018 - 04:58 AM

Hey just my 2 cents about the Electric Ice Buttons, I am not a fan of them.  I had 4 of the true leaf ones for my virtual pin, the build quality is just not what I expected especially from groovy game gear.  The leafs are a PIA to adjust and needed a bunch of work to get them close, and some of the LED light connections were broken when they arrived.  I ended up pulling them out and going with some other buttons, I had high hopes for them.


Hopefully they are better now