Jump to content


Photo

90's Workshop: Buildin' The Table


  • Please log in to reply
369 replies to this topic

#281 wtiger

wtiger

    Pinball Fan

  • VIP
  • 1,148 posts
  • Location:Los Angeles, CA

  • Flag: United States of America

  • Favorite Pinball: Junkyard


Contributor

Posted 25 January 2010 - 12:34 AM

VUK building – Part 2

Now we will start building the vertical wire that goes from the playfield up through the back ring we built. Copy one of the perfect circle objects from your ID table or build a new one. Add it near the VUK where we build the round ring (you’ll probably want to zoom in a few times to the objects won’t bee too small). Add a light object to your table and change the radius to 4. Scale your circle object so that it is the same size as the light of radius 4


Now make sure the bottom height is 0 and the top height is 125 (125 being the same height as our lower narrow wire ramps with image Metal_wire). Set the side image to Metal_wire and uncheck collidable. Now put two copies straight above where the inner two narrow wire ramps end but placed on the round ring object:


Now add two more copies of these circle objects approximately where shown in the image below. Change the top height of each to 166 (this matches the height of our upper wire ramps):


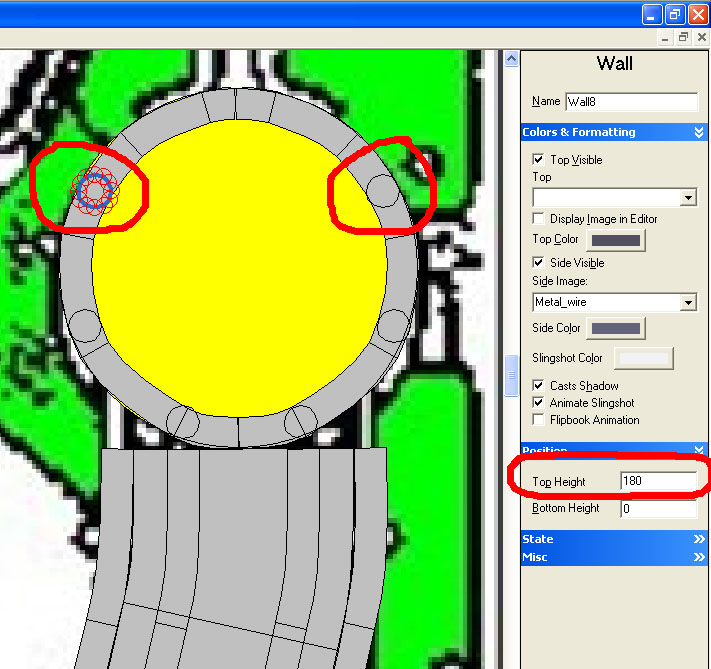
Now add two more copies approximately where shown in the image below. Change the top height of each to 180 (this number is 55 higher than our wire of height 125. Since the ball is approximately 50 units high, we’ll add 55 just for some extra padding. We will be making a couple more wire ramps for the top most part of our VUK in just a little bit):


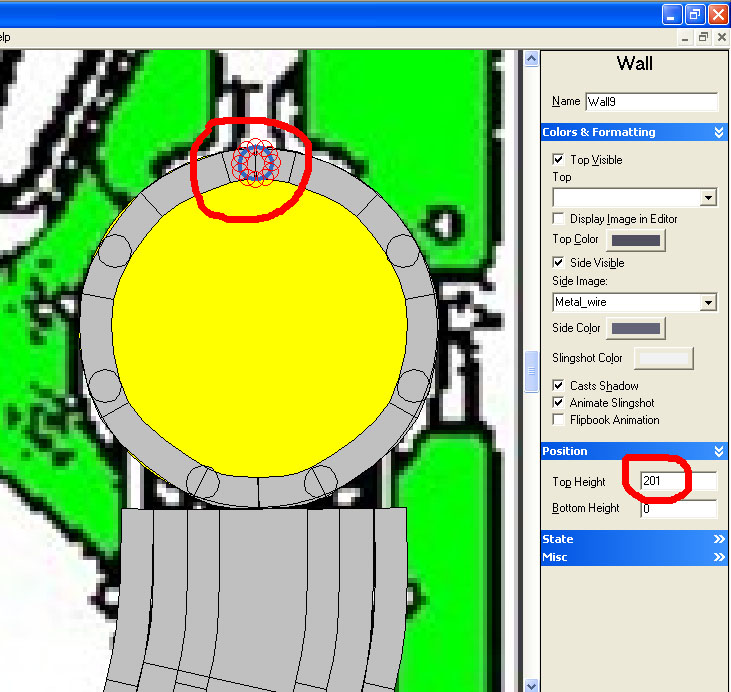
Now add one more circle object at the top center. Change the height to 201. I’m not sure how I came up with this number yesterday, but it’s a little less than half the height of a ball:


It’s starting to take shape:


Now extend both of the inner narrow ramps up to the top portion of the circle objects shows in the image below:


Now right click on the far left narrow ramp and add a control point just a little below the end one:


Now grab the very end control point and move it up and to the left so that it ends half way through the circle object shown:


Now repeat for the right side. You may have to move the control point second from the end (the one we just added) to the right a bit otherwise then the table is rendered that wire might not look quite right. You will have to experiment a bit:


Now for all four of our narrow ramps we can add the black shadow. Do you remember what to do? Make a copy, lower the height by 6 units, change the visible walls to 6, select none for the image, and change the color to Red=45, Green=51, and Blue=51.


Right click on your invisible ramp and translate it about 200 units so that it is out of the way and we can see our reference image:


We will now add two full rings by using an image (just like we did previously with the half rings). Import in the following image:


Add a target object to your table and delete the upper left control point. Move the remaining upper control point to the center:


Now rotate it about 38 degrees and move it to the approximate location of the lower full ring. Select the full ring image for the Side Image and uncheck collidable and uncheck Top Visible.. Set the bottom height to 110 and the top height to 200. Make the left and right edge extend just a bit wider than the left and right narrow ramps:


Now make a copy of this object and move the copy up and into place. Adjust the left and right control points to that they are level:


Now add another narrow ramp with bottom and top height of 180. Start where indicated in the image below and follow the shape of the ramp below it and continue up and connect half way through the circle object as indicated. Make sure you have the left bend at the top of the ramp (this way it will look like it has a downward curve when the table is rendered). You might want to experiment a bit and see if you can make it look better. Once you come up with what looks good, go ahead and add the shadow ramp for it (I think you should know how to do this by now so I’m not going to give you all the numbers):


Now add a ramp to the right side like we just did (using the same parameters):


Now add one more ramp in the center. This one will have a bottom and top height of 200. Don’t forget to add the shadow ramp:


You can go ahead and move your invisible ramp back (translate it -200 to put it back into it’s proper position).

The only other thing to do is add an invisible wall like we did for the previous right ramp (I think I forgot to have you add it to the left ramp after we built it). You can just copy the object from the right ramp and paste it into your working VUK table, rotate it to the proper orientation and change the bottom height to 125 and the top to 175:


Your completed VUK should look like this:


Now all you need to do is copy all the objects that make up your VUK and paste them into your ID table.


#282 wtiger

wtiger

    Pinball Fan

  • VIP
  • 1,148 posts
  • Location:Los Angeles, CA

  • Flag: United States of America

  • Favorite Pinball: Junkyard


Contributor

Posted 25 January 2010 - 01:48 AM

Well, after looking at some more pictures I had archived I realized that the topmost wire ramp that we made run all the way to the back in the center actually stops before the second full ring (You can actually see this in the previous reference picture I posted). Here's an overhead shot of the VUK:


You can leave things the way they are, or you can make the appropriate adjustments. I'll leave that up to you.

#283 faralos

faralos

    VPF Veteran

  • Members
  • PipPipPipPipPipPip
  • 7,838 posts
  • Location:Eastern Pa,USA

  • Flag: United States of America

  • Favorite Pinball: Flash (Williams) 1979, Flash2 Updated


  • Trophies:

Posted 25 January 2010 - 02:49 AM

and here I thouht a vuk ramp would be easy! that stuff is way too complkicated for me to just jump into not starting from the beginning like everyone else here did (since my computer had died and I lost everything!)

But you do mention a 'metal_image' and I looked back thru all the pages of this tutorial and didn't see it available anywhere. So how can I get it just to have it so when I do make ramps I can make them look more realistic?
"Don’t let the noise of others’ opinions drown out your own inner voice.
And most important, have the courage to follow your heart and intuition.”
----Steve Jobs


#284 wtiger

wtiger

    Pinball Fan

  • VIP
  • 1,148 posts
  • Location:Los Angeles, CA

  • Flag: United States of America

  • Favorite Pinball: Junkyard


Contributor

Posted 25 January 2010 - 04:31 AM

QUOTE (faralos @ Jan 24 2010, 06:49 PM) <{POST_SNAPBACK}>
and here I thouht a vuk ramp would be easy! that stuff is way too complkicated for me to just jump into not starting from the beginning like everyone else here did (since my computer had died and I lost everything!)

But you do mention a 'metal_image' and I looked back thru all the pages of this tutorial and didn't see it available anywhere. So how can I get it just to have it so when I do make ramps I can make them look more realistic?


Faralos, You don't need to start at the beginning to make the VUK. Just start a new table, change the dimensions to 1000 x 2300, import the ID-guide-plastic picture (you'll have to find the post towards the beginning of this that has it) as well as the Metal_wire.jpg image and then start building the VUK.

As for the Metal_wire.jpg image, it's the small gradient image at the bottom of this post:

http://www.vpforums....i...ost&p=28220

Right click on the image and save as Metal_wire.jpg

#285 faralos

faralos

    VPF Veteran

  • Members
  • PipPipPipPipPipPip
  • 7,838 posts
  • Location:Eastern Pa,USA

  • Flag: United States of America

  • Favorite Pinball: Flash (Williams) 1979, Flash2 Updated


  • Trophies:

Posted 25 January 2010 - 09:28 PM

QUOTE (wtiger @ Nov 30 2009, 11:04 PM) <{POST_SNAPBACK}>
Part 1

Ok, dust off your Independence table (I know it’s been a while since the last exercise). We are now going to make the metal wire ramp that goes from the left side, starting where the transparent ramp ends, to the right inlane.

yada yada yada...too much for a direct quote here sorry but you get the gist...

Repeat for the right narrow ramp. This will give the bottom of the wire a black shadow:


That’s all I have for now. I will post the next part this coming weekend…


ok that image I can't open or save it, I got the metal ring image but that's it


seeing as that's a full page of learning how would I save all those pics to learn at my own pace? I can right click and save but only the text gets saved. I need to save the images also to actually learn that since it's really involved. This computer doesn't have ANY word processor in it to save all that. I guess I should hunt down something online to save both text and pics huh.. ok just answered my own question I guess never mind


Edited by faralos, 25 January 2010 - 09:30 PM.

"Don’t let the noise of others’ opinions drown out your own inner voice.
And most important, have the courage to follow your heart and intuition.”
----Steve Jobs


#286 destruk

destruk

    VPF Veteran

  • VPF Staff
  • 6,338 posts
  • Location:Colorado Springs, CO

  • Flag: United States of America

  • Favorite Pinball: Ultrapin!


Posted 25 January 2010 - 09:39 PM

Faralos - under the words "Attached image" there is a picture. It is silver and white with a smooth gradient.
Right click on the picture, left click on Save Image As - save it to your hard drive.

I don't know why the file attachment link doesn't display or work for you, but you can try the attached image that is displayed instead.
BTW - most every computer I know has Notepad on it. It's a tiny file that comes with every windows installation there is. Notepad will not save the graphics though. So to save the page as you see it, click File in your browser, then click Save Page and it'll save everything that your browser is showing.

Build a fire, vipers love the heat.


#287 faralos

faralos

    VPF Veteran

  • Members
  • PipPipPipPipPipPip
  • 7,838 posts
  • Location:Eastern Pa,USA

  • Flag: United States of America

  • Favorite Pinball: Flash (Williams) 1979, Flash2 Updated


  • Trophies:

Posted 25 January 2010 - 09:45 PM

I know how to save It isn't letting me right click and save on it at all, in fact trying to save it to notepad my entire computer just locked up. so I saved the 'page as' I did save the metal ring by right clicking but that little gray and white gradient box doesn't save that way at all

"Don’t let the noise of others’ opinions drown out your own inner voice.
And most important, have the courage to follow your heart and intuition.”
----Steve Jobs


#288 kruge99

kruge99

    Pinball Wizard

  • VPF Staff
  • 3,901 posts
  • Location:Markham, Ont.

  • Flag: Canada

  • Favorite Pinball: Black Knight, High Speed and Pin*Bot


Posted 26 January 2010 - 02:29 PM

Hiya,

Please check out my screenshot because the ball is getting stuck on something. I raised the glass height to 260 and the ball is still getting stuck. any clues??


Best Regards,
Todd.

Attached Files


[proud owner of a Williams Solar Fire]

- It's called "The American Dream" because you have to be asleep to believe it.
George Carlin
- Truly great madness cannot be achieved without significant intelligence.
Henrik Tikkanen
- "Reality check, Michelle, Talk about composure, Total lack of. He's a man-- About-- 12 Feet Tall--"
Carrie Kelly
Posted Image

#289 wtiger

wtiger

    Pinball Fan

  • VIP
  • 1,148 posts
  • Location:Los Angeles, CA

  • Flag: United States of America

  • Favorite Pinball: Junkyard


Contributor

Posted 27 January 2010 - 04:01 AM

QUOTE (kruge99 @ Jan 26 2010, 06:29 AM) <{POST_SNAPBACK}>
Hiya,

Please check out my screenshot because the ball is getting stuck on something. I raised the glass height to 260 and the ball is still getting stuck. any clues??


Best Regards,
Todd.


The only thing I can think of off hand is to make sure that all the "wire" ramps have collidable unchecked. I don't think the glass height is a problem since your green "invisible" ramp height is 125 and on the previous ramp we built our invisible ramp height is 175. By the way, how did you get that ball on that ramp wink.gif

#290 kruge99

kruge99

    Pinball Wizard

  • VPF Staff
  • 3,901 posts
  • Location:Markham, Ont.

  • Flag: Canada

  • Favorite Pinball: Black Knight, High Speed and Pin*Bot


Posted 27 January 2010 - 11:13 AM

QUOTE (wtiger @ Jan 26 2010, 11:01 PM) <{POST_SNAPBACK}>
QUOTE (kruge99 @ Jan 26 2010, 06:29 AM) <{POST_SNAPBACK}>
Hiya,

Please check out my screenshot because the ball is getting stuck on something. I raised the glass height to 260 and the ball is still getting stuck. any clues??


Best Regards,
Todd.


The only thing I can think of off hand is to make sure that all the "wire" ramps have collidable unchecked. I don't think the glass height is a problem since your green "invisible" ramp height is 125 and on the previous ramp we built our invisible ramp height is 175. By the way, how did you get that ball on that ramp wink.gif


Hi wtiger, I got the ball on the ramp with two kickers. Kicker5 on the playfield destroys the ball, kicker6 surface setting is on the "ramp" at the top edge of it and creates the ball. I'm 1000% sure all objects nearby have their collidable property unchecked. I will have to go back to the ramp table and use the same kickers method to debug the table there unless there is a way to see with a ball-hit event, what object is in the way of the ball. I'm stumped!!


Best Regards,
Todd.


[proud owner of a Williams Solar Fire]

- It's called "The American Dream" because you have to be asleep to believe it.
George Carlin
- Truly great madness cannot be achieved without significant intelligence.
Henrik Tikkanen
- "Reality check, Michelle, Talk about composure, Total lack of. He's a man-- About-- 12 Feet Tall--"
Carrie Kelly
Posted Image

#291 kruge99

kruge99

    Pinball Wizard

  • VPF Staff
  • 3,901 posts
  • Location:Markham, Ont.

  • Flag: Canada

  • Favorite Pinball: Black Knight, High Speed and Pin*Bot


Posted 27 January 2010 - 02:36 PM

QUOTE (kruge99 @ Jan 27 2010, 06:13 AM) <{POST_SNAPBACK}>
QUOTE (wtiger @ Jan 26 2010, 11:01 PM) <{POST_SNAPBACK}>
QUOTE (kruge99 @ Jan 26 2010, 06:29 AM) <{POST_SNAPBACK}>
Hiya,

Please check out my screenshot because the ball is getting stuck on something. I raised the glass height to 260 and the ball is still getting stuck. any clues??


Best Regards,
Todd.


The only thing I can think of off hand is to make sure that all the "wire" ramps have collidable unchecked. I don't think the glass height is a problem since your green "invisible" ramp height is 125 and on the previous ramp we built our invisible ramp height is 175. By the way, how did you get that ball on that ramp wink.gif


Hi wtiger, I got the ball on the ramp with two kickers. Kicker5 on the playfield destroys the ball, kicker6 surface setting is on the "ramp" at the top edge of it and creates the ball. I'm 1000% sure all objects nearby have their collidable property unchecked. I will have to go back to the ramp table and use the same kickers method to debug the table there unless there is a way to see with a ball-hit event, what object is in the way of the ball. I'm stumped!!


Best Regards,
Todd.


Ok, so the ball moved freely on the ramps table I used to build the VUK on so I went back to the ID4 WIP and moved things out of the way one at a time, finally finding that it was the "Physical" wall of the invisible ramp imediately below the new VUK ramp that was blocking the ball. I reduced the physical wall from 62 to 52 and this allowed the ball to travel the complete distance of the new VUK ramp. Hopefully the setting of 52 won't be too low for the lower wire ramp. Screeny attached with parameters boxed in red.


Best Regards,
Todd.

Attached Files


[proud owner of a Williams Solar Fire]

- It's called "The American Dream" because you have to be asleep to believe it.
George Carlin
- Truly great madness cannot be achieved without significant intelligence.
Henrik Tikkanen
- "Reality check, Michelle, Talk about composure, Total lack of. He's a man-- About-- 12 Feet Tall--"
Carrie Kelly
Posted Image

#292 kruge99

kruge99

    Pinball Wizard

  • VPF Staff
  • 3,901 posts
  • Location:Markham, Ont.

  • Flag: Canada

  • Favorite Pinball: Black Knight, High Speed and Pin*Bot


Posted 27 January 2010 - 07:08 PM

I forgot to post a screenshot of my completed VUK! Here it is.


Best Regards,
Todd.

Attached Files


[proud owner of a Williams Solar Fire]

- It's called "The American Dream" because you have to be asleep to believe it.
George Carlin
- Truly great madness cannot be achieved without significant intelligence.
Henrik Tikkanen
- "Reality check, Michelle, Talk about composure, Total lack of. He's a man-- About-- 12 Feet Tall--"
Carrie Kelly
Posted Image

#293 wtiger

wtiger

    Pinball Fan

  • VIP
  • 1,148 posts
  • Location:Los Angeles, CA

  • Flag: United States of America

  • Favorite Pinball: Junkyard


Contributor

Posted 28 January 2010 - 04:52 AM

Nice Todd!

I'm glad you got the VUK stuck ball figured out (my other guess would have been that the VUK invisible ramp was going the wrong direction). As I'm building the table and posting how to do it, I'm not always trying things out completely (my table actually has a copuple issues that I have yet to fix). This way if there are problems it gives all of you an opportunity to troubleshoot which is good for learning. As far as I know the physical wall height of 52 I think should be OK. Another option would be to increase the height of all the VUK components by 10 or 15 (I'm just guessing here as I don't have the table open to double check various heights).

#294 kruge99

kruge99

    Pinball Wizard

  • VPF Staff
  • 3,901 posts
  • Location:Markham, Ont.

  • Flag: Canada

  • Favorite Pinball: Black Knight, High Speed and Pin*Bot


Posted 28 January 2010 - 01:26 PM

Thanks wtiger! I can't wait for the next lesson... speaking of which, what's next on the list?


Best Regards,
Todd.

[proud owner of a Williams Solar Fire]

- It's called "The American Dream" because you have to be asleep to believe it.
George Carlin
- Truly great madness cannot be achieved without significant intelligence.
Henrik Tikkanen
- "Reality check, Michelle, Talk about composure, Total lack of. He's a man-- About-- 12 Feet Tall--"
Carrie Kelly
Posted Image

#295 wtiger

wtiger

    Pinball Fan

  • VIP
  • 1,148 posts
  • Location:Los Angeles, CA

  • Flag: United States of America

  • Favorite Pinball: Junkyard


Contributor

Posted 29 January 2010 - 03:56 AM

QUOTE (kruge99 @ Jan 28 2010, 05:26 AM) <{POST_SNAPBACK}>
Thanks wtiger! I can't wait for the next lesson... speaking of which, what's next on the list?


Best Regards,
Todd.


Todd, I really appreciate your active participation in this. Thank you. Next will be the light inserts on the playfield along with the text and any other graphic for them. This will probably be a process that will take a bit of time to do since each light on the playfield needs to be done. I started writing up the initial steps yesterday and will hopefully have the first part posted this weekend (Saturday). I'm probably going to do it in a few small steps going over the basics and then letting all of you loose to complete it. We'll see how things end up. Believe it or not I'm still learning a few things too as this whole tutorial progresses!

#296 destruk

destruk

    VPF Veteran

  • VPF Staff
  • 6,338 posts
  • Location:Colorado Springs, CO

  • Flag: United States of America

  • Favorite Pinball: Ultrapin!


Posted 29 January 2010 - 05:21 AM

Yeah, for straight flat ramps, you only need a physical ramp side wall height of 12-15 vp units. For ramps on an incline or that end in a sharp curve, if possible you can take the physical walls all the way up to the glass height (whatever glass height-current ramp height is) to keep the ball on them. When overlapping ramps, a side wall height of 50 is advised, and you want at least 55 clearance at any places the ramp will overlap. Sometimes you can get away with 45, but it's not advisable. I still hope to play your finished table when it's ready - it's one less game I'd have to spend time making. smile.gif

Build a fire, vipers love the heat.


#297 wtiger

wtiger

    Pinball Fan

  • VIP
  • 1,148 posts
  • Location:Los Angeles, CA

  • Flag: United States of America

  • Favorite Pinball: Junkyard


Contributor

Posted 29 January 2010 - 05:59 AM

Thanks for that information Destruk, I appreciate it. If you have any other hints/tips/tricks, please don't hesitate to post here as I know all of us will find it very useful. Thanks again! good.gif

#298 kruge99

kruge99

    Pinball Wizard

  • VPF Staff
  • 3,901 posts
  • Location:Markham, Ont.

  • Flag: Canada

  • Favorite Pinball: Black Knight, High Speed and Pin*Bot


Posted 29 January 2010 - 11:14 AM

Great! I've never done table inserts yet. I've looked at the graphics people used in a number of tables but it's something I would like to add to my repertoire!
I'm also looking forward to following Melon's "Firepower Workshop". Seeing how someone else approaches a problem and comes up with a solution is something I'm very interested in seeing.

And destruk, thanks for clarifying the ramp height question. Not to worry, ID4 will be made biggrin.gif


Best Regards,
Todd.

[proud owner of a Williams Solar Fire]

- It's called "The American Dream" because you have to be asleep to believe it.
George Carlin
- Truly great madness cannot be achieved without significant intelligence.
Henrik Tikkanen
- "Reality check, Michelle, Talk about composure, Total lack of. He's a man-- About-- 12 Feet Tall--"
Carrie Kelly
Posted Image

#299 faralos

faralos

    VPF Veteran

  • Members
  • PipPipPipPipPipPip
  • 7,838 posts
  • Location:Eastern Pa,USA

  • Flag: United States of America

  • Favorite Pinball: Flash (Williams) 1979, Flash2 Updated


  • Trophies:

Posted 29 January 2010 - 07:19 PM

well heck, Destruk, with the speed you make games you could probably make ID in about a week biggrin.gif and that's with all those ramps and lights!
"Don’t let the noise of others’ opinions drown out your own inner voice.
And most important, have the courage to follow your heart and intuition.”
----Steve Jobs


#300 destruk

destruk

    VPF Veteran

  • VPF Staff
  • 6,338 posts
  • Location:Colorado Springs, CO

  • Flag: United States of America

  • Favorite Pinball: Ultrapin!


Posted 29 January 2010 - 11:33 PM

The ramps you guys are doing here take the most time. They look real good.

Build a fire, vipers love the heat.