Blender guide by Remdwaas
I’m really a beginner with blender, but what I learn I want to share with you all. So, when you start using blender you don’t need to spend hours of finding things out on your own. If I learn something new, I will add this to this document. If you have tips for me, or other functions that I can use. Please just send me a message and I will update this Document. I love to learn how to make a own model. For now, I can only adjust existing 3d models, export 3d models for vpx, apply/ create textures, join objects and export them and creating animations with 3d models in vpx, what I will use in the Halo table.
1.1 Basics Blender
1.2 export a 3d model and import it in VPX
1.3 adjust an existing 3d model
1.4 join objects to one 3d model
1.5 applying textures on a model
1.6 creating animated 3d models for vpx and animations
1.7 Sites to download 3d models
The files that you need and the sample table:
https://drive.google...iew?usp=sharing
1.1 Basics Blender

click on the grid

Press x to delete the cube and then enter.
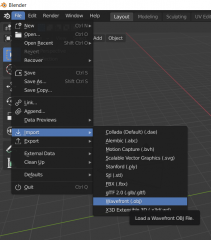
File -> import -> Wavefront (.obj)

Navigate to the SantaModel.obj

You can see it’s now in object mode(yellow highlight) and you can view,scale,move and rotate the object. If you want to edit textures (in 1.5) or want to adjust the 3d model (in 1.3) you have to change this to edit mode. It’s important that you can see the object in front of the camera, because sometimes when you export a object and it’s not good visible you get a 20kb file and then you cannot import the object in VPX.

Let’s go through some movement basics:
• With scrolling the mouse wheel, you zoom in and zoom out on the object (when you edit an UV MAP it uses the same navigation)
• Holding the mouse wheel and moving your mouse, will rotate the screen so you see your object from a different angle
• Hold shift and the scrolling mouse wheel, to change the angle of the object
Some object edits basics:

on the left side there are controls that I often use. This is the move function. You can press G in object mode to move the object randomly. You will use this a lot if your scaling big objects to get or by pressing on the icon with the four arrows you can use the red, green and blue to move an object. Click on the arrow and hold the left mouse button and move your mouse, now the object will move in that direction. Red is for moving on the X, Green is for the Y and blue for the Z. If you want to get out of a mode press esc.

This is the rotate function. You can click on the icon or by pressing R. When pressing multiple times R you can change which part you can rotate. Red is rotating the for object up and down, Green is for rotating the object sideways and blue is for rotating the object to face you differently.
For some objects that you want to let fly in the pinball table or that have to turn, it’s important to export the object on the way so you don’t have to make adjustments in the settings of VPX. It’s key to do a right rotation of the object before you export the object.

To scale an object, I just press S and then move my mouse till where I want to scale. For bigger objects it’s sometimes hard and you have to zoom in and zoom out to see the object (I didn’t find any solution for that jet). To stop the scaling press the right mouse button or esc. To apply the scaling press the left mouse button.
Help! I don’t see the rotation or other options after I click on the left icons

If this happens then you didn’t click on your object. Your object has to be selected to edit.
If something goes wrong with in the process just press ctrl +z to go back to the previous adjustment.
Another tip:
If the midpoint is not correct of an object press: shift+ctrl+alt+c (to set origin to geometry)
1.2 export a 3d model and import it in VPX

Before you export an object check if the object has an UV map. To check that change from object mode to edit mode. And click on UV-editing, in the example it has an UV map.
Now export the object:
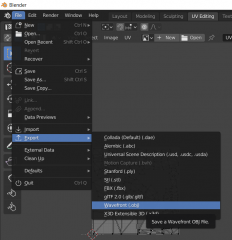
file-> export -> Wavefrond (.obj)
To export any object for VPX you need to remember to export with the following options:
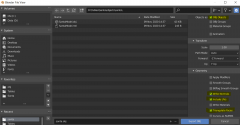
OBJ objects, Write Normals, Include UV's, Triangulate Faces. If this is selected then you can click on Export Obj to export the 3d model.
If you don’t export the triangle faces and didn’t generated an UV profile for your object, then you will get this error in VPX

how to edit and create a UV map is explained in 1.5
To insert the 3d object:

Insert -> Primitive/Object

Import Mesh
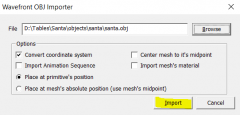
Click on browse and browse to your saved santa object and click on import. (with some models I also check center mesh to it’s midpoint but most likely I use the default settings)
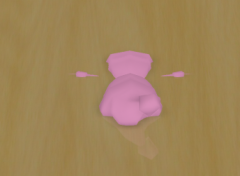
If you place the object on the table and start the table(f5) It’s looks not like santa but a pink object what is half in the table. We need to adjust the settings of the object and also add his UV map picture on it.
Press f3 in vpx to open the image manager.

Click on import and brows to your santa object and click on SantaTex.png and on open. You will come back in the screen above and click on OK.
if you click on the object, you will see its properties.

If you don’t see the properties then on the left side, you have to click on the options button

Under Colors & formatting change the image properties to SantaTex, Material to plastic and uncheck static rendering. If you want your object to do an animation or move it with the script then static rendering has to be off. Otherwise, it doesn’t move. Also if you want to change the Image from a flasher (3d object) then also static rendering has to be off.

Under position & Translation make the Z height 50 and the rotx 90. To make an object smaller adjust the XSize,Ysize,Zsize.

Under Physics uncheck everything and only check Toy. The ball will go through your object now, the table will run faster. For example, if you import an 3d house it’s better to use walls then to make your 3d object collide. With walls you can uncheck that they are visible and the table will run faster.
If everything is good this is your end result:

1.3 adjust an existing 3d model
I had a problem with my drunken santa table santa’s arms where to long for the chimney, so I had to remove the arms and fill the holes in the object. How to do this with any object. Go in to edit mode.

click first on the grid so the object is not selected anymore. Zoom in on his arm and select the settings highlighted and marked. (now you will be able to select the big planes)

Select what you want to delete and press x. click on Faces and it will delete the planes. Sometimes with objects you still see lines or dot’s. Then you have to play with the 2 other options next to the edit mode and before the highlighted section. Then again select the dot’s/ lines and press x and select edges or vertices. If this doesn’t use the other delete options, but it’s a repeating job.

Select the other parts and delete them well. To select more planes hold control and leftclick on the first, second and so on. Press again x select faces to delete his arm.

Zoom in on the hole and select a different option. You can do this on 2 ways. With this selection then you select the lines that you want to connect to add extra planes on and press F to fill the hole. Or use the first option to connect the dot’s and also press F to fill the empty spot. When you do this it’s trial and error there is no best way to do it in ones, it’s what you prefer best. Sometimes it doesn’t connect right away or you need to delete other lines or planes to get a smooth object.
If this is done do the other arm and it will look like this:

now export your new object:
file-> export -> Wavefrond (.obj)
check -> OBJ objects, Write Normals, Include UV's, Triangulate Faces.
Then import the object in vpx again and use the settings like 1.2 but change the XSize,Ysize,Zsize to 50. The result will be like this:

1.4 join objects to one 3d model
For my ductales table I had an issue with the money bin, I only had different parts of the money bin and not one whole 3d model. To fix this with any model. Go to edit mode.
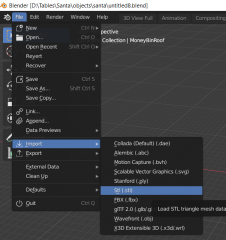
This where the stl files that I used. If this is not enabled in blender jet google how to enable this.

Select all and click on import STL
On the right you see your objects:

Now the fun begins! We have 6 objects and have to fit them all on each other that means you have to scale objects, turn objects and move objects. Time to use the basicskillz! (1.1 Basics Blender)

Select one object on the right and use one of the 3 options highlighted to move,rotate and scale.
Then when everything is on place and the scale that you want, you have to join the objects together as one object. Select the objects and press ctrl + J to join the objects together.

after ctrl + J (join)

If this doesn’t work then do the following:

select all object -> go to object and click join. That’s how you join objects. But before you can export the object, you have to change from object mode to edit mode.

There you clik on uv and then Unwrap, now export your new object:
file-> export -> Wavefrond (.obj)
check -> OBJ objects, Write Normals, Include UV's, Triangulate Faces.
And import your object with the gold3 image in VPX use the size 20 for all the 3 sizes and your object will look like this:
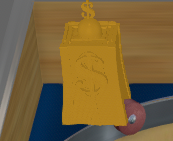
I didn’t know how to do textures so I made it totally gold what gave a nice touch to the game eventually.
1.5 applying textures on a model
This was the hardest part, but once I knew how it works, it made my life really easy. It was a pain in a pain you know….. But thanks to 3rdaxis for pushing me to do my own texture on a 3d model after 4 days i finally did it with blender! It took 4 days to do the castle but it’s what he said it’s a skill so handy for everything!
To apply textures on an object you need to create an UV map. That map creates a group of planes which you can display on an image. What you then need to do is make a new material and map that image so the texture is applied on the 3d object.
When you find an object online it isn’t always ready to be imported in vpx, because you can only apply one image to an object. So, in most situations you need make one image of multiple pictures and adjust the UV.
To understand this better lets import first the door of my doraemon table into VPX. Try to import door_wrong.obj. You will get the follow error again


How to fix this, is simple, but it took me a while to figure it out. Open in blender the object door_wrong and go in object mode.

in the object data properties you see that there is no uv is mapped, also if you click on the UV button that’s highlight and marked, you will get the screen on the left here you see there is also no UV mapped.

If you click on the material properties then you see there is a default OBJ material with no color and also no image mapped. The mapping of the image can be done if you click on the round dot next to the base color.

The simplest way is now to go to UV and click on Unwrap.

If you going to edit the UV mapping then change to the settings above next to edit mode and above that, it’s marked and highlited, the same is for the left site. If you choose this option, you can select planes and that is easy to move.
Editing UV is the same as editing what has been learned in the basics, just click on a spot of the door and then when you press G you can move the triangle (UV). With R you can rotate the triangle (UV). With T you can transform the UV mapping if it doesn’t fit in the image and if you press S you can make the triangle(UV) smaller or bigger.
You have more options to unwrap, for that you need to google.
Blender Intermediate UV Unwrapping Tutorial
Now the color of the door is still nothing, you can change that with an material like I have done in Doraemon or you can add your texture to it. For this tutorial I wanted a textured green door.
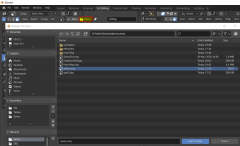
Click on open and browse to green.png and open the image.

The UV is in our picture and that is good, if the uv is bigger then your picture you have to adjust that. On the right side go to the material options, click on base color and select image texture.
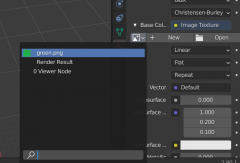
Click on the drop down and select green.png. you have now added a texture to a material and also to your object.

In the object data properties you see there is an UVMap added to your object. Now you can export your object. file-> export -> Wavefrond (.obj)
OBJ objects, Write Normals, Include UV's, Triangulate Faces
import the new door in VPX with the XSize,Ysize,Zsize of 10 rotx,roty of 90 and it will look like this:
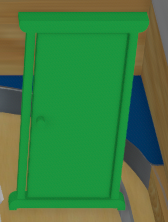
Oke that’s for the simple 3d objects that only need one color, but what about a trainer of your Pokémon table?
What I have seen with dae objects they have more layers with pictures where the UV mapping is mapped. Because VPX can only handle one image with an object you have to make one png file from the 2 files in santa\youngster. Just open 2 mspaint.exe and load both images in paint. With the first paint you make the with bigger so you have white space on the right then you go to your second paint and press ctrl+a(select all) and ctrl+c(to copy) and go back to the first paint screen, move the second picture to the white space and now save the new png to your location.
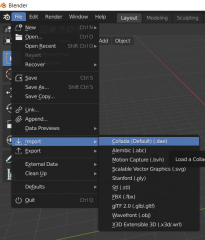
Open blender and go to import -> Collada (default) (.dae) look for rstr0101_00_fi.dae in santa\youngster.

open edit mode and then the mesh_0_body select the highlighted options and open your image texture.

You see now that you use your own picture it does something with the UV mapping. Select all UV that you see there and click on the transform button you see on the left side.

now you can adjust the end to make the UV smaller and when you press G you can move it all to the right spot. If it on the right spot just click next to the UV mapping to apply this.

click on mesh_1_cap and do the same

select all the UV and click on transform and make it smaller till it fits, if it’s outside the image you can move it by pressing G.
Normally we will map the image to the material as an image texture, but if I need to do a lot of models, then I don’t do that. You can just export it and import it in VPX and then the result will be:

Oke that’s look easy but what if I have an object and all the UV is wrapt around each other, what can I do then?
first of all you need to make one image of the images that are used to create the object. Open blender and go to import -> FBX look for santa\Halo Ring\Halo Ring.FBX. Go to edit mode and load your created picture

if it looks like this above you have to select every square for the UV hold control and select al the squares from the ring. With G you can move then the selected part from the existing UV. Just move them apart on a side so you know which texture you want to give. Later with transform you can adjust the UV mapping then it will look like this:

You can just export it and import it in VPX and then the result will be:
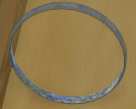
What about STL? STL formats mostly have no UV maps, you have to create them yourself. I have shown an easy/quick unwrap method. But there are better ones.
1.6 creating animated 3d models for vpx
TerryRed said to me that FBX animated objects only works in FP and not VPX. It was harder to do in VPX because you need multiple objects to do an animation. I was so inspired to see the functions that he added into the Tron table, that I also wanted this in VPX. To do an animation on a DMD we are using multiple pictures mostly from a gif and add them together in a block of code. Why can we not do this for 3d objects?
It was an eyeopener to use maximo(https://www.mixamo.com/) I felt it was like pinball fx, that a character can do an animation on the table. I don’t know how it works with FB, but I got it working in VPX. For this you need more models and add them in a block of code and enable the animation with a timer.
For my halo table I wanted the masterchief doing moves. I found an object that did moves but I didn’t know how to use it. So, I edited a halo 2 masterchief and did the texture that his helm had a yellow visor and not a black one.
I took my masterchiefstatic(maybe rotated a couple of times) and uploaded it to mixamo. There you have to turn your model so it’s right in front of you and select the kin, elbows wrists, knees and the rote point below. After this you can choose from the site which animation your model has to do and save this animation as FXB to your pc. In this tutorial we use punshing bag.

File -> import -> FBX

Find the file and click on Import FBX
You have to zoom really far in to see your animated object. I looked many hours to export the animated position of the object. Every time I exported the same static position.

Click on the right side on pose (that is where is pose is displayed) then below click on the frame you want to export. Because you did already your textures before you don’t have to look at it anymore it’s automatically good. Now we have to add another option when exporting the object.
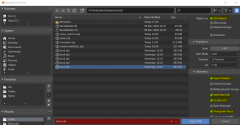
file-> export -> Wavefrond (.obj)
OBJ objects, Write Normals, Include UV's, Triangulate Faces an Apply Modifiers
(because of Apply modifiers is checked, it exports the current position of your object/frame)
Choose 4 other frames and export them so it’s looks like masterchief is boxing. It’s just like with a .GIF file where pictures are behind each other that’s how it also works with 3d animations, only you have to pick a couple of frames and export them.
Import the first object that you want to display. Insert -> Primitive/Object.

Change the name to box001. When naming a object/ light or something else and you use 001 on the end, while copying your next object from the original will get 002 automatically and that’s really handy so you don’t have to rename your objects when making an animation. Choose the masterchief2 image and select plastic with material. Make sure that static rendering is unchecked, because you are going to show and hide the objects. Click on Import Mesh to import the 3d model.

Make sure that the Z is -200 so the objects are hidden under the table.
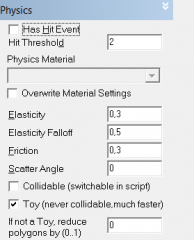
Under Physics uncheck everything and only check Toy. Now click on the table and then click on your object that you just made. Crt+c(for copy) and ctrl+v(to paste). It’s really important that you copy and paste the object on the same spot otherwise your animation is going in every direction.
Go to the properties of box002. Click on Import Mesh to import the 3d model. Choose now the model of box002. Repeat this 3 times more so that you have 5 objects on your table.
Add a timer to the table on the left side click on the timer:

click now nex to the table to create a timer

Name the timer boxingtimer with an interval of 100 and add this on line 26 in the tuturial table:
dim countr
countr = 0
boxingtimer.enabled = 1
Add the following code to the script in the bottom:
Sub boxingtimer_Timer
countr = countr + 1 : If Countr > 5 then Countr = 1 : end If
select case countr
case 1 : box001.z=55:box002.z=-200:box003.z=-200:box004.z=-200:box005.z=-200
case 2 : box001.z=-200:box002.z=55:box003.z=-200:box004.z=-200:box005.z=-200
case 3 : box001.z=-200:box002.z=-200:box003.z=55:box004.z=-200:box005.z=-200
case 4 : box001.z=-200:box002.z=-200:box003.z=-200:box004.z=55:box005.z=-200
case 5 : box001.z=-200:box002.z=-200:box003.z=-200:box004.z=-200:box005.z=55
end Select
End Sub
You make a variable that counts, the couter starts with zero then you enable a timer. That timer does a counter + 1 and your case select say what it has to do with every step. Is the counter more then 5 then it starts with step one again.
You can really make fun animations like in pinball fx. Let bring pinball to the next level. With the help of each other!
1.7 Sites to download 3d models
Last but also very important, where to find 3dmodels.
The sites that I use to find models to add to the tables:
https://www.models-resource.com/
https://sketchfab.com/
https://www.stlfinder.com/
https://www.thingiverse.com/
https://3dwarehouse.sketchup.com/
https://3dmdb.com/
https://free3d.com/
I’m really a beginner with blender, but what I learn I want to share with you all. So, when you start using blender you don’t need to spend hours of finding things out on your own. If I learn something new, I will add this to this document. If you have tips for me, or other functions that I can use. Please just send me a message and I will update this Document. I love to learn how to make a own model. For now, I can only adjust existing 3d models, export 3d models for vpx, apply/ create textures, join objects and export them and creating animations with 3d models in vpx, what I will use in the Halo table.
1.1 Basics Blender
1.2 export a 3d model and import it in VPX
1.3 adjust an existing 3d model
1.4 join objects to one 3d model
1.5 applying textures on a model
1.6 creating animated 3d models for vpx and animations
1.7 Sites to download 3d models
The files that you need and the sample table:
https://drive.google...iew?usp=sharing
1.1 Basics Blender

click on the grid

Press x to delete the cube and then enter.

File -> import -> Wavefront (.obj)

Navigate to the SantaModel.obj

You can see it’s now in object mode(yellow highlight) and you can view,scale,move and rotate the object. If you want to edit textures (in 1.5) or want to adjust the 3d model (in 1.3) you have to change this to edit mode. It’s important that you can see the object in front of the camera, because sometimes when you export a object and it’s not good visible you get a 20kb file and then you cannot import the object in VPX.

Let’s go through some movement basics:
• With scrolling the mouse wheel, you zoom in and zoom out on the object (when you edit an UV MAP it uses the same navigation)
• Holding the mouse wheel and moving your mouse, will rotate the screen so you see your object from a different angle
• Hold shift and the scrolling mouse wheel, to change the angle of the object
Some object edits basics:

on the left side there are controls that I often use. This is the move function. You can press G in object mode to move the object randomly. You will use this a lot if your scaling big objects to get or by pressing on the icon with the four arrows you can use the red, green and blue to move an object. Click on the arrow and hold the left mouse button and move your mouse, now the object will move in that direction. Red is for moving on the X, Green is for the Y and blue for the Z. If you want to get out of a mode press esc.

This is the rotate function. You can click on the icon or by pressing R. When pressing multiple times R you can change which part you can rotate. Red is rotating the for object up and down, Green is for rotating the object sideways and blue is for rotating the object to face you differently.
For some objects that you want to let fly in the pinball table or that have to turn, it’s important to export the object on the way so you don’t have to make adjustments in the settings of VPX. It’s key to do a right rotation of the object before you export the object.

To scale an object, I just press S and then move my mouse till where I want to scale. For bigger objects it’s sometimes hard and you have to zoom in and zoom out to see the object (I didn’t find any solution for that jet). To stop the scaling press the right mouse button or esc. To apply the scaling press the left mouse button.
Help! I don’t see the rotation or other options after I click on the left icons

If this happens then you didn’t click on your object. Your object has to be selected to edit.
If something goes wrong with in the process just press ctrl +z to go back to the previous adjustment.
Another tip:
If the midpoint is not correct of an object press: shift+ctrl+alt+c (to set origin to geometry)
1.2 export a 3d model and import it in VPX

Before you export an object check if the object has an UV map. To check that change from object mode to edit mode. And click on UV-editing, in the example it has an UV map.
Now export the object:

file-> export -> Wavefrond (.obj)
To export any object for VPX you need to remember to export with the following options:

OBJ objects, Write Normals, Include UV's, Triangulate Faces. If this is selected then you can click on Export Obj to export the 3d model.
If you don’t export the triangle faces and didn’t generated an UV profile for your object, then you will get this error in VPX

how to edit and create a UV map is explained in 1.5
To insert the 3d object:

Insert -> Primitive/Object

Import Mesh

Click on browse and browse to your saved santa object and click on import. (with some models I also check center mesh to it’s midpoint but most likely I use the default settings)

If you place the object on the table and start the table(f5) It’s looks not like santa but a pink object what is half in the table. We need to adjust the settings of the object and also add his UV map picture on it.
Press f3 in vpx to open the image manager.

Click on import and brows to your santa object and click on SantaTex.png and on open. You will come back in the screen above and click on OK.
if you click on the object, you will see its properties.

If you don’t see the properties then on the left side, you have to click on the options button

Under Colors & formatting change the image properties to SantaTex, Material to plastic and uncheck static rendering. If you want your object to do an animation or move it with the script then static rendering has to be off. Otherwise, it doesn’t move. Also if you want to change the Image from a flasher (3d object) then also static rendering has to be off.

Under position & Translation make the Z height 50 and the rotx 90. To make an object smaller adjust the XSize,Ysize,Zsize.

Under Physics uncheck everything and only check Toy. The ball will go through your object now, the table will run faster. For example, if you import an 3d house it’s better to use walls then to make your 3d object collide. With walls you can uncheck that they are visible and the table will run faster.
If everything is good this is your end result:

1.3 adjust an existing 3d model
I had a problem with my drunken santa table santa’s arms where to long for the chimney, so I had to remove the arms and fill the holes in the object. How to do this with any object. Go in to edit mode.

click first on the grid so the object is not selected anymore. Zoom in on his arm and select the settings highlighted and marked. (now you will be able to select the big planes)

Select what you want to delete and press x. click on Faces and it will delete the planes. Sometimes with objects you still see lines or dot’s. Then you have to play with the 2 other options next to the edit mode and before the highlighted section. Then again select the dot’s/ lines and press x and select edges or vertices. If this doesn’t use the other delete options, but it’s a repeating job.

Select the other parts and delete them well. To select more planes hold control and leftclick on the first, second and so on. Press again x select faces to delete his arm.

Zoom in on the hole and select a different option. You can do this on 2 ways. With this selection then you select the lines that you want to connect to add extra planes on and press F to fill the hole. Or use the first option to connect the dot’s and also press F to fill the empty spot. When you do this it’s trial and error there is no best way to do it in ones, it’s what you prefer best. Sometimes it doesn’t connect right away or you need to delete other lines or planes to get a smooth object.
If this is done do the other arm and it will look like this:

now export your new object:
file-> export -> Wavefrond (.obj)
check -> OBJ objects, Write Normals, Include UV's, Triangulate Faces.
Then import the object in vpx again and use the settings like 1.2 but change the XSize,Ysize,Zsize to 50. The result will be like this:

1.4 join objects to one 3d model
For my ductales table I had an issue with the money bin, I only had different parts of the money bin and not one whole 3d model. To fix this with any model. Go to edit mode.

This where the stl files that I used. If this is not enabled in blender jet google how to enable this.

Select all and click on import STL
On the right you see your objects:

Now the fun begins! We have 6 objects and have to fit them all on each other that means you have to scale objects, turn objects and move objects. Time to use the basicskillz! (1.1 Basics Blender)

Select one object on the right and use one of the 3 options highlighted to move,rotate and scale.
Then when everything is on place and the scale that you want, you have to join the objects together as one object. Select the objects and press ctrl + J to join the objects together.

after ctrl + J (join)

If this doesn’t work then do the following:

select all object -> go to object and click join. That’s how you join objects. But before you can export the object, you have to change from object mode to edit mode.
There you clik on uv and then Unwrap, now export your new object:
file-> export -> Wavefrond (.obj)
check -> OBJ objects, Write Normals, Include UV's, Triangulate Faces.
And import your object with the gold3 image in VPX use the size 20 for all the 3 sizes and your object will look like this:

I didn’t know how to do textures so I made it totally gold what gave a nice touch to the game eventually.
1.5 applying textures on a model
This was the hardest part, but once I knew how it works, it made my life really easy. It was a pain in a pain you know….. But thanks to 3rdaxis for pushing me to do my own texture on a 3d model after 4 days i finally did it with blender! It took 4 days to do the castle but it’s what he said it’s a skill so handy for everything!
To apply textures on an object you need to create an UV map. That map creates a group of planes which you can display on an image. What you then need to do is make a new material and map that image so the texture is applied on the 3d object.
When you find an object online it isn’t always ready to be imported in vpx, because you can only apply one image to an object. So, in most situations you need make one image of multiple pictures and adjust the UV.
To understand this better lets import first the door of my doraemon table into VPX. Try to import door_wrong.obj. You will get the follow error again


How to fix this, is simple, but it took me a while to figure it out. Open in blender the object door_wrong and go in object mode.

in the object data properties you see that there is no uv is mapped, also if you click on the UV button that’s highlight and marked, you will get the screen on the left here you see there is also no UV mapped.

If you click on the material properties then you see there is a default OBJ material with no color and also no image mapped. The mapping of the image can be done if you click on the round dot next to the base color.

The simplest way is now to go to UV and click on Unwrap.

If you going to edit the UV mapping then change to the settings above next to edit mode and above that, it’s marked and highlited, the same is for the left site. If you choose this option, you can select planes and that is easy to move.
Editing UV is the same as editing what has been learned in the basics, just click on a spot of the door and then when you press G you can move the triangle (UV). With R you can rotate the triangle (UV). With T you can transform the UV mapping if it doesn’t fit in the image and if you press S you can make the triangle(UV) smaller or bigger.
You have more options to unwrap, for that you need to google.
Blender Intermediate UV Unwrapping Tutorial
Now the color of the door is still nothing, you can change that with an material like I have done in Doraemon or you can add your texture to it. For this tutorial I wanted a textured green door.

Click on open and browse to green.png and open the image.

The UV is in our picture and that is good, if the uv is bigger then your picture you have to adjust that. On the right side go to the material options, click on base color and select image texture.

Click on the drop down and select green.png. you have now added a texture to a material and also to your object.

In the object data properties you see there is an UVMap added to your object. Now you can export your object. file-> export -> Wavefrond (.obj)
OBJ objects, Write Normals, Include UV's, Triangulate Faces
import the new door in VPX with the XSize,Ysize,Zsize of 10 rotx,roty of 90 and it will look like this:

Oke that’s for the simple 3d objects that only need one color, but what about a trainer of your Pokémon table?
What I have seen with dae objects they have more layers with pictures where the UV mapping is mapped. Because VPX can only handle one image with an object you have to make one png file from the 2 files in santa\youngster. Just open 2 mspaint.exe and load both images in paint. With the first paint you make the with bigger so you have white space on the right then you go to your second paint and press ctrl+a(select all) and ctrl+c(to copy) and go back to the first paint screen, move the second picture to the white space and now save the new png to your location.

Open blender and go to import -> Collada (default) (.dae) look for rstr0101_00_fi.dae in santa\youngster.

open edit mode and then the mesh_0_body select the highlighted options and open your image texture.

You see now that you use your own picture it does something with the UV mapping. Select all UV that you see there and click on the transform button you see on the left side.

now you can adjust the end to make the UV smaller and when you press G you can move it all to the right spot. If it on the right spot just click next to the UV mapping to apply this.

click on mesh_1_cap and do the same

select all the UV and click on transform and make it smaller till it fits, if it’s outside the image you can move it by pressing G.
Normally we will map the image to the material as an image texture, but if I need to do a lot of models, then I don’t do that. You can just export it and import it in VPX and then the result will be:

Oke that’s look easy but what if I have an object and all the UV is wrapt around each other, what can I do then?
first of all you need to make one image of the images that are used to create the object. Open blender and go to import -> FBX look for santa\Halo Ring\Halo Ring.FBX. Go to edit mode and load your created picture

if it looks like this above you have to select every square for the UV hold control and select al the squares from the ring. With G you can move then the selected part from the existing UV. Just move them apart on a side so you know which texture you want to give. Later with transform you can adjust the UV mapping then it will look like this:

You can just export it and import it in VPX and then the result will be:

What about STL? STL formats mostly have no UV maps, you have to create them yourself. I have shown an easy/quick unwrap method. But there are better ones.
1.6 creating animated 3d models for vpx
TerryRed said to me that FBX animated objects only works in FP and not VPX. It was harder to do in VPX because you need multiple objects to do an animation. I was so inspired to see the functions that he added into the Tron table, that I also wanted this in VPX. To do an animation on a DMD we are using multiple pictures mostly from a gif and add them together in a block of code. Why can we not do this for 3d objects?
It was an eyeopener to use maximo(https://www.mixamo.com/) I felt it was like pinball fx, that a character can do an animation on the table. I don’t know how it works with FB, but I got it working in VPX. For this you need more models and add them in a block of code and enable the animation with a timer.
For my halo table I wanted the masterchief doing moves. I found an object that did moves but I didn’t know how to use it. So, I edited a halo 2 masterchief and did the texture that his helm had a yellow visor and not a black one.
I took my masterchiefstatic(maybe rotated a couple of times) and uploaded it to mixamo. There you have to turn your model so it’s right in front of you and select the kin, elbows wrists, knees and the rote point below. After this you can choose from the site which animation your model has to do and save this animation as FXB to your pc. In this tutorial we use punshing bag.

File -> import -> FBX

Find the file and click on Import FBX
You have to zoom really far in to see your animated object. I looked many hours to export the animated position of the object. Every time I exported the same static position.

Click on the right side on pose (that is where is pose is displayed) then below click on the frame you want to export. Because you did already your textures before you don’t have to look at it anymore it’s automatically good. Now we have to add another option when exporting the object.

file-> export -> Wavefrond (.obj)
OBJ objects, Write Normals, Include UV's, Triangulate Faces an Apply Modifiers
(because of Apply modifiers is checked, it exports the current position of your object/frame)
Choose 4 other frames and export them so it’s looks like masterchief is boxing. It’s just like with a .GIF file where pictures are behind each other that’s how it also works with 3d animations, only you have to pick a couple of frames and export them.
Import the first object that you want to display. Insert -> Primitive/Object.

Change the name to box001. When naming a object/ light or something else and you use 001 on the end, while copying your next object from the original will get 002 automatically and that’s really handy so you don’t have to rename your objects when making an animation. Choose the masterchief2 image and select plastic with material. Make sure that static rendering is unchecked, because you are going to show and hide the objects. Click on Import Mesh to import the 3d model.

Make sure that the Z is -200 so the objects are hidden under the table.

Under Physics uncheck everything and only check Toy. Now click on the table and then click on your object that you just made. Crt+c(for copy) and ctrl+v(to paste). It’s really important that you copy and paste the object on the same spot otherwise your animation is going in every direction.
Go to the properties of box002. Click on Import Mesh to import the 3d model. Choose now the model of box002. Repeat this 3 times more so that you have 5 objects on your table.
Add a timer to the table on the left side click on the timer:

click now nex to the table to create a timer

Name the timer boxingtimer with an interval of 100 and add this on line 26 in the tuturial table:
dim countr
countr = 0
boxingtimer.enabled = 1
Add the following code to the script in the bottom:
Sub boxingtimer_Timer
countr = countr + 1 : If Countr > 5 then Countr = 1 : end If
select case countr
case 1 : box001.z=55:box002.z=-200:box003.z=-200:box004.z=-200:box005.z=-200
case 2 : box001.z=-200:box002.z=55:box003.z=-200:box004.z=-200:box005.z=-200
case 3 : box001.z=-200:box002.z=-200:box003.z=55:box004.z=-200:box005.z=-200
case 4 : box001.z=-200:box002.z=-200:box003.z=-200:box004.z=55:box005.z=-200
case 5 : box001.z=-200:box002.z=-200:box003.z=-200:box004.z=-200:box005.z=55
end Select
End Sub
You make a variable that counts, the couter starts with zero then you enable a timer. That timer does a counter + 1 and your case select say what it has to do with every step. Is the counter more then 5 then it starts with step one again.
You can really make fun animations like in pinball fx. Let bring pinball to the next level. With the help of each other!
1.7 Sites to download 3d models
Last but also very important, where to find 3dmodels.
The sites that I use to find models to add to the tables:
https://www.models-resource.com/
https://sketchfab.com/
https://www.stlfinder.com/
https://www.thingiverse.com/
https://3dwarehouse.sketchup.com/
https://3dmdb.com/
https://free3d.com/





 are all trademarks of VPFORUMS.