Jump to content


Photo
- - - - -

42"/32"/17"Copy of Indiana Jones VP build


  • Please log in to reply
13 replies to this topic

#1 Indy_Jones

Indy_Jones

    Hobbyist

  • Platinum Supporter
  • 19 posts
  • Location:Australia

  • Flag: Australia

  • Favorite Pinball: STTNG

Posted 12 October 2010 - 01:35 PM

First up thanks to all members on here for valuable info posted throughout the forum. BIG HELP

I'm building a Williams widebody replica of Indiana Jones .

Specs:

TV's/monitor:
42" Full HD LCD for playfield
32" Full HD LCD for backglass
17" LG 4:3 ratio monitor for DMD

Computer:
mobo= Gigabyte GA-P55A-UD3R
cpu = intel Core i5 760
P/S = Coolermaster GX750W
Ram = Kingston 4G HyperX
Hdd = WD 500G sataII
Gfx 1 = Gigabyte GF GTX460 1Gig
Gfx 2 = Gainward GTS 250 1Gig
Sound= Creative Inspire 2.1

Pinbits
Williams legs black (cheaper than the gold ones)
Williams side rails, rear glass trim, backbox swivel arms (it wont tho)
IJ yellow start button and red flipper buttons.
IPAC2
Still waiting on lockbar, super ball button, IJ gun handle and couple of other things


The wood is 17mm thick plywood 2-3 sheets@ 2400x?1200? i think + the odd bit of pine

Started on the backbox first using mameman23's plans as a starting point.


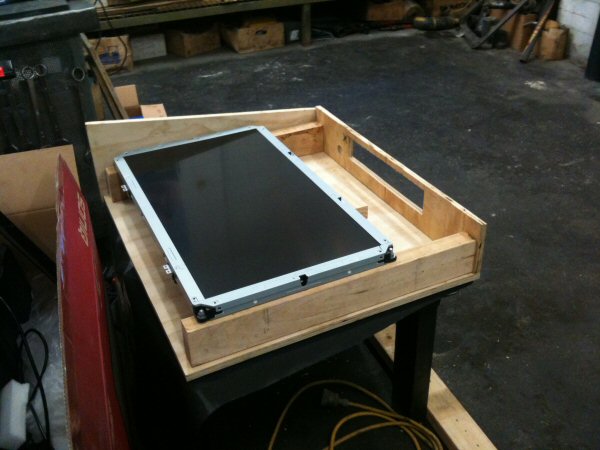
Test fitting the 17"(DMD) under the 32".


Brackets on the corners of the 32" made it easier to mount.


Backbox painted- 7 holes on the back to let heat out, 1 round hole down near the rectangle cutout (for the DMD) is to feed cables up into backbox.


Ive mounted the on/off for the 32" in the side of the backbox incase i needed it.


I've put a coaxial plug on the back so i can also watch tv on the 32" with the built in tuner.


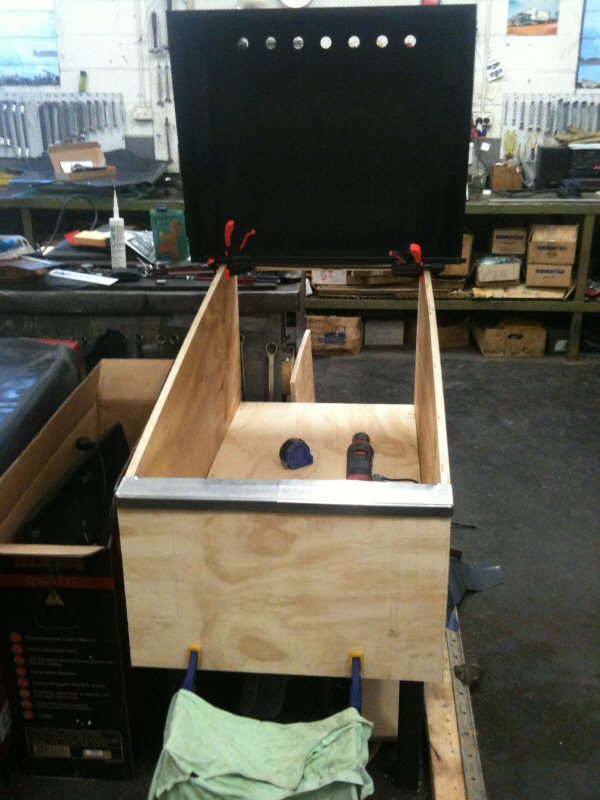
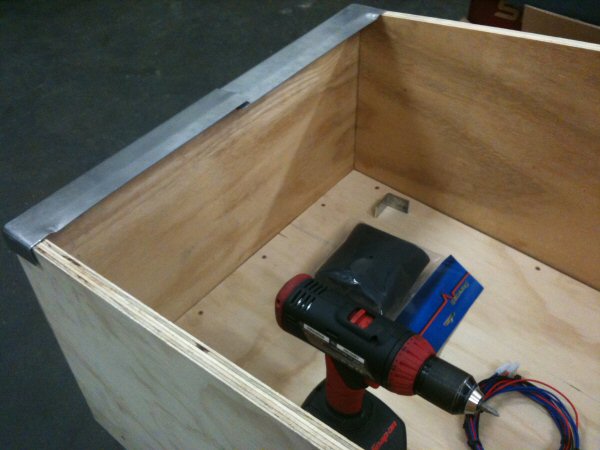
Started on the main cab, i built a floor first then built around it, this was mainly for strengthening the sides and straightening them due to some wanker hosing around my wood. The floor doesn't interfere with the leg bolts or leg bolt backing plate. there is photos of inside soon.


test fitting the front panel. The edges of the front panel and the sides have been cut at 450 to make a nicer corner.


Old Stern 26" 2-piece lock bar sitting on the front
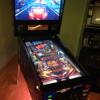

Front view

Edited by Indy_Jones, 13 October 2010 - 10:55 AM.


#2 Rawd

Rawd

    Pinball Wizard

  • VIP
  • 4,311 posts
  • Location:Edmonton, Canada

  • Flag: Canada

  • Favorite Pinball: Triple Strike


Posted 12 October 2010 - 01:51 PM

Awesome job so far man! You're going to love it!


#3 gbeef

gbeef

    Enthusiast

  • Members
  • PipPipPip
  • 109 posts

  • Flag: ---------

  • Favorite Pinball: adams

Posted 12 October 2010 - 03:45 PM

very nice work and artwork will be easy to get for his cabinet.smile.gif can't wait to see it finished.

#4 cyborgcnc

cyborgcnc

    Hobbyist

  • Members
  • PipPip
  • 11 posts

  • Flag: ---------

  • Favorite Pinball: Star trek

Posted 12 October 2010 - 07:20 PM

Yes, VERY NICE indeed!!

I build a MAME cabinet a couple years back, and I am not in the process of refining it's front end (to use Hyperspin..). I will then start on a pinball cabinet soon, as some of the creations here are ABSOLUTELY amazing...

Recently also finished building a CNC machine, so looking forward to using that for some accurate cuts on the parts....

What are your dimensions, and what front end are you planning on using?

Also, curious to see what monitor/screen you chose for your main play-filed monitor? I have been reading that one that does 1:1 pixer rendering is a must, but I am not sure what people mean by that?

#5 Indy_Jones

Indy_Jones

    Hobbyist

  • Platinum Supporter
  • 19 posts
  • Location:Australia

  • Flag: Australia

  • Favorite Pinball: STTNG

Posted 13 October 2010 - 11:14 AM


Added the inside rails for the 42" to sit on. Its screwed through from the outside in then wood filled all the screw-heads and sanded back smooth.


Niiiice fit. this TV has smaller brackets in every corner which I'll screw down to keep it from moving.


Above the TV is added piece of timber just to make up where the TV is too short. Painted black u don't notice it.


Inside view from the back, TV sitting nicely on the rails. The rail on the left I had to cut a small piece out in the middle to accommodate a piece on the TV that was sticking out.


Coin door cut out, I already received the cabinet decals so I used the front piece to trace out where the coin door should be. Also 2x120mm fans will sit on the floor to bring cooler air in.


I've put a door on the back so I still have access inside when completed and the door contains the 2x200mm fans to suck any heat out.
Another shot with the rear door open.


Sanded then sprayed 2 coats of undercoat followed by the black. Although stickers will cover most of the cab I kept it all even.


Test fitting the legs


Looking at the plate where the leg bolts go into.


Made a bracket out of alloy to hold the DMD tv and bolted it to the back of the backbox.


Started to put decal/stickers on.


Check displays are ok, and check tv picks up channels also.


More to come.


QUOTE (Rawd @ Oct 12 2010, 02:51 PM) <{POST_SNAPBACK}>
Awesome job so far man! You're going to love it!

Thanks definitely looking forward to enjoying it.

QUOTE (gbeef @ Oct 12 2010, 04:45 PM) <{POST_SNAPBACK}>
very nice work and artwork will be easy to get for his cabinet.smile.gif can't wait to see it finished.

Yeah mate got the decals a few weeks ago and im very impressed with em.

QUOTE (cyborgcnc @ Oct 12 2010, 08:20 PM) <{POST_SNAPBACK}>
Yes, VERY NICE indeed!!

I build a MAME cabinet a couple years back, and I am not in the process of refining it's front end (to use Hyperspin..). I will then start on a pinball cabinet soon, as some of the creations here are ABSOLUTELY amazing...

Recently also finished building a CNC machine, so looking forward to using that for some accurate cuts on the parts....

What are your dimensions, and what front end are you planning on using?

Also, curious to see what monitor/screen you chose for your main play-filed monitor? I have been reading that one that does 1:1 pixer rendering is a must, but I am not sure what people mean by that?

Cheers, once I'm finished I'll post an updated sheet of dimensions for everything on it. But as a guide I used mameman23's measurements
located here --> http://www.vpforums....?showtopic=8264 But I did change a few things.

#6 Indy_Jones

Indy_Jones

    Hobbyist

  • Platinum Supporter
  • 19 posts
  • Location:Australia

  • Flag: Australia

  • Favorite Pinball: STTNG

Posted 06 November 2010 - 12:45 PM

Photo update.
Decals have been applied finally.


#7 gStAv

gStAv

    Pinball Lover

  • Members
  • PipPipPipPip
  • 1,331 posts

  • Flag: Sweden

  • Favorite Pinball: TOM, IJ, AFM, WC94

Posted 06 November 2010 - 05:46 PM

Woo-hoo! Great craftmanship man! twiddling.gif

3rs054-6.png


#8 chriz

chriz

    Enthusiast

  • Platinum Supporter
  • 451 posts

  • Flag: ---------

  • Favorite Pinball: Funhouse

Posted 06 November 2010 - 06:10 PM

WOW, that looks awesome, I love it!! congrats!!

cheers
Chris


#9 spacemanaust

spacemanaust

    Enthusiast

  • Members
  • PipPipPip
  • 99 posts
  • Location:Melbourne, Australia

  • Flag: Australia

  • Favorite Pinball: Indiana Jones, Funhouse

Posted 07 November 2010 - 10:42 AM

Damn, that is beautiful!!
Many people would think it was the real deal.

Question:
Have you considered putting a second set of flipper buttons on for tables that need it? (eg: Magnasave on Black Knight)


#10 gbeef

gbeef

    Enthusiast

  • Members
  • PipPipPip
  • 109 posts

  • Flag: ---------

  • Favorite Pinball: adams

Posted 07 November 2010 - 04:21 PM

QUOTE (spacemanaust @ Nov 7 2010, 10:42 AM) <{POST_SNAPBACK}>
Damn, that is beautiful!!
Many people would think it was the real deal.

Question:
Have you considered putting a second set of flipper buttons on for tables that need it? (eg: Magnasave on Black Knight)


Very nice looks like the real deal

#11 mameman23

mameman23

    Pinball Fan

  • Silver Supporter
  • 506 posts
  • Location:Farmington Hills, MI

  • Flag: United Kingdom

  • Favorite Pinball: Dr Who, robocop

Posted 08 November 2010 - 03:31 AM

Looking sweet. I think yours and mine are the only scratch built replicas I have seen yet.
PM me for any CNC needs.
Find me on Facebook....Xtreme Pinball
Doctor Who Cabinet Build Thread Here
Tron Cabinet Build Thread Here
Big Bang Bar Build Thread Here
Mameman's cnc fun

#12 gbeef

gbeef

    Enthusiast

  • Members
  • PipPipPip
  • 109 posts

  • Flag: ---------

  • Favorite Pinball: adams

Posted 08 November 2010 - 05:35 AM

nice build looks like my original cab. actually better the decals aren't faded!..

Edited by gbeef, 08 November 2010 - 05:42 AM.


#13 Indy_Jones

Indy_Jones

    Hobbyist

  • Platinum Supporter
  • 19 posts
  • Location:Australia

  • Flag: Australia

  • Favorite Pinball: STTNG

Posted 08 November 2010 - 02:07 PM

QUOTE (spacemanaust @ Nov 7 2010, 10:42 AM) <{POST_SNAPBACK}>
Damn, that is beautiful!!
Many people would think it was the real deal.

Question:
Have you considered putting a second set of flipper buttons on for tables that need it? (eg: Magnasave on Black Knight)


Na, i'm looking at options to put black nudge buttons on there which will be sort of hidden in the artwork behind the flipper buttons.
But I really want to keep it as original looking as possible. Hyperpin buttons are inside the coin door

QUOTE (mameman23 @ Nov 8 2010, 03:31 AM) <{POST_SNAPBACK}>
Looking sweet. I think yours and mine are the only scratch built replicas I have seen yet.


Yeah mate seeing yours was what pushed me to go ahead, was originally going to make a mini pin. I'm glad I chose wisely rofl.gif

QUOTE (gbeef @ Nov 8 2010, 05:35 AM) <{POST_SNAPBACK}>
nice build looks like my original cab. actually better the decals aren't faded!..


Have you still got your original gbeef?

#14 gbeef

gbeef

    Enthusiast

  • Members
  • PipPipPip
  • 109 posts

  • Flag: ---------

  • Favorite Pinball: adams

Posted 08 November 2010 - 04:10 PM

I sold and and replaced it for a VP cab hahaha. I built a ATTACK from mars.. clone. Your specs are the exact same as my pincab.

Edited by gbeef, 08 November 2010 - 04:30 PM.