Jump to content


Photo
* * * * * 1 votes

RocketPin / CyberPin 42"-28"-18" Cab Build + JUKEBOX


  • Please log in to reply
52 replies to this topic

#1 settingsons

settingsons

    Pinball Fan

  • VIP
  • 959 posts
  • Location:Switzerland

  • Flag: Switzerland

  • Favorite Pinball: Terminator 2 and many EM machines


Posted 20 February 2011 - 01:36 AM

Latest Spec Update  23rd Dec 2023


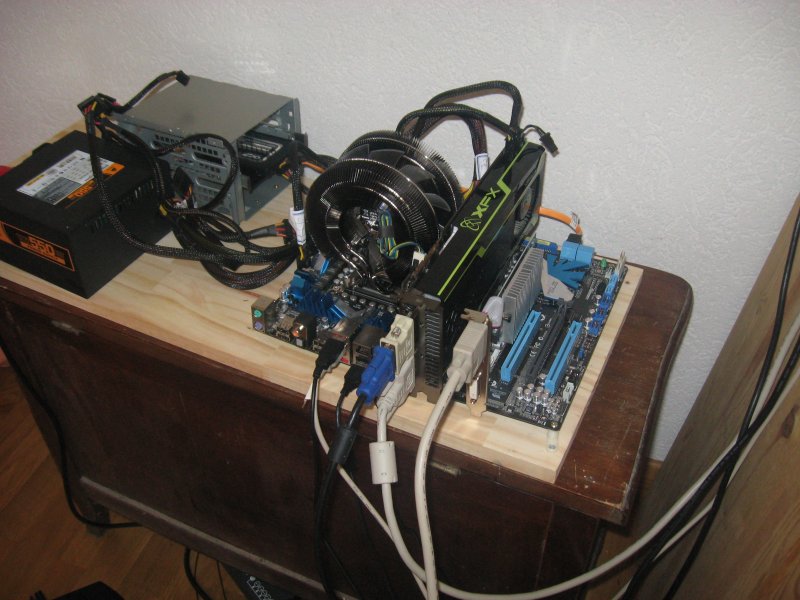
Upgraded CPU/Motherboard/RAM after 13 years with the Core i7-860.

    - AMD Ryzen 7 5700G 3.8Ghz (Turbo 4.6Ghz) 8 Core (16 Thread) CPU

    - ASUS TUF GAMING A520M-PLUS Motherboard

    - Corsair VENGEANCE LPX DDR4 RAM 32GB (2x16GB) 3200MHz CL16 Intel XMP 2.0


New Graphics Card:

    - Nvidia 1060 GTX Graphics Card.


Dec 2021 Upgrades:

Added Zebs Lightbar and Plunger.


Latest Spec Update 1st December 2013:

Youtube Videos

Includes Videos of Visual Pinball, Pinball Arcade (Steam PC) and Pinball FX2 (Steam PC) running in portrait modes.

img_42780.jpg

Used as:
=======
Virtual Pinball Cab running:
- Visual Pinball (XP 32-bit)
- Future Pinball (XP 32- bit)

- Pinball Arcade (Farsight) - (Windows XP 32-bit)

- Pinball FX2 (Zen) - (Windows 8 32-bit)
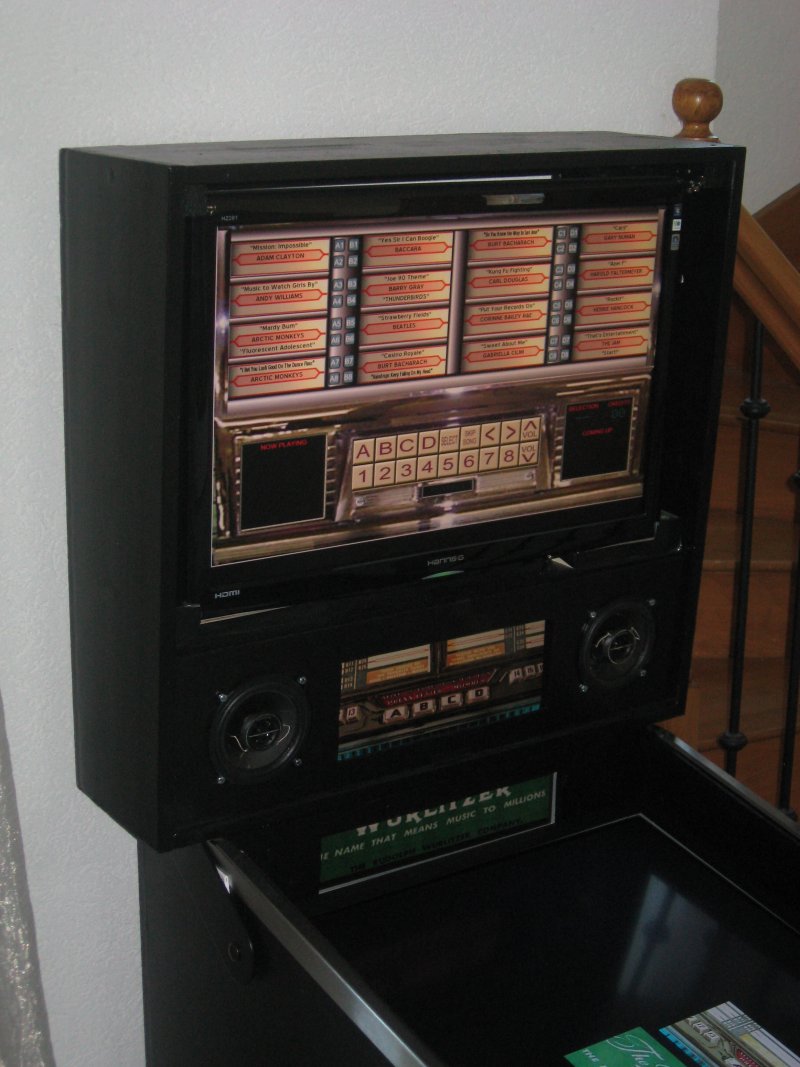
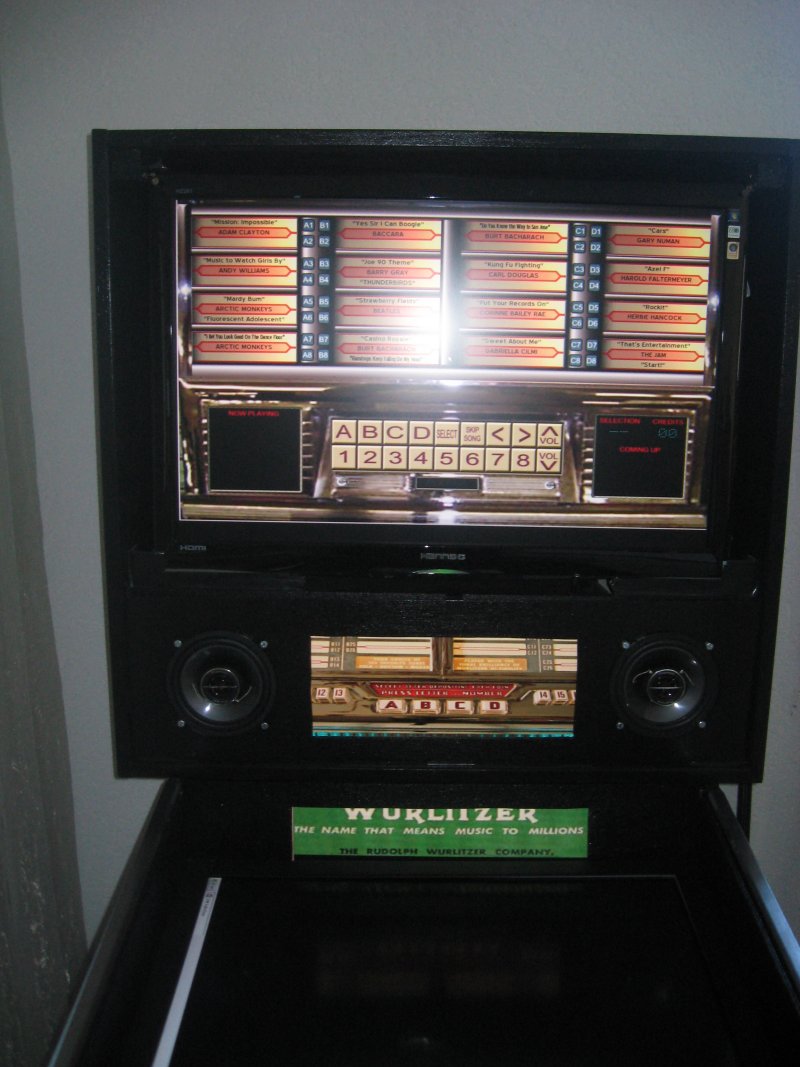
Jukebox running:
- dwJukebox (XP 32-bit)

Monitors:
=========
42" Playfield - LG 42LD550 (100Hz but switched off - Tru-motion game mode)
27.5" Backglass - HannsG HZ281HPB 16:10
18" NEC LCD 4:3 DMD

Cabinet Parts:
============
Ultimate Widebody Cabinet Builders Kit plus Real Williams Coin Door plus Buttons (http://www.virtuapin.net/)
Ipac 2 and Chrome Buttons - Ultimarc
2 x Siemens 12v Contactors for force-feedback PLUS Wolfsoft Opti-coupler
(Force feedback options are in the excellent Pinball Electrical 101 guide:
http://www.vpforums....showtopic=13768
)

PC-specs:
=========
OS = win XP SP3 - 32bit
OPTIMIZED OS/BIOS (Only 6/7 services started)
CPU = Intel Quad Core i7 860 - automatically overclocked to 4x 3.6ghz by BIOS. HyperThreading left on
MB = Asus P7P55D-PRO motherboard
RAM = 2x2GB RAM Ripjaws DDR3 PC12800 (1600Mhz) - 1.65V - 8-8-8-24
GPU = 1x nvidia GTX260 896MB GPU (Playfield and UVP Backglass) / 1x nvidia 8400GS (DMD)
- UPGRADED - please see below
GPU = 1x nvidia GTX480 1.5GB GPU (Playfield and UVP Backglass) / 1x nvidia Gainward 7300 GT 256Mb PCI-E (DMD)
GPUDRIVER: nvidia 258.96 nvidia 301.24 beta (1st May 2012)
HDD = 64GB OCZ Vertex 2 SSD drive
SOUND = Asus Xonar DS
EXTRAS (more hardware, add ons) = No
2 x Pioneer Car Speakers
Trust Tytan Subwoofer and 2 speakers


December 2012 Update:
Added second drive with Windows 8 32-bit installed so can dual boot to play Pinball FX.

vp-setup:
=========
# OF DISPLAYS = 3 (1@32bit-1920x1080, 3@16bit-640x480, 2@16bit-1280x768)
VP VERSION = 9.12
HYPERPIN RUNNING = Yes
UVP = Yes
LEDWIZ = No
HIGHRES BACKGLASS = No (only for AFM)
MAX TEXTURESIZE = Unlimited
ALPHASLIDER = 75% to left
DDRAW (regedit tweak 0/1, you get better fps with 0) = 0
EXTRAS (additional details, errors, graphical glitches) = No
AFINITY = VP set to Core CPU3 & CPU7, UVPServer = CPU5, B2S_exes = CPU5, HP/HGlass/FPLaunch = CPU1,All Other Windows Processes = CPU1

(Forcing VP to more the one core definitely improves performance with the new b2sServer for me.

FPS Scores (based on originally GTX260 card): FPS Scores
========


-- Original Post.....

So after two years of following the great cabinet builds of this forum, I am finally starting my own build. Have two possible names at the moment which the kids came up with so it is either RocketPin or CyberPin!

I will update the full specs later as it is gone 2am in the morning here, but basically I have a 42" LG TV, currently a 22" LG backglass (will upgrade to 26") and possibly a 18" DMD monitor although this may change.

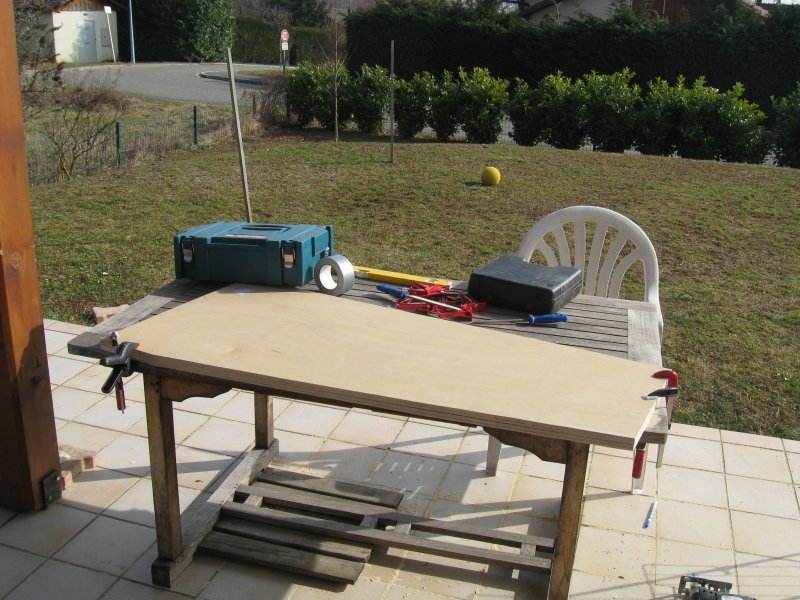
Software side is sorted as I have had Hyperpin/VP with UVP/FP up and running on two monitors for about a year now but the bit I have been dreading - the carpentry hasn't gone too bad as I expected (smile.gif) - this is mainly due to having the right tools such as plenty of clamps, electric drill, electric screwdriver and lots of woodglue and screws. Also many hours of planning on paper!

I have ordered an Ultimate Cab kit from Noah, so once that gets shipped overseas to here hopefully the cab will start to look more the part. I will also be ordering some buttons, Ipac2, etc. this week and eventually maybe try to add a Ledwiz as well.

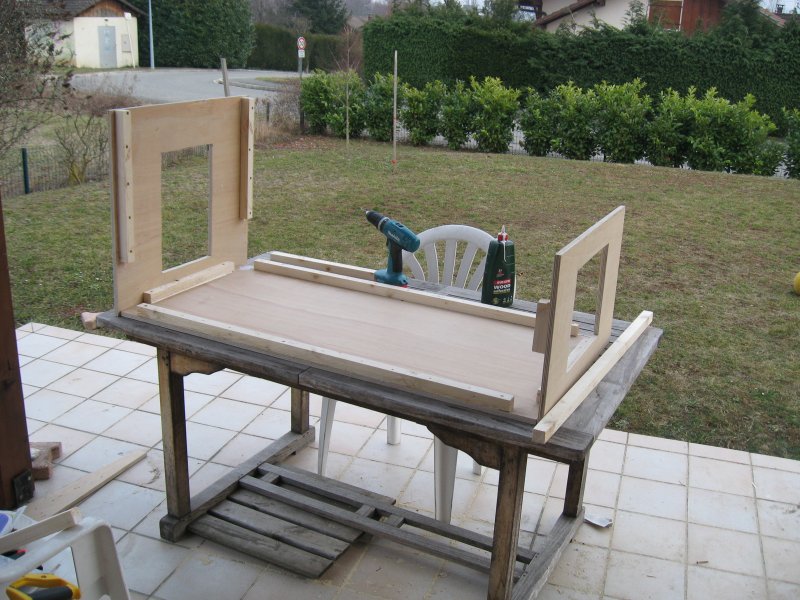
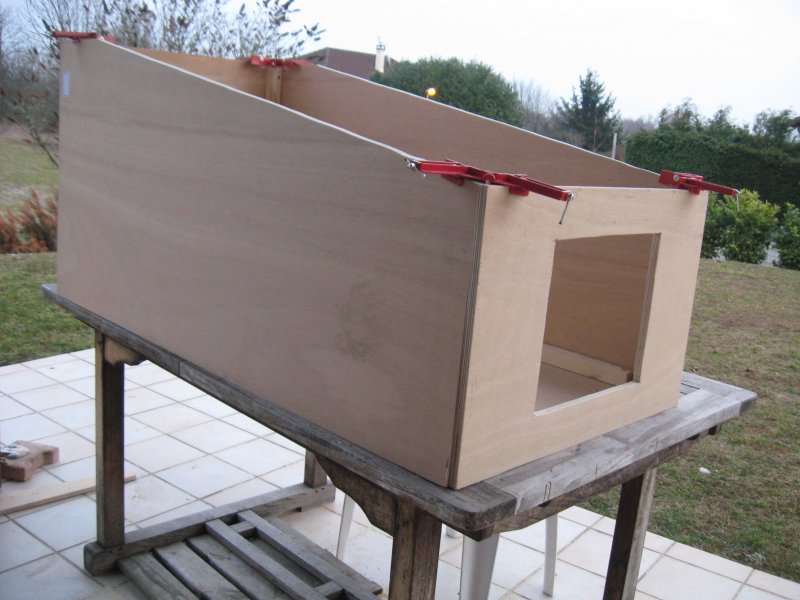
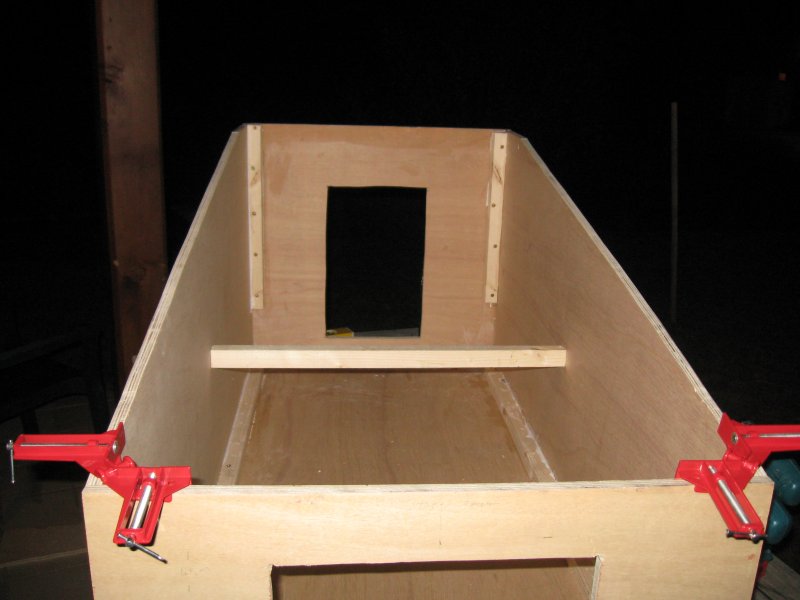
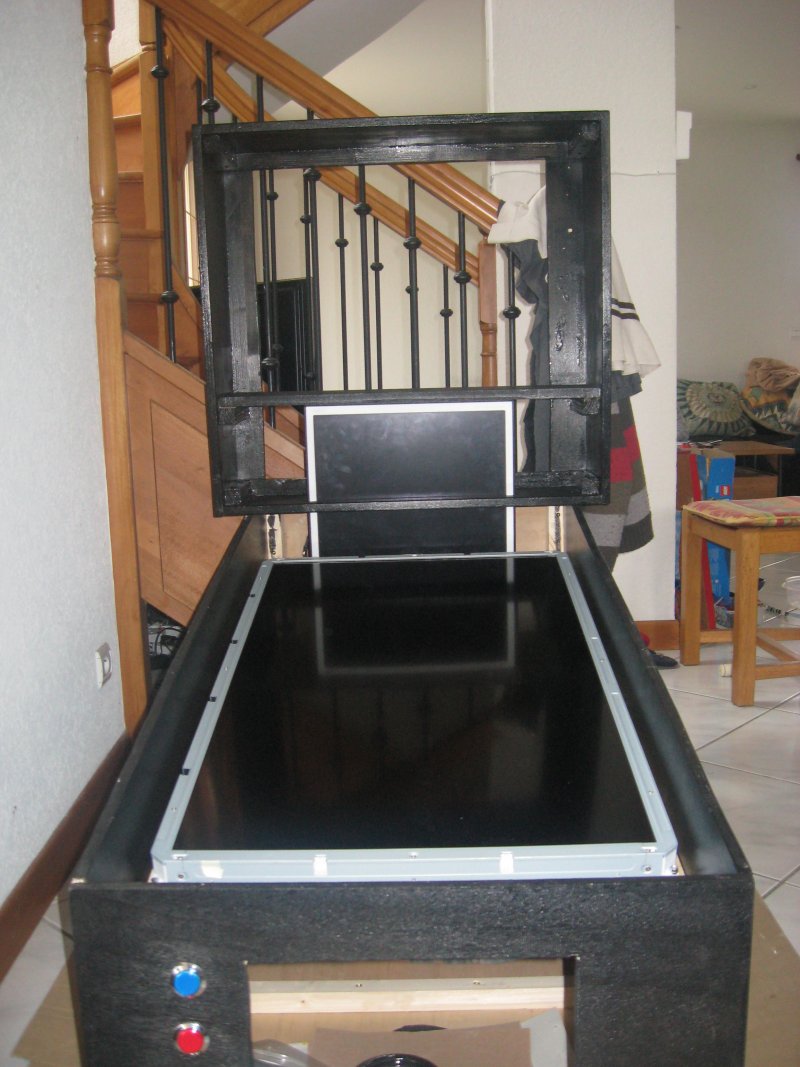
Here are the first pictures. I built a backbox out of pine in about 5 hours last weekend, but have yet to screw this together. For the cab I built this today in about 8 hours and I have used a good grade 15mm plywood which I finally tracked down (it was difficult to source here), and this is screwed and glued.

img_28920.jpg

img_2895.jpg

img_2896.jpg

img_2902.jpg

img_2903.jpg

img_2905.jpg

img_2913.jpg

img_2914.jpg

img_2917.jpg

img_2918.jpg

img_2924.jpg

img_2925.jpg

img_2926.jpg

img_2929.jpg

img_2930.jpg

img_2935.jpg

img_42780.jpg


img_35690.jpg

 
img_35670.jpg
 
 
img_3572.jpg
 
 
Pinball Arcade PC Steam version running in 'portrait mode' under Windows XP 32-bit.
 
 
Here is a video of Pinball FX2 running in 'portrait mode' under Windows 8.

Edited by settingsons, 23 December 2023 - 11:06 AM.


#2 maceman

maceman

    Home Pinball Machine Collector/ Restorer

  • VIP
  • 2,271 posts
  • Location:Canada, Eh!

  • Flag: Canada

  • Favorite Pinball: ....**Haunted House**....


Posted 20 February 2011 - 03:30 AM

I'll be interested to see how you make up the bracing to hold up the LG monitor PF. I say this only because mine is an LG as well and it took me a bit to figure out what would work good. They don't leave enough room around the edges before you hit the wiring or whatever, and there isn't any good spots to go across horizontally in my opinion. Oh well..I am sure you will have a good plan and then I will kick myself for probably making it harder than it should've been for me smile.gif

Looks great so far!

Maceman
________________________________________________________________________________
Canada Eh!
hm_avatar.pngss_avatar.jpg MODS ys_avatar5.jpggenie_avatar.pngj2o_avatar.png

#3 Blitz17

Blitz17

    Enthusiast

  • Members
  • PipPipPip
  • 376 posts
  • Location:Blue Springs, MO

  • Flag: United States of America

  • Favorite Pinball: Star Trek TNG - jpsalas

Posted 20 February 2011 - 05:59 AM

Looks great!
Having a cabinet to play full screen pins is awesome! Check out my mini pin cab here on VPForums.


Processor: AMD Dual Core X2 Phenom 555 BE 3.2Ghz (OC to 3.5Ghz)
System Ram: GSkill Ripjaws 4G
Graphics Card: Asus Nvidia GTX460 (driver version 270.99) (OC)
SSD: 40G OCZ Vertex 2
Power Supply: Antec TruePower 750W
Operating System: TinyXP

#4 settingsons

settingsons

    Pinball Fan

  • VIP
  • 959 posts
  • Location:Switzerland

  • Flag: Switzerland

  • Favorite Pinball: Terminator 2 and many EM machines


Posted 20 February 2011 - 09:50 AM

QUOTE (maceman @ Feb 20 2011, 04:30 AM) <{POST_SNAPBACK}>
I'll be interested to see how you make up the bracing to hold up the LG monitor PF. I say this only because mine is an LG as well and it took me a bit to figure out what would work good. They don't leave enough room around the edges before you hit the wiring or whatever, and there isn't any good spots to go across horizontally in my opinion. Oh well..I am sure you will have a good plan and then I will kick myself for probably making it harder than it should've been for me smile.gif

Looks great so far!

Maceman


Thanks Maceman.
I must admit that is something I am still puzzling over. I have recased the TV until it is ready to fit -I am still unsure the best way to go about it. What solution did you come up with - any pictures smile.gif ? I re-scanned your threads pictures but couldn't tell from those shots.


Thanks Blitz - those clamps you recommend made the job a whole lot easier - cheers!

#5 Rawd

Rawd

    Pinball Wizard

  • VIP
  • 4,311 posts
  • Location:Edmonton, Canada

  • Flag: Canada

  • Favorite Pinball: Triple Strike


Posted 20 February 2011 - 01:47 PM

Awesome! So glad you are finally building your cab!


#6 settingsons

settingsons

    Pinball Fan

  • VIP
  • 959 posts
  • Location:Switzerland

  • Flag: Switzerland

  • Favorite Pinball: Terminator 2 and many EM machines


Posted 20 February 2011 - 04:35 PM

QUOTE (Rawd @ Feb 20 2011, 02:47 PM) <{POST_SNAPBACK}>
Awesome! So glad you are finally building your cab!


Many thanks Rawd - I thought it would never happen smile.gif. I have been using your tutorial that you created a while back and it has (and will be) a great help with the build.
--------

Another update:

We decided to go for CyberPin as the name. Today I glued and screwed the backbox together and sat it on the cab. I need to get a piece of ply to put a door on the back.

Here are some pictures including some of the test setup of the screen (a lot of play testing has been going on in recent months wink.gif .


Back to work tomorrow so probably won't get much done in the week, although I am please with the progress so far. One thing I think I should have done is gone for 18mm (0.7 ") plywood instead of 15mm. The cab in pretty robust but I wll strengthen it a bit with some extra baton inside, etc.

Edited by settingsons, 20 February 2011 - 05:01 PM.


#7 maceman

maceman

    Home Pinball Machine Collector/ Restorer

  • VIP
  • 2,271 posts
  • Location:Canada, Eh!

  • Flag: Canada

  • Favorite Pinball: ....**Haunted House**....


Posted 20 February 2011 - 07:59 PM

Wow- That looks awesome loaded up, even outside of the cab!! 42" eh? We;ll, that is Huge! smile.gif

Actually, what is interesting is the 42"(i am assuming the one taken apart in your pic is the 42"?) is similar when opened to the 32", but both are different that the 37".

What I mean is this. I started with 32" and had it opened, but when i upgraded to the 37", one thing i noticed right away was the difference in where they put some of the 'guts'. The 32" would have been easy as there were more options, but the 37" really is wired all over the place. Similar to what you will do, I removed the speakers as well from the plastic and put aside for now. I also carefully re-routed the control pad for the vol/channels/etc and the infrared sensor. The infrared, I put some small wood in and taped it to the monitor and then taped the Infrared to it, so it wasn't taped directly to the metal(wasn't sure what to do so went by instinct smile.gif).
The vol control thing, I just taped to the monitors metal as it is less worrisome.

In short, I ended up using 2 runners on the long(length) sides only. My side walls fit the monitor snugly- I was surprised to see how well- so i just used an inch runner per side (anymore thickness on the runners and i would be into the monitor too much where the wiring and such starts.

There is really no easy way to run a horizontal runner(s). I think it would be too difficult that way and am glad mine fit so well vertically (lengthwise). I haven't taken pics of that closely, so let me know if you need them and i will do next photo run!

Looking awesome!

Maceman

Edited by maceman, 20 February 2011 - 08:01 PM.

________________________________________________________________________________
Canada Eh!
hm_avatar.pngss_avatar.jpg MODS ys_avatar5.jpggenie_avatar.pngj2o_avatar.png

#8 settingsons

settingsons

    Pinball Fan

  • VIP
  • 959 posts
  • Location:Switzerland

  • Flag: Switzerland

  • Favorite Pinball: Terminator 2 and many EM machines


Posted 20 February 2011 - 08:26 PM

Many thanks for the info maceman and the comments! If you could let me see the photos of the mounting that would be a big help cool.gif

When I first planned to be build a cab I start with 32" in mind. This grew to 37", 40" and then I finally stopped on 42"!. I was lucky enough to get a good deal on the TV which allowed me to justify the costs plus I have dreamt of owning a pinball since I was 14 years old... thought I deserve it...about time, etc. etc! Plus it is a great project to work on with the kids and something I am sure they will remember.

The TV is the LG 42LD550 and it is how you describe - the cables are all tied into the frame, etc. so from what you say I need to be careful. The TV will fit quite tight into the cabinet from the measurements I have taken. The TV is 58cm wide and the cab internally is 60.5cm, so only about 0.5" each side to spare. Maybe what you did I can do as well?

The screen really does look awesome, and the realism of some of the latest HD tables is superb. I think you will be really pleased with the LG you have - great viewing angles, etc. I also set it to game mode, turn tru-motion off, and set to 'Just Scan' mode which I understand is the 1:1 pixel mapping option so no scaling processing, etc. being done by the TV.

I am using a desktop computer with a GTX260 graphics card, but I did spend a lot of time trying to achieve a smooth ball movement (disabling window services, changing processor infinity, etc), and although not every table plays perfect the majority do. Fortunately there is so much good advice in these forums and a lot of helpful members to help out.

Anyway when you next upload some photos one of you screen mount would be great. Thanks

Edited by settingsons, 20 February 2011 - 08:32 PM.


#9 Blitz17

Blitz17

    Enthusiast

  • Members
  • PipPipPip
  • 376 posts
  • Location:Blue Springs, MO

  • Flag: United States of America

  • Favorite Pinball: Star Trek TNG - jpsalas

Posted 21 February 2011 - 03:37 PM

QUOTE (settingsons @ Feb 20 2011, 03:50 AM) <{POST_SNAPBACK}>
QUOTE (maceman @ Feb 20 2011, 04:30 AM) <{POST_SNAPBACK}>
I'll be interested to see how you make up the bracing to hold up the LG monitor PF. I say this only because mine is an LG as well and it took me a bit to figure out what would work good. They don't leave enough room around the edges before you hit the wiring or whatever, and there isn't any good spots to go across horizontally in my opinion. Oh well..I am sure you will have a good plan and then I will kick myself for probably making it harder than it should've been for me smile.gif

Looks great so far!

Maceman


Thanks Maceman.
I must admit that is something I am still puzzling over. I have recased the TV until it is ready to fit -I am still unsure the best way to go about it. What solution did you come up with - any pictures smile.gif ? I re-scanned your threads pictures but couldn't tell from those shots.


Thanks Blitz - those clamps you recommend made the job a whole lot easier - cheers!


Glad I could help out. It is looking great!
Having a cabinet to play full screen pins is awesome! Check out my mini pin cab here on VPForums.


Processor: AMD Dual Core X2 Phenom 555 BE 3.2Ghz (OC to 3.5Ghz)
System Ram: GSkill Ripjaws 4G
Graphics Card: Asus Nvidia GTX460 (driver version 270.99) (OC)
SSD: 40G OCZ Vertex 2
Power Supply: Antec TruePower 750W
Operating System: TinyXP

#10 fiatbravodriver

fiatbravodriver

    Hobbyist

  • Members
  • PipPip
  • 46 posts

  • Flag: United Kingdom

  • Favorite Pinball: T2

Posted 21 February 2011 - 05:44 PM

Great Work Mate,

Im a bit behind you on my build. Ive got the legs ordered today. Dreading having to make the holes for them.

Does anyone have any tips?

James.

#11 settingsons

settingsons

    Pinball Fan

  • VIP
  • 959 posts
  • Location:Switzerland

  • Flag: Switzerland

  • Favorite Pinball: Terminator 2 and many EM machines


Posted 23 February 2011 - 09:39 PM

QUOTE (fiatbravodriver @ Feb 21 2011, 06:44 PM) <{POST_SNAPBACK}>
Great Work Mate,

Im a bit behind you on my build. Ive got the legs ordered today. Dreading having to make the holes for them.

Does anyone have any tips?

James.


Many thanks James. Not sure if you already have this, but there is some good all-round info on the following link including some info on fitting the legs.

PinaColada Leg Fitting Info
Hope it helps.

Vic

Edited by settingsons, 23 February 2011 - 09:45 PM.


#12 zebulon

zebulon

    Cantankerous old B****D

  • Platinum Supporter
  • 1,172 posts
  • Location:Whitby, Ontario, Canada

  • Flag: Canada

  • Favorite Pinball: xenon, Medieval Madness, Royal Flush, Silverball Mania

Posted 24 February 2011 - 02:39 AM

Great work, good looking cab.

I found with my 2 tv's that I could unplug the additional tuner boards and ir receiver/front control boards, leaving just the hdmi/vga/dvi board in and they work fine. It allowed me to lighten the tvs considerably and get alot of the electronics out of the way. So much so that the backbox tv is literally just the screen, the power supply and logic board are remotely mounted on a seperate board.

Keep up the good work!!!

 ZB%20%20Storefront1%20.png               [email protected]

Don't pm or expect an answer from me here ... the links above are my contacts.

I know so much about so little that I could teach you all there is to know about nothing......


#13 fiatbravodriver

fiatbravodriver

    Hobbyist

  • Members
  • PipPip
  • 46 posts

  • Flag: United Kingdom

  • Favorite Pinball: T2

Posted 24 February 2011 - 02:59 PM

Hi Settingsons, thanks for the link. Ive been on Pinacolada's site many many times and forgot about his tips.

I had my legs ordered monday and the courior tried to deliver an empty large cardboard tube on weds that I refused. Im gutted I was hoping to get the legs on this sat. Im waiting for Pinball Heaven (uk) to sort out.

Bit off topic but what do you think the chances are of anyone emailing me some widebody decals that are ready to go to the printers. Im just not good enougth in PS to make my own. Id love T2 or twilight zone or indy. I would not pass them on or host them etc. Id also be happy to paypal some beer money in return :-)

#14 settingsons

settingsons

    Pinball Fan

  • VIP
  • 959 posts
  • Location:Switzerland

  • Flag: Switzerland

  • Favorite Pinball: Terminator 2 and many EM machines


Posted 24 February 2011 - 09:10 PM

QUOTE (zebulon @ Feb 24 2011, 03:39 AM) <{POST_SNAPBACK}>
Great work, good looking cab.

I found with my 2 tv's that I could unplug the additional tuner boards and ir receiver/front control boards, leaving just the hdmi/vga/dvi board in and they work fine. It allowed me to lighten the tvs considerably and get alot of the electronics out of the way. So much so that the backbox tv is literally just the screen, the power supply and logic board are remotely mounted on a seperate board.

Keep up the good work!!!

Hey Zebulon - that sounds like a good idea. The TV is recased now until I get the parts from Noah, but when I do the full de-casing I will try to do that which might free up some more space for the rails. That combined with Maceman's idea might do the trick. Cheers


QUOTE (fiatbravodriver @ Feb 24 2011, 03:59 PM) <{POST_SNAPBACK}>
Bit off topic but what do you think the chances are of anyone emailing me some widebody decals that are ready to go to the printers. Im just not good enougth in PS to make my own. Id love T2 or twilight zone or indy. I would not pass them on or host them etc. Id also be happy to paypal some beer money in return :-)

That is a shame about the legs not turning up. Talk about build your hopes up only to be shattered sad.gif.

I am in the same boat as you with the artwork. Unfortunately I don't have an artistic bone in my body - nor does the wife come to that (not that she would be interested anyhow thmbdn.gif ). For the artwork - this is some way off me yet, but I was thinking of asking someone on the forum if they would mind helping out and of course pay them for their artistic skills. You might want to create a thread for it. Good luck man with the rest of your build - hopefully we can see some pictures when you are ready smile.gif.

Edited by settingsons, 24 February 2011 - 09:17 PM.


#15 settingsons

settingsons

    Pinball Fan

  • VIP
  • 959 posts
  • Location:Switzerland

  • Flag: Switzerland

  • Favorite Pinball: Terminator 2 and many EM machines


Posted 26 March 2011 - 10:05 PM

It has been a while since the last update of my build. So here goes.....!

BUILT NEW PC ----
Have been spending most of the time getting bits together for a new PC. I ended up tearing apart my Dell Core i7 860 (4 cores plus 4 -HT), and getting a decent overclockable motherboard, Zalman cooler, OCZ Vortex 2 SSD 60GB.

The new motherboard allowed me to add a second graphics card to drive the Backglass monitor and a 3rd monitor for the DMD. I am very pleased with the performance now of VP with UVP.

The processor is currently overclocked from 2.8Ghz to 3.6Ghz, but I should be able to take it upto 4Ghz.

I am getting about 850FPS on Medievel Madness, 750FPS on LH's Indiana with a 3-screen setup.

CABINET PARTS ----
I ordered an Ultimate Widebody Cabinet Kit from Noah plus some buttons. I was hoping o get them Friday, but the Customs held them for 2 days, but the online tracking says they are on there way from Paris!

CABINET PROGRESS ----
I added a shelf last weekend to hold the 3rd monitor. Today I Polyfilled, sanded, Polyfilled, sanded again, and then put the base coat of paint on. I had real trouble finding the right paint here. Gloss paints are now banned in France and Switzerland, so I was recommended a 2-in-1 paint for wood which also serves as a primer. I must say I am very pleased with the finish of the paint - it has a nice shine, is hard-wearing and very easy and clean to work with. I won't miss gloss now. Only ONE coat done so far.

I stuck a few buttons on just to see what they looks like. They are the Ultimarc chrome buttons. I am not sure if the buttons can be labelled as they can't be taken apart. If anyone knows of a method to label them, then please let me know.

PLAY TESTING ----
I finished the day of with some all important play testing smile.gif. Unclewilly's Fathom with a fantastic FD Backglass is absolutely awesome. I can't wait to get it in the cab properly!

I was pleased with the performance increase I got with experimentation after I set the Pinmame registry setting for each 3-screen table to have ddraw off (ie: set to zero). I am getting smoother play and 100+ fps.

Well enough talking - here are some photos....


PHOTOS ----


Hope will make more progress next weekend when the Ultimate Cabinet Kit arrives.

Cheers

Vic

Edited by settingsons, 26 March 2011 - 10:08 PM.


#16 maceman

maceman

    Home Pinball Machine Collector/ Restorer

  • VIP
  • 2,271 posts
  • Location:Canada, Eh!

  • Flag: Canada

  • Favorite Pinball: ....**Haunted House**....


Posted 27 March 2011 - 04:37 AM

That is looking AWESOME!
________________________________________________________________________________
Canada Eh!
hm_avatar.pngss_avatar.jpg MODS ys_avatar5.jpggenie_avatar.pngj2o_avatar.png

#17 settingsons

settingsons

    Pinball Fan

  • VIP
  • 959 posts
  • Location:Switzerland

  • Flag: Switzerland

  • Favorite Pinball: Terminator 2 and many EM machines


Posted 27 March 2011 - 05:25 PM

I de-cased the 42" LG playfield TV fully today, and before I started I noticed a 5 inch crack on the screen. the thickness of a hair. It does appear to affect the display, and I have no idea how it could have happened. I think I will just live with it and hope it won't spread. If anyone knows of anything I can do to stop it spreading then I would love to know.,

I managed to mount two batons of timber using nuts and bolts within the TV so it makes the handling easier:


The dreaded crack - it is really noticable in this photo with the flash, but in reality it is quite hard to spot:


Playfield fitted:


#18 maceman

maceman

    Home Pinball Machine Collector/ Restorer

  • VIP
  • 2,271 posts
  • Location:Canada, Eh!

  • Flag: Canada

  • Favorite Pinball: ....**Haunted House**....


Posted 27 March 2011 - 11:26 PM

?????

Ahh man.That is the pits. Are you sayng you just noticed that,as in, it is something that happened after you bought the monitor?

If so, The only thing i can think of is if you somehow twisted the screen when carrying after the plastic was removed and it had a weak point there that tore. I am surprised it would be cracked like that. Any weight put on the screen I don't think would do that.....

I think that will drive you nuts in the long run..............

Maceman
________________________________________________________________________________
Canada Eh!
hm_avatar.pngss_avatar.jpg MODS ys_avatar5.jpggenie_avatar.pngj2o_avatar.png

#19 settingsons

settingsons

    Pinball Fan

  • VIP
  • 959 posts
  • Location:Switzerland

  • Flag: Switzerland

  • Favorite Pinball: Terminator 2 and many EM machines


Posted 28 March 2011 - 04:24 PM

QUOTE (maceman @ Mar 28 2011, 12:26 AM) <{POST_SNAPBACK}>
?????

Ahh man.That is the pits. Are you sayng you just noticed that,as in, it is something that happened after you bought the monitor?

If so, The only thing i can think of is if you somehow twisted the screen when carrying after the plastic was removed and it had a weak point there that tore. I am surprised it would be cracked like that. Any weight put on the screen I don't think would do that.....

I think that will drive you nuts in the long run..............

Maceman

Hey maceman thanks for the sympathy.  Although I do have a crack on the screen I had a typo in post above - missed out 'not'!  I meant to say it doesn't seem to affect the display!  I was exhausted when I wrote that post.

Anyway I have had the screen for about two months.  Maybe I stressed it the first time I decased it although I was so careful.  Oh well fingers crossed it won't get worse.


#20 zebulon

zebulon

    Cantankerous old B****D

  • Platinum Supporter
  • 1,172 posts
  • Location:Whitby, Ontario, Canada

  • Flag: Canada

  • Favorite Pinball: xenon, Medieval Madness, Royal Flush, Silverball Mania

Posted 29 March 2011 - 01:04 AM

QUOTE (settingsons @ Mar 28 2011, 12:24 PM) <{POST_SNAPBACK}>
QUOTE (maceman @ Mar 28 2011, 12:26 AM) <{POST_SNAPBACK}>
?????

Ahh man.That is the pits. Are you sayng you just noticed that,as in, it is something that happened after you bought the monitor?

If so, The only thing i can think of is if you somehow twisted the screen when carrying after the plastic was removed and it had a weak point there that tore. I am surprised it would be cracked like that. Any weight put on the screen I don't think would do that.....

I think that will drive you nuts in the long run..............

Maceman

Hey maceman thanks for the sympathy.  Although I do have a crack on the screen I had a typo in post above - missed out 'not'!  I meant to say it doesn't seem to affect the display!  I was exhausted when I wrote that post.

Anyway I have had the screen for about two months.  Maybe I stressed it the first time I decased it although I was so careful.  Oh well fingers crossed it won't get worse.


Is that a crack or a scratch?

Either way, if you want to fill it (I assume it's not going back under warranty), I found that my missus' clear nail polish worked wonders (good thing she doesn't come on here and read any of this). I scratched mine by getting clumsy with all the back and forth putting it in the cab and then removing it, filled the scratch with the nail polish and it leveled it out great. I have to really search to find it.

Cab looks great, it's really coming along.

Edited by zebulon, 29 March 2011 - 01:05 AM.

 ZB%20%20Storefront1%20.png               [email protected]

Don't pm or expect an answer from me here ... the links above are my contacts.

I know so much about so little that I could teach you all there is to know about nothing......