Jump to content


Photo
- - - - -

Starting my 3/4 scale pinball cabinet


  • Please log in to reply
24 replies to this topic

#1 GordonSW

GordonSW

    Hobbyist

  • Members
  • PipPip
  • 22 posts
  • Location:Karlsruhe, Germany

  • Flag: ---------

  • Favorite Pinball: Medieval Madness, Attack from Mars

Posted 04 June 2012 - 09:59 PM

Hello,

first of all please excuse my English as it is not my first language. As long time reader of German computer magazine c't I was inspired by an article about building a virtual pinball a few weeks ago. After browsing this forum, viewing a few videos on YouTube and playing Virtual Pinball myself I decided to build my own pinball. The first choice was to buy an old machine and use it as basis for my project, but I realised two things: I don't have enough spare money to buy a 37" or 40" LCD TV. And I don't have enough room in my apartment for a full-grown pinball cabinet.

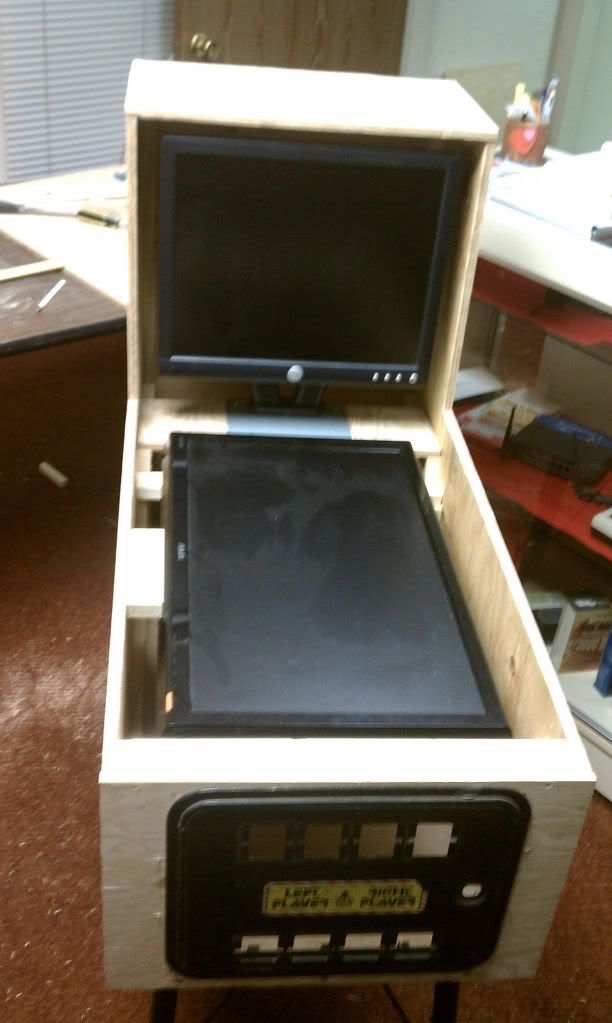
After burying my plan (and playing Virtual Pinball for a week) I reconsidered my options and decided to build my own pinball cabinet on a 3/4 scale. My woodworking skills should be sufficient for this task. On the down side I have to buy pinball legs, buttons, ball shooter and so on. Having most of the hardware of my old PC left I just need an 27" LCD monitor as playfield. Because I don't want to lose warranty I have to build the cabinet wide enough to contain the LCD with its housing. Further I decided two use just one monitor for backglass and DMD so I won't have to buy another monitor and graphics card.

To get a sense of the dimensions of the cabinet I built one out of cardboard (and huge amounts of tape). The result after two hours of work can be seen in the pictures (the black areas represent the LCD panels). The dimensions are 440 x 890 x 800mm (w x h x d) or 17.5 x 35 x 31,5 inch. Although I think I should plan for a wider back box ;-)


I'm planning to use the following hardware. Any thoughts about the configuration?

Computer (running Windows XP SP3):
- Gigabyte MA770-UD3 motherboard
- AMD Phenom II X3 720
- Scythe Samurai ZZ cpu cooler
- 2GB Corsair XMS2 PC2-6400
- Palit GeForce GTS 250 512MB GDDR3
- 60GB OCZ Vertex 2 SSD
- Forton 350W ATX 80+ power supply1
- 2 x 120mm Revoltec blue LED fan
- 2.1 PC speakers (don't know which yet)
- I-PAC 2 interface

Playfield:
- Iiyama ProLite X2775HDS-B1 (27" MVA panel 1920x1080)

Backglass:
- Fujitsu-Siemens P20-2 (20" PVA panel 1600x1200)

When I got the LCDs (hopefully before weekend) I will be able to take the measurements und plan the cabinet in detail. I've seen a few posts where people have used Google SketchUp. Maybe I'll try it this time. Although my previous woodwork projects went quite well using pencil and paper.
I appreciate any comments or suggestions. I will keep you posted on further progress...

Edited by GordonSW, 05 June 2012 - 05:34 AM.


#2 dazzadasha

dazzadasha

    Enthusiast

  • Platinum Supporter
  • 418 posts
  • Location:Melbourne Oz

  • Flag: Australia

  • Favorite Pinball: Firepower, Getaway, T2

Posted 04 June 2012 - 11:14 PM

Nice going.- Just starting one a little smaller - 23" play field- Will watch your progress with interest.
Good Luck.

Mini pin maker
sep17875.jpg

I still cant believe that we have


#3 swaffar

swaffar

    Enthusiast

  • Members
  • PipPipPip
  • 141 posts
  • Location:Spangdahlem, Germany

  • Flag: United States of America

  • Favorite Pinball: BBB, MM, CV

Posted 05 June 2012 - 02:05 AM

You may want to check out my thread. I just posted dimensions for my cab which is very similar. I could also give you metric measurements if you'd like.

http://www.vpforums....s...st&p=180503

Check out my mini-cab project

Signature_zps03cd408c.jpg


#4 GordonSW

GordonSW

    Hobbyist

  • Members
  • PipPip
  • 22 posts
  • Location:Karlsruhe, Germany

  • Flag: ---------

  • Favorite Pinball: Medieval Madness, Attack from Mars

Posted 05 June 2012 - 06:15 AM

QUOTE (swaffar @ Jun 5 2012, 03:05 AM) <{POST_SNAPBACK}>
You may want to check out my thread. I just posted dimensions for my cab which is very similar. I could also give you metric measurements if you'd like.

http://www.vpforums....s...st&p=180503


I read your post a few days ago and and found it very inspiring. I'm very impressed by what you accomplished, but I'm lacking some of the required skills and/or tools to build such an elaborated cabinet.

I won't need exact measurements though. I want to fit the cabinet size to the dimensions of my LCD to keep the border around the playfield as small as possible without removing the LCD housing. That's one reason I chose the Iiyama monitor. I'm going to use 16mm (~5/8") MDF supported by pine bars for the same reason.


#5 GordonSW

GordonSW

    Hobbyist

  • Members
  • PipPip
  • 22 posts
  • Location:Karlsruhe, Germany

  • Flag: ---------

  • Favorite Pinball: Medieval Madness, Attack from Mars

Posted 07 June 2012 - 08:30 PM

Parts and Plans...

The first parts arrived yesterday. I've got plunger, buttons, speaker grill, I-PAC adapter, fans and my 27" LCD. Still waitung for backglass LCD and pinball legs.
pinball_parts1.jpg

I started using Google SketchUp after viewing several tutorial videos. Sometimes it's a pain but I'm satisfied with the results so far.
pinball_measurements.png pinball_preview.png

Tomorrow I'm going to assemble the computer parts and start testing the multi monitor setup...


Edited by GordonSW, 27 August 2020 - 06:34 PM.


#6 GordonSW

GordonSW

    Hobbyist

  • Members
  • PipPip
  • 22 posts
  • Location:Karlsruhe, Germany

  • Flag: ---------

  • Favorite Pinball: Medieval Madness, Attack from Mars

Posted 09 June 2012 - 10:40 PM

I have been working on the details for my cabinet design. There really is not much room for computer and subwoofer in a cabinet this small. That is why my new design is 5cm higher and I deciced to adapt swaffar's drawer design.
I also have to place the buttons slighty lower and the LCD a little bit higher than I originally planned, because I don't want to remove the LCD body.

pinball_measurements_cabinet.png

Today my backglass monitor arrived. It's an old 20" LCD with 1600 x 1200 pixels. My plan is to use the upper 1600 x 900 as backglass and show the DMD with 1024 x 256 below. I still have to figure out how to place the speakers. At least I decided which speakers I want to use and ordered a "Trust Soundforce 2.1 Presto" set for 20€.

My attempts to configure Visual Pinball / Hyperpin / UltraVP were not totally successful. I now can play two tables with Hyperpin with the playfield shown vertical on my 27" LCD and the DMD on the correct postion on the second monitor, but Hyperpin shows no playfield or backglass previews. Additionally my UltraVP doesn't show the UVP backglasses and the program window can be seen above my playfield while playing a table. As far as I know I did exactly what was described in the Tweegster tutorial. Has anybody ideas what I can do about that?


Edited by GordonSW, 27 August 2020 - 06:35 PM.


#7 GordonSW

GordonSW

    Hobbyist

  • Members
  • PipPip
  • 22 posts
  • Location:Karlsruhe, Germany

  • Flag: ---------

  • Favorite Pinball: Medieval Madness, Attack from Mars

Posted 10 June 2012 - 09:26 PM

Made some progress with the woodwork this weekend...

Planning is nice but when I started building I noticed some errors that didn't hit me before. I wanted to rest the glas on two wooden bars which would have prevented me from lifting the playfield LCD out of the cabinet. Instead I countersank the cabinet side (will be hidden unter siderails anyway). Tomorrow I'm going to change the order for my glas pane to. Unfortunately I made some errors measuring and using my power tools as well. I'll have to fix them later unless they're hidden by a bezel or siderail.

I finally decided to use leaf switch instead of microswitch buttons, so I didn't drill holes for those so far. I'm still using microswitch buttons for the front, but I will add a dedicated start button. I also ordered a tilt set from the same shop.

I hope to get the legs and my 2.1 speaker set until next weekend to verify my design for the inner cabinet layout.

pinball_cabinet1.jpg
pinball_cabinet2.jpg
pinball_cabinet3.jpg
pinball_cabinet4.jpg

P.S. Find the cat ;-)


Edited by GordonSW, 27 August 2020 - 06:36 PM.


#8 htamas

htamas

    Pinball Wizard

  • VIP
  • 2,155 posts
  • Location:California

  • Flag: Hungary

  • Favorite Pinball: cannot pick just one, and they change anyway


Posted 10 June 2012 - 10:44 PM

QUOTE (GordonSW @ Jun 10 2012, 02:26 PM) <{POST_SNAPBACK}>
P.S. Find the cat ;-)

That's easy... second pic from the bottom, on the shelf. smile.gif

Nice progress, will watch the further posts.

Sehr schöne Arbeit, viel Spass damit smile.gif

Edited by htamas, 10 June 2012 - 10:46 PM.


#9 swaffar

swaffar

    Enthusiast

  • Members
  • PipPipPip
  • 141 posts
  • Location:Spangdahlem, Germany

  • Flag: United States of America

  • Favorite Pinball: BBB, MM, CV

Posted 11 June 2012 - 12:38 PM

Looking good. You might finish before me at this rate. I'm still waiting for the solenoids I ordered from Amazon.... back on May 7th.

Check out my mini-cab project

Signature_zps03cd408c.jpg


#10 MTPPC

MTPPC

    Enthusiast

  • Members
  • PipPipPip
  • 352 posts
  • Location:Big Sky, Montana USA

  • Flag: ---------

  • Favorite Pinball: Mata Hari .directB2S

Posted 14 June 2012 - 05:15 PM

I started my mini-digital-pinball last week. This is a made from scratch project using a 24" asus widescreen and a 17" dell 4:3 monitor. My buddy gave me an HP dual core 2.5. I'm going to use hyperpin, a xinmo 1-player encoder and joy2keys to run future pinball tables. I don't know anything about visual pinball, but I might try that in the future. For now, I have all my software running good and about a dozen tables set up and working nicely.

I'll have flipper and left nudge buttons on the left side and flipper, right nudge, and bottom nudge on the right side. My coindoor came off a Steel Talons arcade machine and has room for eight buttons. So far, I'm thinking:

Coin
Start (shifted pause)
Plunger
Escape or Back
Instruction Card (shifted Flyer)
Effects Volume Up (shifted Music Volume Up)
Effects Volume Down (shifted Music Volume Down)
Shift (via joytokeys)

The PC power button will just be a standard arcade button on the back of the machine. The playfield will be covered w/ 3/16" glass and the backglass will be 1/8". It's built on a 1-1/4" Fiberboard adjustable leg table cut to 36" x 18". The box is made of 7/16" fir exterior plywood.

A buddy lent me an air brad nailer and I used 1" brads, 3/4" nailers and glue to assemble it. What a life saver!

I'm using 1.5" light aluminum angle for side rails and lock bar and using Large Flat ATA Flight Road Trunk Case Corners where the chamfered angles meet. (http://www.ebay.com/...=item3349f3a1e9). There is a 16" x 8" eave vent and fan in the back. There are two 4" speakers mounted in the roof of the back glass.


I'm to the point where sanding, bondo and painting will be next, but it's not too late to implement any suggestions. I just ordered 3/16" glass for the playfield and 1/8" glass for the back glass.

Edited by MTPPC, 14 June 2012 - 05:19 PM.


#11 GordonSW

GordonSW

    Hobbyist

  • Members
  • PipPip
  • 22 posts
  • Location:Karlsruhe, Germany

  • Flag: ---------

  • Favorite Pinball: Medieval Madness, Attack from Mars

Posted 14 June 2012 - 08:51 PM

QUOTE (MTPPC @ Jun 14 2012, 05:15 PM) <{POST_SNAPBACK}>
I started my mini-digital-pinball last week. This is a made from scratch project using a 24" asus widescreen and a 17" dell 4:3 monitor. My buddy gave me an HP dual core 2.5. I'm going to use hyperpin, a xinmo 1-player encoder and joy2keys to run future pinball tables. I don't know anything about visual pinball, but I might try that in the future. For now, I have all my software running good and about a dozen tables set up and working nicely.

I'll have flipper and left nudge buttons on the left side and flipper, right nudge, and bottom nudge on the right side. My coindoor came off a Steel Talons arcade machine and has room for eight buttons. So far, I'm thinking:

Coin
Start (shifted pause)
Plunger
Escape or Back
Instruction Card (shifted Flyer)
Effects Volume Up (shifted Music Volume Up)
Effects Volume Down (shifted Music Volume Down)
Shift (via joytokeys)

The PC power button will just be a standard arcade button on the back of the machine. The playfield will be covered w/ 3/16" glass and the backglass will be 1/8". It's built on a 1-1/4" Fiberboard adjustable leg table cut to 36" x 18". The box is made of 7/16" fir exterior plywood.

A buddy lent me an air brad nailer and I used 1" brads, 3/4" nailers and glue to assemble it. What a life saver!

I'm using 1.5" light aluminum angle for side rails and lock bar and using Large Flat ATA Flight Road Trunk Case Corners where the chamfered angles meet. (http://www.ebay.com/itm/Large-Flat-ATA-Flight-Road-Trunk-Case-Corner-/220284035561?pt=LH_DefaultDomain_0&hash=item3349f3a1e9). There is a 16" x 8" eave vent and fan in the back. There are two 4" speakers mounted in the roof of the back glass.


I'm to the point where sanding, bondo and painting will be next, but it's not too late to implement any suggestions. I just ordered 3/16" glass for the playfield and 1/8" glass for the back glass.


Looking good. I'm recognizing a trend towards mini/midi builds smile.gif

Good idea with the legs. I spent 80,-€ on original pinball legs because I was worried about stability (planning to integrate a nudge detection). My plan for the side rails is quite similar, but I haven't decided about the lockdown bar yet.
Your cabinet is a bit larger compared to your playfield LCD size, ho do you plan to cover the gap?


#12 GordonSW

GordonSW

    Hobbyist

  • Members
  • PipPip
  • 22 posts
  • Location:Karlsruhe, Germany

  • Flag: ---------

  • Favorite Pinball: Medieval Madness, Attack from Mars

Posted 14 June 2012 - 09:21 PM

QUOTE (swaffar @ Jun 11 2012, 12:38 PM) <{POST_SNAPBACK}>
Looking good. You might finish before me at this rate. I'm still waiting for the solenoids I ordered from Amazon.... back on May 7th.

I still have very much to do and not much time during work days (just a little planning and sketching). You still have a good chance to finish first wink.gif
I'm looking forward to seeing your cabinet in it's full glory. By the way, what are the solenoids for?

I got my pinball legs (black), flipper buttons (red) and leaf switches, 2.1 PC speakers and a Logitech K40mini keyboard delivered this week. I'll have to wait two weeks for my tilt set though...

I used yesterday's evening to repair some of the damage I did to my cabinet with wood filler.
cabinet_repairs.jpg

My PC speakers (ripped from their cases) are deeper than I expected causing trouble with my original design for the backbox. Because I use a 4/3 monitor for backglass and DMD there is no space for speakers where they should be in an original backbox. I'm still undecided about which of the following is the best solution. What are your opinions?
pinball_backbox1.png
pinball_backbox2.png


Edited by GordonSW, 27 August 2020 - 06:37 PM.


#13 htamas

htamas

    Pinball Wizard

  • VIP
  • 2,155 posts
  • Location:California

  • Flag: Hungary

  • Favorite Pinball: cannot pick just one, and they change anyway


Posted 15 June 2012 - 02:43 AM

I'd go with option 2...

#14 MTPPC

MTPPC

    Enthusiast

  • Members
  • PipPipPip
  • 352 posts
  • Location:Big Sky, Montana USA

  • Flag: ---------

  • Favorite Pinball: Mata Hari .directB2S

Posted 15 June 2012 - 03:05 AM

QUOTE (GordonSW @ Jun 14 2012, 01:51 PM) <{POST_SNAPBACK}>
Looking good. I'm recognizing a trend towards mini/midi builds smile.gif

Good idea with the legs. I spent 80,-€ on original pinball legs because I was worried about stability (planning to integrate a nudge detection). My plan for the side rails is quite similar, but I haven't decided about the lockdown bar yet.
Your cabinet is a bit larger compared to your playfield LCD size, ho do you plan to cover the gap?

I ordered 3/16" glass cut for the playfield and then I'm going to use a gloss black art paper bezel taped to the backside of the glass under the side rails. I order 1/8" glass for the backglass and I'm putting more of a standard black frame matte behind it. I bought the table at a university surplus sale for $5. It has adjustable legs so I can tilt the table more for sitting or extend the legs to put the playfield at a typical stand up height.

Your machine seems to have a lot better fit and finish than mine, but mine was a spur-of-the-moment decision to use the hardware I already had. I figure it's a good dry run for building a full-size pinball simulator. I've got about $350 into it total right now and should finish up for around $50 more. My computer and backglass monitor were free and the playfield monitor is worth about $100.

#15 htamas

htamas

    Pinball Wizard

  • VIP
  • 2,155 posts
  • Location:California

  • Flag: Hungary

  • Favorite Pinball: cannot pick just one, and they change anyway


Posted 15 June 2012 - 10:35 PM

QUOTE (MTPPC @ Jun 14 2012, 08:05 PM) <{POST_SNAPBACK}>
I'm going to use a gloss black art paper bezel taped to the backside of the glass under the side rails. I order 1/8" glass for the backglass and I'm putting more of a standard black frame matte behind it.

You can also tape off the area on the backside of the glass with painter's tape and use black paint instead of paper. It will look great from the front. That's what I did.

QUOTE
mine was a spur-of-the-moment decision to use the hardware I already had.

Much like mine smile.gif

QUOTE
the playfield monitor is worth about $100.

Hm... that's good. By the looks, your playfield monitor is the exact same what I use and mine cost me $150 refurbished. So 100 bucks for that monitor is a great price.


#16 dazzadasha

dazzadasha

    Enthusiast

  • Platinum Supporter
  • 418 posts
  • Location:Melbourne Oz

  • Flag: Australia

  • Favorite Pinball: Firepower, Getaway, T2

Posted 17 June 2012 - 08:17 AM

Great stuff. You are going all out with this one.

Mini pin maker
sep17875.jpg

I still cant believe that we have


#17 GordonSW

GordonSW

    Hobbyist

  • Members
  • PipPip
  • 22 posts
  • Location:Karlsruhe, Germany

  • Flag: ---------

  • Favorite Pinball: Medieval Madness, Attack from Mars

Posted 18 June 2012 - 09:38 PM

Last weekend I worked on my cabinet again and finally attached the legs. I even started to work on the backbox.

I changed my design regarding the supporting bars and just used bars in the corners to support stability for the legs, the sides are screwed to the bottom directly. The glass I ordered fits perfectly (after I had changed the order). I made a cut-out in the bottom for the subwoofer and one for better air flow which will be covered by aluminium mesh later. The height of the drawer had to changed since my estimation for the subwoofer size was wrong. I also attached the back door and cut holes for two 120mm fans in it.

During the week I plan to mount playfield and backglass LCDs as well as the speakers and start wiring buttons. Next weekend it's time for sanding and painting...

pinball_cabinet5.jpg

pinball_cabinet6.jpg

pinball_cabinet7.jpg

pinball_cabinet9.jpg


Edited by GordonSW, 27 August 2020 - 06:39 PM.


#18 GordonSW

GordonSW

    Hobbyist

  • Members
  • PipPip
  • 22 posts
  • Location:Karlsruhe, Germany

  • Flag: ---------

  • Favorite Pinball: Medieval Madness, Attack from Mars

Posted 23 June 2012 - 12:51 PM

IT LIVES! ;) 

Made some progress during the week. I mounted the LCD monitors and speakers. Although I had planned not to, I had to remove the playfield's bezel (I didn't cause any damage to it so I would be able to use the display a a normal monitor if necessary). Because I didn't really like any of my previous backbox designs I mounted the speaker under the display instead.
pinball_backbox.jpg

Yesterday I wired the buttons and connected them to my I-PAC 2 encoder. That wasn't as difficult as I expected (learned a new word "daisy chain") I also repaired a few more mistakes and (now useless) screw holes with filler.
pinball_buttonwiring2.jpg

Now everything is wired up and I configured five b2s tables running with hyperpin. I still don't know why the backglass preview is wrong sized, but everything else is running smoothly. Sadly I have to disassemble everything to paint the body later today.
pinball_itlives.jpg


Edited by GordonSW, 27 August 2020 - 06:57 PM.


#19 GordonSW

GordonSW

    Hobbyist

  • Members
  • PipPip
  • 22 posts
  • Location:Karlsruhe, Germany

  • Flag: ---------

  • Favorite Pinball: Medieval Madness, Attack from Mars

Posted 08 July 2012 - 08:56 PM

I fininished painting yesterday. Now it's time to assemble all the parts and see how it fits together.

painting1.jpg
painting2.jpg
painting3.jpg

I built me some alu siderails, but I'm still undecided about the lockdown bar. Hopefully I'll be able to post images of the assembled cabinet tomorrow ...


Edited by GordonSW, 27 August 2020 - 06:40 PM.


#20 MTPPC

MTPPC

    Enthusiast

  • Members
  • PipPipPip
  • 352 posts
  • Location:Big Sky, Montana USA

  • Flag: ---------

  • Favorite Pinball: Mata Hari .directB2S

Posted 08 July 2012 - 10:26 PM

I used that light 1.5" angle from Lowe's and some trunk corners. If I had to do it again, there would be only one screw on each side of the rail over the coin door.